My Rotimatic Review

Posted on December 25th, 2017 by Mona ©copyrighted in Product review/Giveaways | 3 Comments »

A few days back I was contacted by the people at Rotimatic if I was interested in reviewing the worlds first roti making robot. I was elated and very excited. I immediately said yes and I couldn’t wait to receive it.

We have been testing Rotimatic since almost a few weeks and I have simply fallen in love with it.

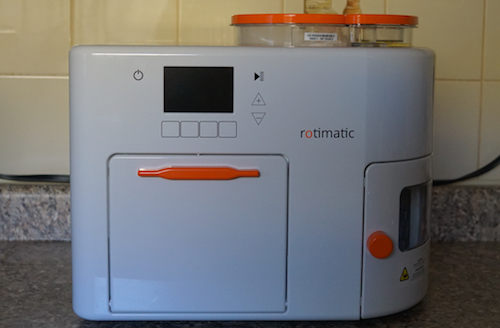
Rotimatic is the worlds first automatic roti making robot. In most of the desi households women spend a lot of time making rotis for breakfast lunch and dinner. Who doesn’t love to eat roti at meals. And Rotimatic is a blessing for all roti loving families.

As some of you may know, I have been blessed with a second baby Alhamdulillah and she is growing up fast Mashallah. But life with babies means no time to spend in the kitchen and we rely heavily on help, especially on someone who can send home cooked meals. I cannot tell you how much I missed eating roti and if I was able to request someone for a few fresh handmade rotis, I profoundly blessed them.

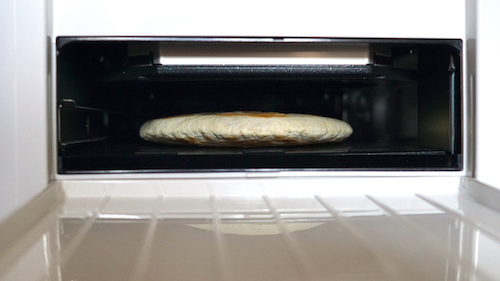
Heres how it works: To make Rotis, I switch it on and simply fill the containers of the Rotimatic with flour, water and oil, select the level of thickness and the amount of oil I prefer. It takes about 6 minutes to warm up and begins making delicious rotis for us all while I am busy looking after kids and doing other things. The rotis are about 6 inch in diameter, and perfectly roasted and round in shape. I was initially using a brand of flour not suggested for use by Rotimatic and I was getting undone rotis, but when I switched to using Aashirwaad aata, the problem solved. The rotis were simply perfect. It has made my life so much easier and we get to enjoy healthy rotis at meals Alhamdulillah.

I have tried spinach roti, masala roti and plain roti. So many options, how awesome is that. Inshallah I would like to try making aloo roti using Rotimatic. There is also an option for puri making. You need to sync your Rotimatic on your phone and keep yourself updated with all the latest updates.

Rotimatic is pricey and a large and heavy machine that occupies a space similar to that of a microwave oven on your countertop. It does make a loud sound when operating, which I didn’t like. But its a great gadget in my opinion. It makes perfectly round rotis, and the amount of oil it uses even on the max setting is very little, which means it makes very healthy rotis, which are just as good as handmade rotis. If I feel like indulging I simply brush then with ghee or oil. Wrap them all up in a napkin to keep warm and soft. After each use, I simply hand wash the parts which takes me just a few seconds and then after they have dried, the assembly doesn’t take much time either and is very easy.

Power Consumption (Idle vs In-Use)

Power Consumption Chart

Since some people might be curious regarding the power consumption of this machine, I decided to add these numbers in. In comparison, Rotimatic draws power in the same range as an oven. From the power consumption chart for making 10 Rotis, with least thickness and 3/4 roast level, it started to draw in the ~1500W range as it warmed up the griddle, water etc. then once those were warm, the consumption tapers off with peaks when the Rotimatic is making the individual rotis. You can probably make out the 10 peaks for the 10 rotis. The time to make 10 rotis was a little under 30 min when including the cool down time. Due to the WiFi capabilities of Rotimatic, it draws about 2.3W even when turned off, something to note.

Here is a video I made using my Rotimatic which will you give an idea about how this machine works.

I am in love with my Rotimatic and I certainly recommend it. You can purchase this awesome home appliance for yourselves by clicking here.

Luv,
Mona

AddThis Social Bookmark Button

Chuqandar Ki Subzi

Posted on January 23rd, 2016 by Mona ©copyrighted in Beetroot/Chuqandar, Canola Oil, Ginger-Garlic paste, Onion/Pyaaz, Red Chilli powder, Salt/Namak, Tomato/Tamatar (fresh), Turmeric/Haldi, Yogurt/Dahi | 7 Comments »

Beetroot might not be a favorite of many, but both me and my husband love this hearty maroon root vegetable.

I love this simple curry along with warm parathas. It reminds me of my mother’s cooking and my childhood.

Chuqandar Ki Subzi – Beetroot Curry

Ingredients:
Beetroot – 3, peeled and chopped
Canola Oil – 3 tbsp
Onion – 1, medium size, chopped
Ginger garlic paste – 1 tbsp
Tomato – 2, medium sized, chopped
Red Chilli powder – 1 tbsp
Salt – 1/2 tbsp
Turmeric powder – 1/3 tbsp
Yogurt – 1/8 cup

Method:

In a pressure cooker at medium high heat, pour in oil and as soon as it is hot add the chopped onion.

Fry it until it is golden brown in color. Add the, ginger garlic paste and fry for a minute. Add chopped tomato, red chilli powder, salt and turmeric powder and give it a stir.

Cook until the tomatoes are soft and mushy. Add yogurt, keep stirring and let cook on simmer for 2-3 minutes. Add the chopped beetroot and half a cup of water and mix well.

Pressure cook for 5-10 minutes or until the beetroot is soft. Let cook until oil seperates. Serve with rice or Roti.

Luv,
Mona

AddThis Social Bookmark Button

Keema Bharay Tamatay Ka Salan – Tomatoes stuffed with Minced Meat in a Spicy Aromatic Gravy

Posted on August 19th, 2015 by Mona ©copyrighted in Coconut Cream, Ginger-Garlic paste, Groundnut/Moomphalli, Lamb/Beef/Mutton/Veal/Sheep, Onion/Pyaaz, Red Chilli powder, Roasted Groundnut paste, Salt/Namak, Tomato/Tamatar (fresh), Turmeric/Haldi, Yogurt/Dahi | 4 Comments »

One of my most favorite dishes that my Mother-in-Law makes is this gravy curry of stuffed tomatoes. Every time she visits us we definitely ask her to make it for us. Today I am sharing her recipe with you all. It is a wonderful dish that tastes amazing and will definitely impress your loved ones.

Keema Bharay Tamatay – Tomatoes stuffed with Minced Meat in a Spicy Aromatic Gravy

Ingredients:

Canola Oil – 1/2 cup
Tomatoes – 6 large tomatoes
For Minced Meat:
Minced Meat – 1 pound
Red Chilli powder – 1 tsp
Salt – 1 tsp
Turmeric powder – 1/2 tsp
Ginger garlic paste – 1 tbsp
For Qorma:
Onion – 1, sliced thick
Roasted Groundnut Paste – 1/3 cup
Coconut Cream – 3 tbsp
Yogurt – 3/4 cup
Red Chilli Powder – 2 tbsp
Salt – 2 tbsp
Turmeric Powder – 1 tsp

Method:
1. Halve the tomatoes, and scoop out the pulp. Grind the pulp into a smooth puree. Keep aside. Keep the tomato halves aside in a platter.
2. In a non-stick pan with a thick bottom at medium high heat, add onions and brown them while stirring frequently. Remove in a platter and let cool. In the same pan, add the groundnuts and roast them for a few mintues until they are just a few shades darker. Remove in a cup and keep aside to cool. Once cool, add the roasted onions and groundnuts in a grinder and grind until it is a smooth puree. Add yogurt and puree.
3. Prepare the gravy – In a thick bottomed non-stick saucepan at medium high heat, add oil and then pour the groundnut puree and the tomato pulp puree. Keep stirring constantly for 5-8 minutes. Lower the heat and cook covered until it leaves oil. Keep stirring occasionally.
4. In a frying pan at medium high heat, add the minced meat along with ginger garlic paste, red chilli powder, salt and turmeric powder. Mix well and let cook until the meat is dry and well-cooked.
5. Fill the tomato halves with the cooked Keema. Top each with the groundnut gravy.
6. Add the rest of the minced meat and the gravy to a thick bottomed wide saucepan. Spread it evenly in a layer. Arrange the stuffed tomato halves over the gravy and let cook covered at medium heat for about 30 – 45 minutes until it leaves oil. Garnish with chopped mint and cilantro leaves and serve with Parathas and Rice.

Luv,
Mona

AddThis Social Bookmark Button

Hyderabadi Chicken Haleem – Harees

Posted on July 17th, 2015 by Mona ©copyrighted in Almonds/Badaam, Black pepper powder, Broken Wheat/Daliya, Canola Oil, Cardamom/Elaichi, Cashewnuts/Kaaju, Chane ki Dal, Cilantro/Kothmir (fresh), Cinnamon/Dalchini, Clove/Laung, Garam masala powder, Ghee, Ginger-Garlic paste, Green Chillies, Lemon/Nimbu, Mint/Pudina (fresh), Onion/Pyaaz, Poppy seeds/Khus-Khus, Poultry/Murgh, Red Chilli powder, Roasted Cumin powders, Salt/Namak, Turmeric/Haldi, Yogurt/Dahi | 5 Comments »

Haleem is meat delicacy, especially enjoyed during the month of Ramadan in India and Pakistan. In Hyderabad, one can see all restaurants begin to sell Haleem as soon as Ramadan commences. Tiny Haleem stalls pop up at every nook and corner, and people of all faiths enjoy it. It is the city’s most induldent dishes. Haleem is not as easily available the rest of the year in restaurants in India.

Haleem is originally an Arabic dish, brought to Hyderabad by the immigrants of Yemen, Iran and Afghanistan. It has all the nutrients a fasting body requires at the end of the day.

Home cooked Haleem is the best. So today I am sharing with you all my simple recipe for Chicken Haleem. I have posted two versions of Haleem earlier on my blog. You can try them all.

Hyderabadi Chicken Haleem – Harees

Ingredients:
Serves – 6-8

Boneless Chicken Breast – 2 (if large chicken); 3 (if small chicken) – cut into cubes
Marinade:
Ginger-garlic paste – 1 tbsp
Red chilli powder – 1 tsp
Turmeric powder – 1/4 tsp
Salt – 1 tsp
Haleem:
Chana dal – 100 gms
Broken wheat – 250 gms
For Qorma:
White poppy seeds/Khuskhus – 1 tsp
Chopped almonds and cashewnuts – 1 tbsp each
Canola oil – to deep fry
Onions – 3, large, finely sliced
Cloves – 2
Cardamom – 2
Cinnamon stick – one 2″ stick
Dry roasted Cumin seed powder – 1/2 tsp
Green chillies – 4, each broken into two
Yogurt – 1 cup, lightly whisked
Red chilli powder – 2 tsp
Salt – 2 tsp
Black pepper powder – 1/4 tsp
Garam masala powder – 1/2 tsp
Cardamom seed powder – 1/4 tsp
Lemon juice – 1/4 cup/60 ml/4 tbsp
For Garnish
finely chopped Cilantro, and Mint leaves
Crisply fried onions
Lemon juice
Ghee
Fried cashew nuts
sliced/chopped Green chillies

Method:

1. Soak chana dal and broken wheat for 30 minutes in fresh cool water.
2. In a mixing bowl, add the cubed chicken breast, ginger-garlic paste, 1 tsp red chilli powder, turmeric powder and 1 tsp salt. Mix well and let marinate to 1-2 hours. In a frying pan at medium high heat, pour 1 tbsp of oil add the marinated chicken and cook while turning the chicken pieces until done. Remove from heat and keep aside to cool.
3. Drain the soaking dal and the broken wheat and transfer them to a non-stick saucepan. Pour in 4 cups of fresh cool water and let cook while stirring frequently until the mixture is soft. This might take 1-3 hours. You can also pressure cook if you would like to save time, but I like to slow cook it. Add more water if needed to cook. Transfer to a bowl.
3. Meanwhile, shred the cooked chicken and keep aside in a bowl.
4. Soak cashewnuts and almonds in 1/2 cup warm water for 15 minutes. Grind them into a smooth puree.
5. In a food processor or a blender, add the cooked dal and the cooked broken wheat and process until well blended.
6. In a deep frying pan at medium high heat, pour oil to deep fry and as soon as it warms up, add the sliced onion and fry it stirring constantly until evenly golden brown in color. Using a slotted spoon transfer half of the fried onions onto a platter, scatter so that they cool and crisp up in a while, use these fried onions for garnish later on.
7. In a large non-stick saucepan, add 4 tbsp oil, lower the heat and add cloves, cinnamon stick, cardamom, green chillies and cumin seed powder. Stir fry for 10-20 secs. Add the yogurt and cook until separates. Add the pureed nuts mixture and mix well. Add red chilli powder, black pepper powder and salt. Half cover and cook stirring occasionally until it leaves oil. Add the blended wheat+dal mixture and the shredded chicken meat and mix. Pour in 2 cups water, and add garam masala powder and cardamom powder. Mix well. Cover and let cook on medium heat, stirring occasionally for 10-20 minutes. Remove from heat when the desired consistency of a thick porridge is achieved. Ladle in serving plates, garnish and serve warm.

Luv,
Mona

AddThis Social Bookmark Button

Guest Post: Rubina’s Slow Cooker Healthy Butter Chicken

Posted on July 16th, 2015 by Mona ©copyrighted in Guest Posts | 2 Comments »

This is a guest post by Rubina of All Floured Up. She is a new mum and a big foodie at heart. Her blog is full of delicious recipes to try. Please welcome her! ~ Mona

I’m Rubina from the food blog “All Floured Up” and today I’ve got a delicious and super simple recipe. It’s a slow cooker recipe for butter chicken, and to make it even better, I’ve made this a healthy version.

This butter chicken is creamy, spiced perfectly, and comes together so quickly. I used Greek yogurt instead of heavy cream as a finishing “healthy” touch. I hope you enjoy this delicious recipe!

Slow Cooker Healthy Butter Chicken
Serves 4-6

Ingredients:
2 lbs boneless, skinless chicken leg meat, cut into 1″ pieces
Chicken marinade: 1 tbsp tandoori masala, 1 tsp ginger paste, 1 tsp garlic paste, 1 tbsp yogurt.
1 tbsp butter
2 14 oz can tomato sauce
1 onion, finely chopped
1 tsp garlic, paste (3 large cloves)
1 tbsp fresh ginger, paste (1.5″ piece)
1 tsp red chili powder
1 tsp cayenne pepper
1 tsp ground cumin
2 tsp garam masala powder
1 tsp tandoori masala
2 cups nonfat Greek yogurt
Naan/rice for serving
Cilantro for garnish

Instructions:
1) Marinate the chicken pieces in the chicken marinade (tandoori masala, ginger/garlic paste, and yogurt).
2) In a pan, melt the butter and quickly stir fry the chicken for 2-3 minutes on high heat. It doesn’t have to be cooked all the way through.
3) In a slow cooker, add the tomato sauce, onion, garlic paste, ginger paste, chili powder, cayenne pepper, cumin, garam masala, tandoori masala, and the partially cooked chicken (and any juices left in the pan).
4) Set slow cooker on low for 6 hours or high for 4 hours. Cook until chicken is soft and sauce is bubbling.
5) When chicken is cooked, take the Greek yogurt in a large bowl, beat it so it softens up a little. Add 1/2 cup of the tomato sauce from slow cooker to thin the yogurt a little.
6) Stir the yogurt with the chicken gravy, cook for 10 more minutes in the slow cooker.
7) Serve hot with rice, naan, and of course, garnish with cilantro. Enjoy!
***If you don’t own a slow cooker, simply combine all ingredients and cook on lowest heat setting on stovetop in a pot for 2 hours, until sauce is thickened. Stir every 20 min or so to ensure no burning. Finish up with step 5 from above.

~Rubina

AddThis Social Bookmark Button