Mango Cheesecake

March 22nd, 2015 Mona Posted in Butter/Makhan, Cream Cheese, Egg/Anda, Mango/Aam, Sugar/Shakkar, Yogurt/Dahi 2 Comments »

My husband is not a very big fan of cheesecakes. But I on the other hand, a big fan!

I wonder who might have been the person who thought first of inventing a cake made of cheese.

Cheesecakes are divine. A rich, smooth dessert, that definitely would make anyone happy, except my husband.

Mango Cheesecake
recipe adapted from here

Crust:
Digestive Biscuits – 250 gms, finely ground
Butter – 3/4 cup, melted
Cheesecake:
Cream Cheese – 500 gms
Hung Yogurt – 1 cup
Mango Puree – 2 cups
Eggs – 4, large
Sugar – 3/4 cup

Method:
Preheat oven to 350°F
Wrap the outside of a 9 inch springform pan with 2-3 layers of heavy duty aluminium foil.
For the Crust: In a mixing bowl, add the finely ground digestive biscuits and pour in the melted butter. Mix until well moistened. Transfer crumbs to prepared pan, and press crumb mixture evenly onto the bottom of the pan. Bake for 15 minutes. Let cool completely.
For Cheesecake Filling: In a food processor, or an electric mixer fitted with a paddle attachment, add all the remaining ingredients and process for 5 minutes until just combined, keep scraping down the bowl. Pour cream cheese filling over crust. Place foil-wrapped springform pan in a roasting pan large enough to hold it. Fill roasting pan with enough hot water to come 1-inch up the sides of the springform and carefully transfer to middle oven rack. Bake until cake is set but still slightly wobbly in center, about an hour and a half.
Transfer the cake pan to a cooling rack and let cool completely. Later refrigerate, uncovered for 6-8 hours.
To serve, run a knife around the edges, slice and serve wedges. The cake keeps well refrigerated for upto 2 weeks.
Enjoy!

Luv,
Mona

AddThis Social Bookmark Button

Healthy Ramadan Meal – Baked Chicken with Vegetables, Couscous and Tatziki

July 4th, 2014 Mona Posted in Black pepper powder, Bok Choy, Broccoli, Canned Tomato paste, Capsicum, Carrot/Gajar, Cilantro/Kothmir (fresh), Couscous, Cucumber, Garam masala powder, Garlic/Lahsun, Ginger-Garlic paste, Green Beans/Binees ki phalli, Lemon/Nimbu, Mint/Pudina (fresh), Olive Oil, Olive/Zetoon, Onion/Pyaaz, Poultry/Murgh, Radish, Red Potatoes, Salt/Namak, Tomato/Tamatar (fresh), Turmeric/Haldi, Vegetable Stock, White Potato/Aloo, Yogurt/Dahi No Comments »

We desi people tend to eat unhealthy especially during the month of Ramadan. We should all be making a great effort to cook healthy meals for our family and take care of our loved ones instead. Inshallah from this Ramadan onwards, I will posting healthy meal ideas for Iftaar and Suhoor. Keep watching this space for more healthy recipes and meal ideas to come.

The following recipe is just something I made on a whim. It is easy, healthy, and makes a perfect meal for ramadan.

Baked Chicken with Vegetables, Couscous and Tatziki

Chicken Legs/thighs pieces – 12-15 pieces
Black Pepper powder – 1/4 tsp
Salt – 1 tsp
Turmeric – 1/4 tsp
Onion – 1, roughly chopped
Ginger garlic paste – 1 tbsp
Mixed Chopped Vegetables – 4 cups, carrots, grape tomatoes, peppers, potatoes, olives, green beans, broccoli, radish, baby bok choy etc
Garam masala – 1/2 tsp
Olives – pitted, 1/4 cup
Olive oil – 2 tbsp
for Couscous:
Couscous – 1 cup
Olive oil – 1 tbsp
Tomato paste/Pasta sauce (store bought) – 1 tbsp
Fresh leaves and Cilantro – 1 tbsp, finely chopped
Water/Chicken/Vegetable stock – 2 cups, very hot
Salt – 1 tsp
for Tatziki
Cucumber – 1/2, peeled and grated
Garlic clove – 1, mashed
Salt – 1/2 tsp
Fat-free Yoghurt – 1 cup
Juice of half lemon
Fresh mint – 4-5 leaves, finely chopped

Ingredients:
Preheat the oven to 350°F. In a mixing bowl bowl, add chicken, black pepper powder, turmeric, salt, ginger garlic paste, onion, garam masala, olives, olive oil and mix well. In a baking dish with high sides, add the vegetables in a layer. Over them add the marinated chicken again a layer. Cover with aluminium foil and bake for 35-45 minutes covered, then the next 15-20 minutes uncovered until the chicken is juicy and done.
Add pasta sauce/tomato paste, chopped herbs, olive oil, and water/chicken stock in a kettle and let it come to a boil. Add couscous in a bowl. Once the water/chicken stock is boiling, pour over the couscous in the bowl and cover with a tight lid. Keep adise and let rest for 10 minutes. Then fluff with fork.

Using a box grater, coarsely grate the cucumber. Sprinkle it with a 1/2 tsp of salt. Let rest for 10 minutes. Then squeeze and scrunch with clean hands to get rid of the excess salty water. Add it to a bowl. Also add yogurt, mashed garlic, lemon juice, chopped mint leaves and salt. Tatziki is ready.

In a serving dish, add the couscous in a layer. Top it with baked chicken and vegetables. Serve along with tatziki on the side.

Healthy Desi Meals Ideas for Iftaar/Suhoor:
For Iftaar
~ Chanay ki Dal – Lemony Boiled Split Bengal Gram 
~ Jaam ka Kachalu – Guava Chaat 
~ Fruit Chaat – Fruit Salad
~ Baked Samosas – bake the samosas instead of deep frying
~ Ragda Cutlet – alter the recipe by not adding any oil to cook the onions, just saute them in a pan until they get a nice brown color; bake the potato cutlets instead of shallow frying; also do not sweeten yogurt
~ Pita Pockets made using Sheekh Kebabs 

Luv,
Mona

AddThis Social Bookmark Button

Nargisi Koftay ka Qorma – Scotch Eggs in Gravy

June 25th, 2013 Mona Posted in Canola Oil, Cilantro/Kothmir (fresh), Egg/Anda, Garam masala powder, Ginger-Garlic paste, Hyderabadi special, Lamb/Beef/Mutton/Veal/Sheep, Lemon/Nimbu, Red Chilli powder, Roasted Coconut paste, Roasted Groundnut paste, Salt/Namak, Turmeric/Haldi, Yellow Onion/Pyaaz, Yogurt/Dahi 7 Comments »

If you want to impress your guests, then this is the dish that you should be making and serving them. With just a little pre-preparation, you can make this exotic looking dish in a jiffy.

Nargisi Kofta are so named because when the koftas are sliced open, they look like the almond shaped flower of the narcissus. I usually make shaami meat in large amounts and store it in the freezer for later use. Doing this really simplifies my meals. When I have just Khatti dal and rice, and my hubby is craving something meaty, I quickly defrost a pack of shaami meat, and either make Shaami kawab, or Nargisi Kofta.

Nargisi Koftay ka Qorma – Scotch Eggs in Gravy
Serves: 4

For the Nargisi Kofte:

Ingredients:

Shaami Meat – 1 zip-lock bag, defrosted or frsh made
Hard boiled eggs – 2, peeled

Method:
1. Divide the shammi meat mixture into two portions. Roll each portion into a ball, then flatten out to form a thin patty. Wrap each patty around the peeled boiled eggs, smoothing out the join and making sure there is no egg left exposed. (if you feel that the shammi meat is not holding well to the egg, you can add a binding agent to the meat mixture, like egg white, or besan and mix well. Then, cover the boiled egg with the fixed meat, and it wont fall off)
2. Add 1-2 tbsp of canola oil and heat until hot. Shallow fry the nargisi koftay, turning it gently using a spoon, until it is browned on all sides. Some people also deep fry the kofta in oil, but I prefer to shallow fry them in little oil. Remove and drain on paper towel.

These are ready to serve as is. You can serve them as an appetizer. Or if you want to serve them in a gravy, follow the steps below.

For Qorma (the masala gravy):

Ingredients:

Canola oil – 5 tbsp
Onions – 4, finely sliced
Yogurt – 400 ml, lightly whipped
Red chilli powder – 1 tbsp
Salt – to taste
Turmeric – 1/4 tsp
Ginger garlic paste – 1 1/2 tsp
Roasted Groundnut paste – 2 tbsp
Roasted Coconut paste/Coconut cream – 2 tbsp
Garam masala powder – 1 tsp
Chopped cilantro – 2 tbsp
Lemon juice – 1 tsp (optional)

Method:
1. Take a heavy bottomed non stick frying pan on medium heat and throw in the thickly sliced onion rings with no oil. Give them a stir and cover with a lid. Open the lid, and stir them again, add a few splaches of water and cover the lid again. Continue doing this until the onions are are caramelized and cooked. Transfer them into a blender container. Add the yogurt, roasted groundnut paste and roasted coconut paste/coconut cream and blend till it is a smooth puree.
2. Pour oil into the same pan, and add ginger garlic paste. Fry for a minute and add the pureed paste. Throw in red chilli powder, salt and turmeric and mix well. Cover and let cook for around 15-30 minutes on low heat until oil separates and floats on top while stirring occasionally in between. Add garam masala, chopped cilantro and pour in a about 1 1/2 glass of water and mix well (you can add more water if you prefer a thin consistency.) Half-Cover and let simmer for 8-10 minutes. Pour lemon juice and remove from heat. Serve immediately along with Naan or parathas or along with a Pulao or plain rice.

For the final curry preparation:

1. Just when you want to serve the curry, gently drop the Nargisi Kofte, each cut into half , into warm Qorma.
2. Serve warm with Roti or Naan or Pulao.

Luv,
Mona

AddThis Social Bookmark Button

Basic How To’s: Series IV ~ Home made Yogurt, Dahi

February 26th, 2009 Mona Posted in Milk and Milk Products, Simple Kitchen Tips, Yogurt/Dahi, Yogurt/Dahi 9 Comments »

Basic How To: Yogurt/Curd/Dahi

Preparing yogurt, also referred to as ‘curd’ by Indians, or dahi in Urdu language, the wonder food, a natural antibiotic, at home is quite a simple task. Just like milk, yogurt is packed with good nutrients including protein, calcium, magnesium, potassium, zinc and B vitamins. Probiotic yogurts with active cultures helps reduce constipation and bloating, and boosts immune system function. Yogurt is one of the essential ingredients in Indian cuisine. Its sweet-sour flavor is used in marinating the meats, and to prepare gravies for curries, as a dessert, in face-packs or hair-packs etc.

I often prepare yogurt at home and use store brought yogurt only if I need to get a new starter, or at times when I am out of yogurt and need it immediately for my cooking. Store bought yogurt often has gelatin/pectin mixed in it to enhance the thickness consistency of it, which is very bad news for both non-vegetarians as well as Muslims, because gelatin is not Halal.
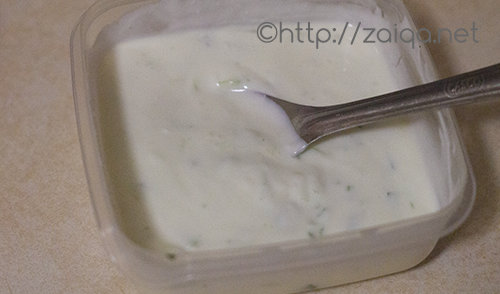
Homemade Yogurt

To prepare yogurt you can either use full fat whole milk or skimmed milk, or milk prepared from milk powder, it is your wish. Yogurt from whole milk or full fat milk is definitely thicker and much creamier. The proportion I use to make yogurt is 2 tablespoons of starter yogurt to every 1 litre of milk.

Homemade Yogurt/Dahi:
Makes-2 cups
Note: Make sure you sterilize all the containers and utensils you are using while preparing yogurt

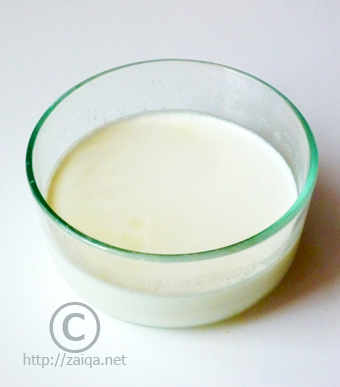
Heat milk until it reaches 180°F/80°C either in the microwave or on stove. Set aside for a few minutes. Let it cool down until the milk is just lukewarm, you should be able to tolerate the heat of the milk on your finger for about 20 seconds or a thermometer inserted should read between 115°F/46°C  (if the milk is too hot or cold, yogurt/dahi will not properly set). Stir in yogurt, either commercial or some of your previous batch, 2 tbsp for each quart or liter of milk. Cover and wrap the container in kitchen towel . Keep it undisturbed to ferment in a constant warm and dark place for around 2-4 hours or overnight. Once set, refrigerate the yogurt to store. Its consistency will firm as it chills in the refrigerator and then slowly continues to acidify. The longer the yogurt is stored, the sourer it becomes
Always save some yogurt as it can be used as a starter for the next batch.

In places where it is warm and humid, making yogurt is quite easy and does not require much attention. You can cover the bowl with the yogurt starter and leave it on your countertop, undisturbed for it to set in around 8 hours.

***

Tip: As I currently live in Toronto where the temperatures are usually very chilly during winters, what I do is put the bowl of lukewarm milk on a heating vent and add the yogurt starter, mix it well and cover the bowl with a lid. Wrap the bowl in a towel and leave it to set, undisturbed, for about 6-8 hours or overnight. You will get thick and creamy yogurt by morning.
Some of my friends even use a heating pad at medium heat, below the container in which you are setting the yogurt for a constant supply of heat to aid in its formation.

***

Tip:  Many a times it happens that you end up with failed yogurt. You discover that the yogurt has not set at all, and it is just like milk, and you discard the whole thing.
Instead of discarding it, you can prepare two Indian milk products from it:
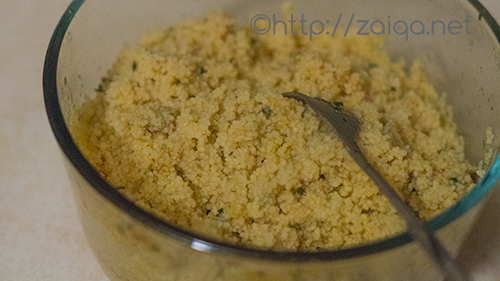
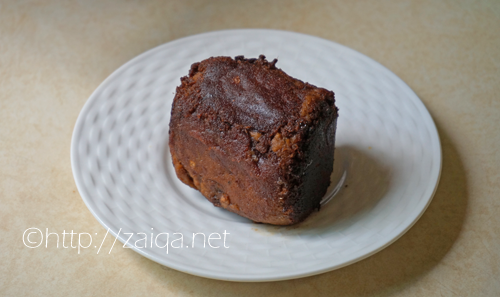
1. Daan-e-daar Khoa (Granular Khoa): Pour the failed yogurt in a saucepan at medium heat and add about 1 tbsp of lemon juice (to 2 cups of failed yogurt) to curdle the milk and continue cooking. Keep stirring the milk and cook until most of the moisture has been evaporated and the milk is reduced to dry lumpy texture. Remove from heat and transfer to a cup and let cool. Once cool, refrigerate it for a hour so that it thickens/hardens. Remove the prepared Khoa from the refrigerator transfer to a zip-lock sandwich bag and freeze to store for future use, or use immediately.
2. Paneer: Pour the failed yogurt in a saucepan at medium heat and add about 1 tbsp of lemon juice (to 2 cups of failed yogurt) to curdle the milk and continue cooking milk for a few minutes until you see the milk has curdled completely. Carefully strain the curdled milk through the sieve lined with the muslin cloth. Let the whey collect in the bottom saucepan. The whey is highly nutritious. Store it to use later on in other curries instead of water (at this stage if you wish, you can experiment and add a few flavors that you like to the curds in the muslin cloth, like dried herbs, etc. Mix the dried herbs well with the curds and continue). Later, lift the edges of the cloth and tie the corners of the cloth into a bag completely enclosing the curds. Remove the sieve from saucepan and place it in the sink. Place the bag of curds back in the sieve. Set aside under a heavy weight for about 3-4 hours to press to a flat shape about 2 cm thick. Later, transfer the Paneer block to a zip-lock packet and store refrigerated. Use within a week.

This post is my contribution to the event Back to Basics originally stated by Jaya, and currently being hosted by Aqua at Served with Love.

Luv,
Mona

AddThis Social Bookmark Button