Puran ki Roti – Parathas stuffed with Lentil Halwa

December 19th, 2013 Mona Posted in Canola Oil, Cardamom/Elaichi, Chane ki Dal, Ghee, Hyderabadi special, Salt/Namak, Sugar/Shakkar, Whole Wheat Flour/Durum Atta 7 Comments »

It isn’t until you lose something that you realize how important something was. A few days back I was on the verge of losing my blog. My blog of years, which is very dear to me. I was asking for help around, but no one could, and those who could, were way out of my budget. But I did not give up, how could I? I prayed and alhamdulillah, out of nowhere a very hunble gentleman came to my rescue like an angel. This brother was so willing to help me out for nothing in return. I will never forget your selfless help and you will always be in my prayers.

And I realized how much I missed blogging about my family recipes, and documenting the stories that live in my heart and memories. With a little boutique business and along with a toddler, I was unable to give the attention to my blog that I used to before. But inshallah, I am back. You will all see me blog regularly and I will never take my blog for granted ever again.

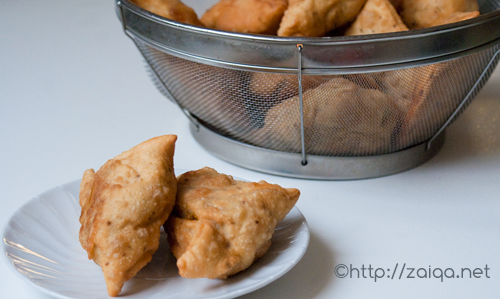
Today I bring you a recipe that is very close to my heart, that screams my childhood, those beautiful afternoons, when after a small siesta, my mother would make a few of these absolutely wonderful rotis for us all to fill our stomachs with. We all enjoyed the rotis with so much joy and always looked forward to the the next time when mother would make them again.

Puran ki Roti – Parathas stuffed with Lentil Halwa
Makes – around 10 Rotis

Durum Flour – 1 1/2 cup
Ghee – 1 tbsp
pinch of salt
enough water to make dough
For Puran:
Chana Dal – 1 cup
Sugar – 1 1/4 cup
Green cardamom powder – 1/3 tsp
Oil – as required for toasting

Method:

1. Wash and soak chana dal in surplus water overnight.
2. The next day, drain the water and transfer to a pressure cooker. Add water to cover the dal and pressure cook until the dal is soft. Using a whisk or an immersion blender, blend until the dal is smooth. You can also grind it if you want. Transfer to a pan at medium high heat and add sugar and cardamom powder. Mix well and cook while stirring frequently until the dal resembles a thick paste and begins to sererate from the pan. Keep a close eye. Remove from heat and let it cool to room temperature. You can also make this ahead of time and store in refrigerator for upto a week.
3. To make dough, add flour, ghee and salt in a mixing bowl. Mix well then add water little by little. Form a soft pliable dough just like chapathi dough. Cover the dough and allow it to rest for an hour.
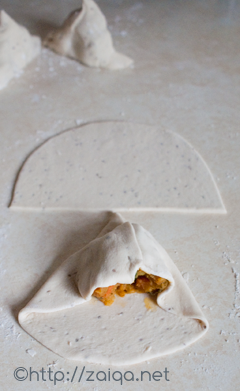
4. Make 10 lemon sized balls of both the dough as well as the prepared lentil mixture. Roll the dough flat just slightly using your hands, then place the lentil mixture ball in the center and wrap the dough around it completely to cover it well, just like you make stuffed parathas. Then flatten it slightly. Now using your rolling pin, roll it to a thick or thin poli. Dust flour if needed. Heat tawa pan and carefully place the rolled out roti on the tawa, drizzle oil and cook the roti on both sides until brown spots appear. Continue until all are done. Serve hot.

Luv,
Mona

AddThis Social Bookmark Button

Namakpaare – Triangular Crispy Salty Munchies

February 28th, 2013 Mona Posted in Canola Oil, Carom seeds/Ajwain, Hyderabadi special, Salt/Namak, Whole Wheat Flour/Durum Atta 6 Comments »

One of my most fond memories whenever I think of Namakpaare of eat them is the way my mom used to offer them to us as a quick snack. There always used to be something on our dining table during my childhood, something yummy, a delicious snack. I remember my mom used to spend a better part of her time daily in the kitchen, toiling away to keep us content, to keep us nourished and full.

Namakpaare are triangular deep fried crispy salty snacks that can be made ahead and stored at room temperature in air tight containers. A simple and delightful snack. A sweet version of the same is called as Shakkarpaare, which I had posted about a while ago.

Ammi (as I call my mom) used to offer us namakpaare mixed in a cup of warm khatti dal. You might be surprised at this unusual combination. But it always worked, and so wonderfully. I always loved to eat namakpaare soaked in khatti dal and I have fond memories of it. It is comfort food for me. When I gave my dear husband namakpaare the same way, he enjoyed them too.

Namakpaare – Triangular Crispy Salty Munchies

Ingredients:

Durum Flour – 3 cups
Carom Seeds/Ajwain – 1/2 tbsp
Salt to taste
Water – as needed
Oil to deep dry

Method:

1. In a mixing bowl add flour , ajwain, salt a tsp of oil. Mix with your hands. Add water as needed to form a stiff dough. Cover the dough in the bowl with a damp towel. Let the dough rest for 1/2 an hour.

2. Later shape the dough into a log. Cut the log into pieces. Roll Each dough piece into balls between your palms.

Using a rolling pin, roll each ball into a disk, not very thin, neither thick. Using a pizza cutter, cut into 1/2 inch strips lengthwise and then 1/2 inch across to get diamond shaped pieces. Do the same with rest of the dough.

3. Heat oil to deep fry in a kadhai/wok and deep fry the namakpaare on medium heat. Fry till golden on both sides. Continue frying in batches until all the dough in used.

4. Store the namakpaare after they completely cooled down in an airtight container. They stay fresh for weeks.

Luv
Mona

AddThis Social Bookmark Button

Meethay Ghoday

December 29th, 2012 Mona Posted in All-Purpose Flour/Maida, Almonds/Badaam, Canola Oil, Milk and Milk Products, Raisins/Kishmish, Salt/Namak, Sugar/Shakkar, Whole Wheat Flour/Durum Atta 21 Comments »

A few days before I heard my mother in law speak about a sweet dish that I had never seen, tasted or even heard about in my entire life. She told me that Ghoday, is a special Hyderabadi dessert that her mom used to make for her when she was a kid. I immediately requested her to make it for me well.

ghoday – left to dry

The method is simple. And very similar to making pasta. Dough is rolled out, cut into squares and made into a cute flower shapes.

shaping ghoday

 Then they are left to dry out for a few hours or overnight. Once nicely dried they are deep fried until golden brown in color. Finally they are cooked in milk and sugar and served at room temperature.

deep fried ghoday

It was my first time I had prepared and tasted this dessert. I enjoyed it. It was delicious!

Meethay Ghoday – Traditional Hyderabadi Milk and Flour based Dessert

Ingredients:

Durum Flour – 1 1/2 cup (you can also use maida)
Salt – 1/4 tsp
Canola oil (you can also use a little bit of ghee for nice flavor)
Water
Milk – 2 cups
Sugar – 1 cup
Raisins and sliced almonds – 3 tbsp, shallow fried

Method:

1. Combine the flour, salt, oil and water (reserving some of the flour for rolling). Add only a little water at a time and make a dough. Cover with a damp towel and keep aside for 30 minutes. Later knead for 5-10 minutes until the dough is smooth, firm and pliable. Make the dough into a log and cut into 3 equal sized pieces. Roll into a ball between your palms. Using a rolling pin roll each ball into into a disc. Make sure that the circle is as thin as it can be and try to use as less flour as possible to aid in the rolling process. Cut the rolled out dough into squares using a knife or a pizza cutter. Shape each square into a flower as shown in the picture above and keep them aside on a tray. Continue until all the dough is used up. Leave the shaped flowers on the tray uncovered for 5-8 hours or overnight until they are dry and hardened a little bit.
2. In a frying pan pour oil to deep fry the prepared dried dough flowers. Once the oil is hot, deep fry them all until they are nicely golden brown in color. Usin a slotted spoon, remove them onto a platter.
3. In a heavy bottomed saucepan at medium high heat, pour milk and about 1 cup water and add the deep fried dough flowers. Mix well and let it simmer covered for 10-15 minutes until they are softened. Give it a stir once in a while. Add sugar and mix. Add more water if you need to cook them more. Once cooked thoroughly, add the shallow fried raisins and sliced almonds. Transfer to a serving bowl. Let cool to room temperature. Ghoday is ready to be served.

Luv,
Mona

AddThis Social Bookmark Button

Aloo kay Samosay

March 23rd, 2010 Mona Posted in All-Purpose Flour/Maida, Canola Oil, Carom seeds/Ajwain, Carrot/Gajar, Cilantro/Kothmir (fresh), Cumin seeds/Zeera, Eid/Ramadhan/Iftaar, Garam masala powder, Ghee, Ginger/Adrak, Hyderabadi special, Kasuri methi, Lemon/Nimbu, Mustard seeds/Rai, Nigella seeds/Kalonji, Peas/Matar, Red Chilli powder, Red Potatoes, Roasted Coriander powder, Roasted Cumin powders, Salt/Namak, Turmeric/Haldi, White Potato/Aloo, Whole Wheat Flour/Durum Atta 17 Comments »

Chai shops, bakeries, mithaiwala shops, cart vendors, chat bhandars along the length and breadth of the Indian subcontinent, all sell these magical pastries. Originated and traveled to India possibly from the Middleeast, Samosas are triangular pastries, a popular street food, usually stuffed with minced meat, or a potato mixture. They are the usual appetizers that make their presence at the Nizami Hyderabadi meals, and also enjoyed throughout India and also all over the world by everyone. Samosas are also very famous in Toronto and loved by people here.

Samosas – ready to be eaten

This classic Indian snack food appears in different avatars and types within the Hyderabad city, and also all over India with minor regional variations, some differing in the fillings used, others varying in shapes. For example Luqmi, a rectangular qimah-minced meat stuffed appetizer commonly eaten in Hyderabad, is a royal cousin of samosa. Other regional variants of samosas include the sambusak, samusak or shingara etc.

Today I had prepared some aloo samosas~potato stuffed pastries that are just as good as the Qimah Samosas – minced meat stuffed samosas. You can even bake them if you wish, bit I like to deep fry and prepare them the way they were supposed to be made. The crisp outer texture of samosa is what I love the most.

Aloo kay Samosay – Potato Stuffed Triangular Pastries

Ingredients:

Canola Oil to deep fry
For Filling:
Canola oil – 2 tbsp
Cumin seeds – 1 tsp
Black mustard seeds – 1 tsp
Fresh Ginger – 1 tbsp, finely grated
Potatoes – 4, peeled and chopped
Carrot – peeled and chopped, 1 cup
Red chilli powder – 1 tsp
Dry roasted Coriander powder – 3/4 tsp
Dry roasted Cumin seed powder – 1/4 tsp
Kasuri methi – 3 tbsp
Salt – 1 tsp
Frozen green peas – 1/2 cup (or) Dried green peas – 1/2 cup, soak them in surplus water overnight and pressure cook until soft the next day, drain and keep aside to use
Lemon juice – 4 tbsp
Garam masala – 1/2 tsp
Cilantro – 2 tbsb, finely chopped
For Covering:
All-purpose flour/Maida – 1 cup
Whole wheat flour/Durum flour – 1 cup
Carom seeds/Ajwain – 1 tsp
Nigella seeds/Kalonji – 1/2 tsp
Canola Oil or Ghee – 2 tbsp
Water
Salt to taste

Method:

1. In a saucepan, heat oil and as soon as it warms up add the cumin seeds, mustard seeds and ginger and let them splutter. In a few seconds add the chopped potatoes and carrots. Add water to cover the vegetables and add red chilli powder, salt, cumin seed powder, kasuri methi and cover with a lid. As soon as the potatoes are done, uncover and add the frozen peas or cooked dried peas, garam masala, chopped cilantro and lemon juice. Cook while stirring until the mixture is dry. Keep aside.

2. Now prepare the dough. Add maida, ajwain, kalonji and salt in a mixing bowl and mix. Add canola oil or ghee and mix well using fingers. Gradually add water and knead to form a smooth and pliable dough. Turn the dough onto a floured work surface and knead until elastic. Cover with a towel and keep aside for 30 minutes for the dough to rest. Later shape the dough into 8 balls and cover them with a towel.
3. One by one roll the balls into thin ovals. Using a pizza cutter or a knife cut each oval in the center into two halves, thus a total of 16 half-ovals will be produced. Cover the rest with a towel while filling others. Take a half-oval and brush half of each straight edge using your fingertip with water. Fold the second half of the straight edge over the fist half to form into a cone. Pinch close the seam. Hold the cone with the open end up and fill the cone with some of the filling. Cut off any excess dough and use it later. Brush one side of the open end with water. Pinch to seal the top edges enclosing the filling. Prepare all the samosas the same way and keep them covered under a towel.
4. Once all are ready, heat oil in a deep saucepan or kadai. To test if the oil is ready to be used, drop a pinch of dough into the hot oil, the dough should come up within a few seconds. Deep fry the samosas a few at a time until golden. Using a slotted spoon remove them into a strainer. Serve warm along with tamarind chutney or ketchup. Once cool, they can even be stored in the refrigerator for 2-3 days and reheated in the oven.

To Bake the Samosa:
After step 4, place the samosas in a greased or non-stick baking tray. Bake in a pre-heated 220° C oven for 20 minutes or until light brown in color. Serve immediately

Note:
1.If you are finding it difficult to enlcose the filling in the dough this way, please head over to Qimah Samosa-Minced meat stuffed samosa where I have explained an easier way to assemble samosas.
2. If there is any left over dough and the filling has been used up, you can make namakpaare out them.
3. If there is any left over filling and the dough has been used up, use the filling to make vegetable curry puffs.

This month Sailaja is on a chaat spree and she is dishing out varieties of chaat items on her blog. Head over her blog to go though them all.

Luv,
Mona

AddThis Social Bookmark Button

Crispy Chewy Chocolate Chip Cookies

December 6th, 2009 Mona Posted in All-Purpose Flour/Maida, Baking powder, Baking soda, Brown Sugar, Butter/Makhan, Canola Oil, Chocolate and Cocoa, Egg/Anda, Eid/Ramadhan/Iftaar, Sugar/Shakkar, Vanilla powder, Whole Wheat Flour/Durum Atta 18 Comments »

A true American delicacy~brownies and chocolate chop cookies are my weakness. Oversize and dense with chocolate chips, these cookies are thin, crisp and slightly chewy in the center.

I got hold of this recipe for these indulgent cookies which are so easy to prepare from my darling dear sister, which she got from one of her close friend. I keep preparing them quite frequently at my home whenever the craving hits me. She deserves all the compliments for these delightful cookies.

Crispy Chewy Chocolate Chip Cookies
Makes about 15 jumbo cookies

All-purpose flour – 1 1/2 cup
Whole wheat flour – 1 cup
Baking powder – 1 tsp
Baking soda – 1 tsp
Granulated white sugar – 1/2 cup
Brown sugar – 1 cup, firmly packed
Eggs – 2, large, at room temperature
Canola oil – 90 ml
Vanilla powder – 1 1/2 tsp
Unsalted butter – 1/2 cup, melted and slightly cooled
Semi-sweet chocolate chips – 1 1/4 cup

1. Preheat the oven to 375°F. Grease cookie sheets or line with parchment paper.
2. Add all the first 6 listed dry ingredients in a large mixing bowl, mix using a whisk. In an another mixing bowl, add the next 4 wet ingredients and lightly whip using a whisk for approx a minute. Add the wet ingredients into the dry ingredients and mix well until dough like. Mix in the chocolate chips using a wooden spoon. Using an ice-cream scoop, scoop onto prepared cookie sheets.

3. Bake 10-12 minutes, or until the edges are lightly toasted. Keep a close eye at the last minutes, they can get burned or overdone easily.

4. Leave to cool on tray for 5 minutes. Using a flat spatula transfer them to a wire rack until they are cooled completely, approx 1 hour. Store in an air tight container at room temperature.

Tip: You can also freeze the cookie dough for later use, and when required bake them at a moments notice. Simply, scoop the cookie dough on a baking tray lined with parchment paper and freeze for 1 hour. Later, transfer the frozen cookie dough balls into to an air tight zip-lock plastic bag and freeze for later use for up to 3 months. When guests arrive, or your kids desire them, simply transfer the frozen unbaked cookie dough balls onto a parchment paper lined cookie sheet and bake as directed above, adding a couple of minutes to the baking time, keeping a close eye.

Note: Vanilla extract (vanilla in liquid form) is non-halal. Only powdered vanilla is Halal.

Luv,
Mona

AddThis Social Bookmark Button