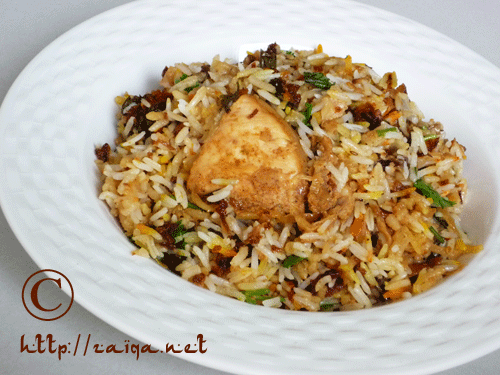
Kachchi Aqni ki Dum Murgh Biryani
Biryani is one of the most famous Hyderabadi one-dish meals craved and devoured by people from all over the world. The basic process of preparing Biryani involves the layering of raw marinated or cooked meat along with half cooked long grained aromatic Basmati rice, and a range of fresh spices and herbs for exceptional flavor and aroma.
Basically, there are two kinds of Biryani: Pakki Biryani, and Kachchi Biryani.
Pakki Biryani: where are half Basmati cooked rice is layered along with completely cooked chicken or lamb meat and then cooked till done on slow heat on dum.
1. Pakki Gosht ki Biryani
2. Pakki Murgh Biryani
Kachchi Biryani – which is the true Hyderabadi Biryani – where are half cooked Basmati rice is layered along with raw marinated meat and then finished on slow heat till done on dum.
1. Kachchey Gosht ki Biryani
2. Kachche Aqni ki Dum Murgh Biryani (which I am writing about today)
The preparation process of Kachchi Biryani is rather simple compared to the Pakki Biryani. In Kachchi biryani all you have to do is to marinate the chicken for overnight preferably and the next day layer it along with half cooked Basmati rice and leave it cook on slow heat/dum until completely done; whereas in Pakki Biryani you have to stand in front of your stove attending the chicken as it cooks completely, and then layer it with half cooked Basmati rice and finish it until done on slow heat/dum.

As you use the raw marinated chicken in this method, while you slow cook the Biryani on dum, the flavor of the chicken intensifies and infuses with the rice and other aromatic fresh herbs and spices giving you a heavenly aroma in the end which will fills your kitchen and your entire house.
*****
Here is the outline of the steps involved in the preparation, so that it is simpler for you all to understand the detailed method, follow these steps while you prepare the Biryani:
Outline of the steps:
Marinate Chicken.
Day 2:
1. Add Fried onions to the Marinated Chicken.
2. Give a smoked flavor to the Marinating Chicken with Fried Onions (optional, but gives a very good flavor to the Biryani).
3. Prepare Basmati Rice, also called as Adhaan.
4. Arrange layers and garnish.
*****
The Detailed method:
Serves – 8-10Day 1–Marinate Chicken:

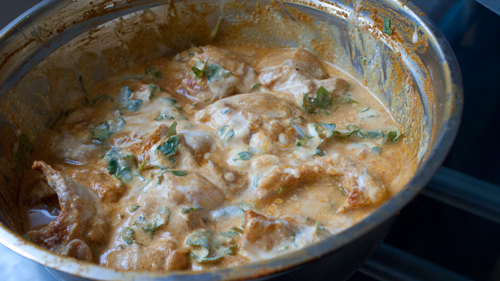
Chicken marinating in a bowl
Ingredients:
Chicken – 1.4 kg, with bone, cut into medium size pieces
Red chilli powder – 1/2 tsp
Green chilli paste – 1 1/2 tsp
Salt – 2 tsp
Turmeric/Haldi – 1/2 tsp
Tomato – 2, medium sized, pureed (optional)
Ginger-Garlic/Adrak-Lahsun paste – 2 tbsp
Yogurt – 2/3 cup, lightly whipped
Freshly squeezed Lemon Juice – 1/2 cup
Garam masala – 2 tbsp
Green Cardamom powder – 1 tsp
Dry roasted Cumin seed powder – 1 tsp
Dry roasted Coriander seed powder – 1 tsp
Fresh Cilantro and Mint – 2 tbsp, roughly chopped
Method:
In a large bowl marinate the chicken with all the ingredients. Make sure all the pieces of chicken are coated in the marinade. Cover and leave in the fridge overnight.
Day 2.
1) Adding Fried onions to the marinated chicken:
Ingredients:
Canola Oil – 3/4 cup
Finely sliced Yellow Onions – 800 gms
Salt – 1 tsp
Method:
1. Remove the marinating chicken from the fridge and let it come to room temperature.
2. Meanwhile, pour oil into a large non-stick frying pan at medium high heat. As soon as it gets warm, throw in the sliced onions and add salt. Stir fry until they are evenly golden brown in color. Make sure they do not burn them. Using a slotted spoon, remove the onions from the oil into a platter. Divide the fried onions into two equal parts and add one half of the fried onions to the marinating chicken and mix well. Spread the other half on a tissue lined platter to be used later for garnish, until cool. Once they are cool, they crisp up. Also divide the oil in which the onions were fried into two equal parts. Add one part of the oil into the marinating chicken and mix well. Reserve the other half to be added to the rice as the top layer along with garnish later on.
2) Give a smoked Flavor to the Marinating Chicken (optional step, but gives a really good flavor to the Biryani. I recommend you try this atleast once. Skip to the step 3 if you want to avoid)
Ingredients:
3 or 4 Burning Charcoal briquettes
Canola oil/Ghee – 1 tsp
Disposable aluminium foil tray/loaf pan
Method:
1. Make a well in the center of the marinating chicken in the bowl so that the mini aluminium loaf pans fits into it perfectly. My Ammi uses an onion skin for this purpose. With the help of tongs, carefully put the burning charcoal briquettes into the aluminium loaf pan.
2. Pour about a teaspoon of oil/ghee onto the charcoal. You will see that dense fumes start forming.
3. Immediately cover the bowl with a lid, so that the fumes do not escape. Keep it aside until you prepare the rice.
3) Preparing Basmati Rice/Adhaan:
Ingredients:
Long grained Basmati Rice (preferably ‘Lal Qilla’ Brand) – 4 cups, presoaked in water for 30 minutes
Salt – 3 tsp
Bay leaf/Tej Patta – 1
Cloves – 3
Green cardamom – 4
Cinnamon stick – 3/4 inch
Caraway seeds/Shah Zeera – 1 1/2 tsp
Water – 9 cups
Method:
1. Wash the rice and soak it in surplus water for about 30 minutes.
2. In a large cooking pot pour in water along with cloves, bay leaf, cardamom, cinnamon, caraway seeds and salt. Give it a stir, cover and let it come to a boil. (While the rice is boiling, follow the steps below under ‘Arranging layers and Garnish’ until step 4 and be ready)
3. Once boiling add the rice and mix gently, let the rice cook until it is half done, 2-3 minutes. Drain the rice and keep aside.
4) Arranging layers and Garnish: (Work fast while the rice is still hot! and try not to let the rice cool down)
Ingredients:
Marinating Chicken
Boiled, Quartered and shallow fried Potatoes – 2 cups (optional)
Mint leaves/Pudina – 1/2 cup, loosely packed, roughly chopped
Half cooked rice prepared earlier
Cilantro/Kothmir – 1 cup, loosely packed, roughly chopped
Ghee – 2 tsp (optional)
Reserved Fried Onions for garnish
1/4 Saffron strands, crushed and steeped in 1/4 cup warm milk
Rose water/Gulab Jal – 1 tsp (optional)
Green Cardamom seed powder – 1/2 tsp (optional)
Toasted Almonds and Cashewnuts – 1/2 cup total (optional)
Shelled Hard Boiled Eggs – 6-8 (optional)
Dough to seal the edges of the Casserole dish (optional)
(I use the ingredients stated as ‘optional’ only during parties when guests are invited)
Method:
1. Preheat the oven to 550°F (only if using an oven to prepare it on Dum, read below)
2. Carefully lift the loaf pan containing the charcoal briquettes from the marinating chicken, and discard it.
3. In a heavy bottomed casserole dish (which can be used in Oven-if using the Oven method (or) which can be used on stove-top-if using the Stovetop method – read below), arrange the marinating chicken along with all its juices in a single layer. Do not crowd it. (Use two casserole dishes if needed)
4. Spread the chopped mint leaves and the shallow fried potatoes (if using) over it.
5. Now add the drained warm half cooked rice prepared earlier and spread it nicely to cover the chicken all over. Reserve about 1 1/2 cups cooked rice for the top most layer.
6. Next, spread the chopped cilantro, toasted almonds and cashewnuts, hard boiled eggs (if using), reserved fried onions, cardamom seed powder and pour ghee (if using) and the saffron soaked in milk and rose water all over the rice. Add the 1 1/2 cup reserved rice and spread as the top most layer to cover evenly. Now pour the reserved oil in which the onions were fried evenly all over the rice.( I do not add fried onions over the top layer of rice to avoid getting the onions and herbs blackened or burned by steam).
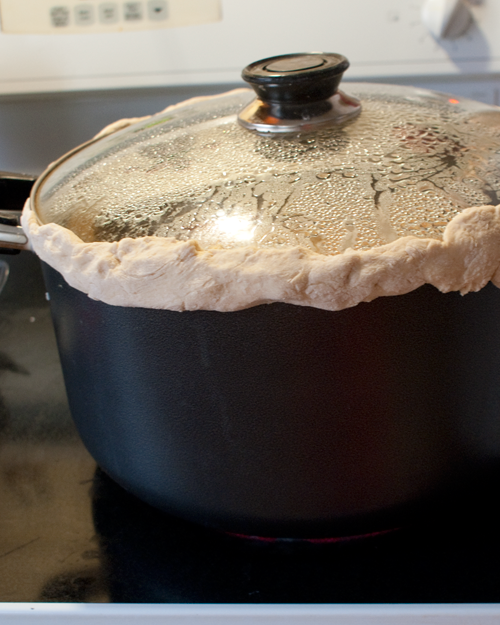
7. Cover the dish with an aluminium foil or a tight lid (or) seal the edges with a dough and cover with the lid tightly, you can use some weight over the lid, so that no steam escapes.

Lid sealed with dough and being cooked on stovetop
If using an oven to cook:
Put the sealed casserole in the preheated oven at 550°F for 20 minutes. Later, lower the heat to 300°F and leave the casserole dish in the oven for about 30 minutes. Remove from dish from oven once done.
If you are cooking on stove top:
1. Take a flat Dosa Tawa or a griddle pan and put it on the stove at high heat. As it gets warm, put the casserole dish on the tawa and let it cook for about 5 minutes on high heat.
2. Later, lower the heat to medium and let it cook for about another 15 minutes.
3. Now, reduce heat to very low and let cook for another 15-20 minutes and your Biryani will be done by now.
Once done, let the dish rest for 30 minutes. Later, open the lid and a heavenly aroma fills your house inviting all your house members. Carefully dig your spoon deep into the casserole dish until it touches the bottom, and gently mix the rice with the chicken until it is all completely mixed. Serve immediately.
Tip: Adding salt to the water in which you cook rice is essential, or else the whole taste of Biryani turns upside down. One tip if you have forgotten to add salt to the water while boiling rice is – stir the required amount of salt in a little quantity of hot water, about half cup or a few tablespoons, and pour this on the biryani evenly. Warm the biryani in microwave and serve immediately.
Suggested accompaniments: I enjoy my Biryani with Mirchi Ka Salan or Baghare baingan and Dahi ki Chutney as a side dish, and glass of chilled coke alongside. Yumm-O!
Note: You can also go through this video of ‘Khan Biryani’ showcased by VahChef, one of my favorite chefs, to get an idea on how to prepare Kachchi Murgh Biryani. His method for Khan Biryani is a bit different but quite interesting though.
I shared this recipe as part of the RCI:Authentic Cuisine of Hyderabad Event that I am hosting this month on my blog.
Be sure to read all the rules for the event and drop me your entries. The last date to send me your entries is September 15th’ 07.
Luv,
Mona
You can follow any responses to this entry through the RSS 2.0 feed. You can leave a response, or trackback from your own site.

June 20th, 2011 at 1:54 pm
Salaam Mona, adding shah zeera to adhan is enough or we need to add to aqani as well. Also, adding garam masala powder will suffice instead of adding all masala separately?
WaAlaiKuMAsSalaam Brother Abu Mudassir, it is enough if you add shah zeera to the adhan. I usually add both the garam masla powder as well as the sabut masala for biryani, however you can only add either if you wish.
September 11th, 2011 at 10:11 pm
Hi Mona,
Thanks a lot for this wonderful recipe. Made a heavenly Biryani today and enjoyed it with friends.
September 17th, 2011 at 4:16 pm
Salaam,I must admit that I have looked at your website from time to time to get inspiration and it has served me well. However, I never felt a need to leave a comment till today. I tried your kachi biryani and the instructions were so detailed, my cooking effort was very successful!! Thank you for your wonderful hobby – it has served me well 🙂
October 3rd, 2012 at 2:43 pm
[…] need for biryani in a hurry. If you’re excited about it and have some time on your hands, try this fabulous one from Mona at Zaiqa. Hyderabadi biryani is one of the best kinds you can have. I dream […]
July 7th, 2013 at 3:11 am
Hi Mona,
Stumbled upon your blog while looking for good recipes…..and your blog is a gold mine for food lovers.
We are from Bombay but now settled in Gulf and loveeee to eat…….tried the kacchi murg biryani recipe, absolutely amazing, we all loved it, specially my daughters.
Thank you so much and keep up the good work.
Love,
Vaishali
July 12th, 2013 at 9:08 am
Sister,
I am from Hyderabad, a foodie and cook occasionally over weekends, it is amazing to learn authentic food from you. Really appreciate the work you done in putting up this excellent site.
Thanks
July 24th, 2013 at 8:45 am
Hi Mona,
I came across your blog while searching for a biryani recipe. Thanks to you now I can make biryani that looks and tastes like biryani:) Your detailed step by step instructions gave me the courage to try making biryani for the first time.
The maximum temperature on my oven is 500F so I cooked the biryani a little longer (approx. 10 minutes) on that and then reduced the temperature. There was little water on the bottom of the pot when I checked it after letting it rest for 30 minutes and the rice on the top layer were a bit crunch. However, the chicken was tender and well cooked. So I put the biryani back in the oven for another 10 minutes at 300F and it came out perfect.
Appreciate you sharing the recipe on the blog and look forward to trying more of your recipes.
Thanks a ton.
September 15th, 2013 at 1:39 pm
awesome recipe yum yum yum
November 19th, 2013 at 4:45 am
Awesome biriyani.. I made it yest and it was really awesone.. i am keepin this recipe for life.. I have also tried your bagare baigan and it was also good…
March 31st, 2014 at 8:51 am
What is meant by 1-cup? 160ml or 200ml?
Anwer, 1 cup = 250 ml.
May 7th, 2014 at 5:07 am
thanks alot mona, I tried ur recepie it was simply great.first time I made it and it was excellent.once.again thanks to u.
May 10th, 2014 at 3:27 pm
Salam.
I’ve made this Bhiryani a number of times and it’s delicious. Before I used the packet masalas to make my bhiryani but now this is definitely my go to recipe!
And I can control the amount of chilli this way too, as some ready made ones are a bit much for my husband & kids.
In fact I will be making it again tomorrow for my Mumani. Can’t wait 🙂
Thank you for sharing this with us.
August 25th, 2014 at 3:13 am
Hi monaa…..dear I want red chicken recipe..which usually being cooked in hyderabadi shaadis…
January 16th, 2015 at 9:37 am
Hi mona
I am planning to bake this briyani in aluminium tray, so it will be easy to serve.. Please let me know the oven temperature to bake the biriyani in aluminium tray so that it will not become mashy or burnt…
Thank you so much for your wonderfull rciepie
September 26th, 2015 at 1:45 am
[…] Pathar Ka Gosht, Mahekhalya, Kacchi imli ka Dalcha, Till Ki Chutney, Maleeda, Gulgule, Qubuli, Kacchi Biryani, Double Ka meetha, Baghare Baingan, Nihari, Pakki Biryani, Mirchi Ka Salan, Khichdi, Qageena, Kulfe […]
January 21st, 2016 at 3:45 pm
How much is 4 cups of rice in grams and how many medium onions will make 800 grams
March 14th, 2016 at 2:08 pm
asalamualaikum mona
hope ur doing well……made ur biryani few times and it turned out great always …..but one thing always confuses me
how much wud b 800 grams sliced onions???
like how many medium or small onions wud it make???
July 11th, 2016 at 6:38 pm
We hosted a party recently for 40 people and made this recipe with about 7 whole chickens…that’s the confidence we have in your recipes!
I skipped all the optional ingredients and made it exactly as is. Was simple, great for bulk cooking and absolutely delicious! Highly recommend!
June 29th, 2017 at 8:30 am
Asw mona, Is tawa is required ,can’t we directly make it on stove