Puran ke Laoz

March 14th, 2009 Mona Posted in Chane ki Dal, Ghee, Jaggery/Gud, Khoa, Pinenuts/Chilgoze, Pistachios/Pista, Sugar/Shakkar 12 Comments »

Chana dal, or split bengal gram are an essential item among Pulses in Indian cooking. The other dals most commonly used by indians in their everyday cooking are Tuvar dal or yellow lentils, Masoor dal or Red lentils. These three pulses or dals are the basic source of protein intake in an Indian, chiefly vegetarian diet. Mostly savory dishes are prepared out of dals, but a few of the sweet dishes like the one I am writing today are my favorites.

Chana dal and a block of Jaggery/Gud

My Ammi prepares the following halwa a lot. It brings back many sweet memories from my childhood. It is a simple meetha, which everyone will enjoy, and it is healthy too. It has got chana dal which are rich in proteins, ghee which has got many health benefits and lots of nuts to add flavor and richness.

This meetha is quite subtly sweetish in taste. Once this meetha is done, it is spread out evenly on a flat greased dish and left to set until cool. It is then cut into diagonal pieces, hence called laoz. You can always add more sugar or khoa for flavor according to your preferences. The prepared chana dal or split bengal gram paste is called as ‘Puran’. It is also used as a stuffing for Parathas, just like Aloo Parathas, to prepare ‘Mitthi Roti’, and also as a filling in the ‘Halwa/Puran Puri’ which are the halwa stuffed deep fried pastries/puri which I will write about soon. Khoa and nuts are added to the Puran for that purpose.

Kadai

It is better to prepare this meetha in a non-stick heavy bottomed kadai or saucepan, so that it wont stick to the bottom and burn. A kadai is a deep Indian kitchen utensil. It is wok shaped, has thick walls, usually used to for deep frying purpose. Mine is a new addition to my kitchen utensils, recently gifted to me by my MIL.

Puran ke Laoz – Bengal gram Halva

Ingredients:

Chana Dal – 1 cup
Sugar – 75 grams
Jaggery – 40 grams
Powdered cardamom pods – 1/4 tsp
Khoa – 3 tbsp
Ghee – 2 tbsp
Finely chopped nuts (walnuts, pistachio, almond, pine nut) – 1/8 cup
Slivered nuts – for garnish

Puran ke Laoz – Bengal gram Halva

Method:
-Soak the dal for about 3-6 hours in surplus cool water. Later, drain and wash the dal. Pressure cook the dal in fresh cool water, until it is soft. Let cook until there is little or no water left. Once cool, puree it to a fine paste in a blender.
-Grease a stainless steel thali or any swiss roll tin with a little oil/ghee. Keep aside.
-Put the paste into a non-stick Kadai at medium heat. Add the powdered cardamom powder, ghee, jaggery, sugar and khoa. Mix well and keep stirring continously and let it cook until it thickens, no longer sticks and leaves sides of the pan. It will take around 20 minutes (time depends on the amount of water in the paste). Once done, stir in the chopped nuts. This is the Puran. Put the puran on the greased thali or swiss roll tin and spread it evenly to a thickness of 1 cm or half inch. Flatten the surface using a flat spatula. Once a little bit cool, put it in the refrigerator for an hour to serve later.
You can store these meetha stacked in an air tight food storage box for upto a month.

Luv,
Mona

AddThis Social Bookmark Button

Shaami, Shikampur aur Kofte

January 15th, 2009 Mona Posted in Canola Oil, Chane ki Dal, Cilantro/Kothmir (fresh), Cumin seeds/Zeera, Eid/Ramadhan/Iftaar, Garam masala powder, Ginger-Garlic paste, Green Chillies, Hyderabadi special, Lamb/Beef/Mutton/Veal/Sheep, Red Chilli powder, Red Chilli/Lal mirch, Salt/Namak, Turmeric/Haldi, Yellow Onion/Pyaaz 29 Comments »

I remember when I was kid, my mother used to get up early and prepare the whole days meal while we were all still sleeping, and also fix everybody’s lunch boxes, sometimes each one different from one another according to the likes of each person. By lunch time in the school, tired and bored, lunch was always what I looked forward to. Yummy and heartfully delicious simple home food to satisty the hungry stomach. Later, when I was in the junior college, I had to stay away from my parents. I then seriously missed food, especially filling lunches. That is when I began to develop a like for Shaami-sandwiches for lunch everyday. My mother would prepare Shaami in bulk, and send to me. I used to store them in the freezer, content and happy. That is when I learnt to prepare these.

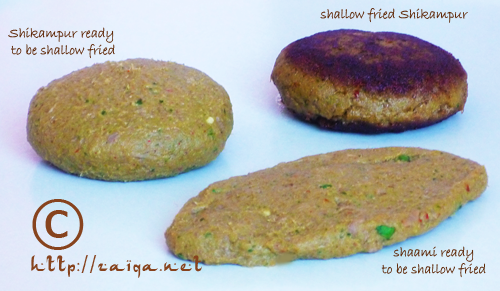
Shaami, Shikampur and Kofta are all prepared the same way from a dough like cooked meat+dal+spices paste. Boneless/Minced meat is cooked dry along with lentils, onions and spices to perfection, along with a few fresh herbs, spices and chillies. This is then ground to a dough like paste which is then shaped into various kinds. If you shape it into a diamond like oblong kawabs, it is called as ‘Shaami‘, if you shape it into a small patty with a finely chopped onion+yogurt+herb relish, it is called as ‘Shikampur‘, and if you shape them into small golf balls, they are called as ‘Kofta‘. Each of them are shallow fried in oil and then eaten.

Preparing the meat+dal mixture before hand, and storing it in sandwich bags, like I have explained below, saves a lot of time. Infact during my holidays, I buy the ingredients for this in bulk, and prepare and store them in the freezer for future use. Comes extremely handy to me.

You can serve Shaami and Shikampur as snacks along with chutney to your guests, or add them between your sandwich bread for lunch, between burger buns for a delightful meal, or you can add a few Shaami along with little chutney, salad and mayonnaise and roll them between a Paratha as a wrap. Kids will love it.

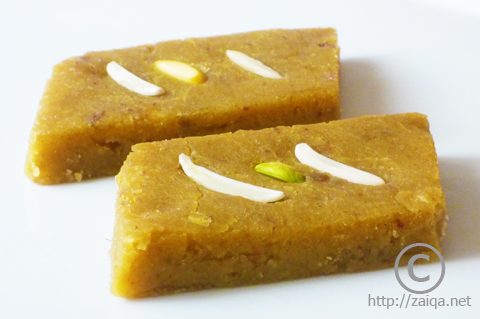
Shaami and Shikampur and Kofte – Fragrant and Spicy Meat Kababs

Ingredients:

Boneless Lamb/Veal meat (or) Minced Lamb/Veal meat – 700 gms
Yellow onions – 2 large, roughly chopped
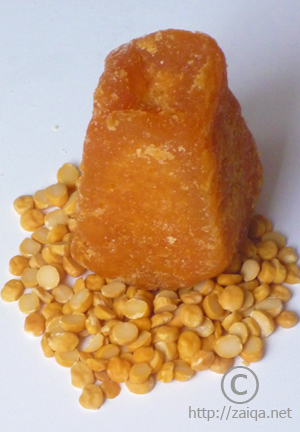
Chana Dal – 1 cup (pre-soaked for 1 hour and drained)
Turmeric – 1/4 tsp
Red Chilli powder/Lal mirch powder – 3 1/2 tsp
Cumin seeds – 1/2 tsp
Garam masala powder- 1 tsp
Cinnamon sticks/Dalchini – one 8 cm long stick
Salt – 3 tsp
Ginger garlic paste – 2 tbsp
Green Serrano chillies (or) Small green chillies – around 12, roughly chopped
Small Thai Red chillies – 3, chopped (optional)
Lemon juice – 4 tbsp
Cilantro – 1 cup, roughly chopped

Method:

1. In a pressure cooker at medium high heat, pour half cup water, and add lamb, pre-soaked dal, chopped onions, turmeric powder, red chilli powder, salt, cumin seeds, and ginger garlic paste and cinnamon stick. Mix well. Close the lid and let it pressure cook until the meat is tender. Later, open the lid and let it cook until all the liquid has evaporated and it is mostly a dry mixture. There should be no water in the mixture left. This is important, else you will not be able to properly shape them later on and they will end up cracking while you shallow fry them in the end.
2. Let the mixture cool down. Once cool, remove and discard the cinnamon stick. Add the mixture to a food processor. Throw in the cilantro, garam masala powder, chillies, lemon juice and process without adding any water until smooth and pasty. The mixture is ready.

During earlier times, this mixture was grinded using a Sil-Batta or a grinding stone from the past. Sil referring to flat stone and Batta referring to a cylindrical grinding stone. The process must have been a vigorous exercise for arms.

Method of storing the extra meat mixture for future use:

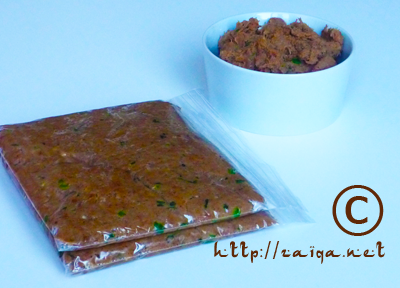
Meat mixture packed in Sandwich bags to be stored frozen for later use

I often prepare the meat mixture for Shaami/Shikampur and Kofta in bulk at a time. Once the mixture is cool enough to handle, store the extra amount in ziplock sandwich bags. Stack them up and freeze for future use. When you feel like having it, take a few sandwich bags out of the freezer and keep them on the countertop until they defrost to room temperature. Shape them into Shaami or Shikampur or Kofta and shallow fry them to serve. It saves a lot of my time this way.

***

To prepare Shaami:

1. Wash your hands clean. Take a small amount of cool water/oil into a cup. Take the above prepared meat mixture, the size of a golf ball into your hands. Dipping your right hand fingertips into the water, shape the mixture into a oblong diamond shaped Shaami(as shown in the picture above). Keep aside. Continue preparing Shaami until you get the number of Shaami you need.
2. In a small frying pan at medium high heat, pour little oil and shallow fry the Shaami until crisp dark brown on each side. Shallow fry them in batches and serve warm.

***

To prepare Shikampur:

1. Finely chop 1 medium onion, 1 tbsp fresh cilantro, 1 tbsp fresh mint leaves, and 4 small green chillies. Add 2 tbsp hung thick yogurt and salt to taste. Mix well. This is the yogurt relish. (Prepare more of this if you are planning to make many Shikampur for a large crowd)
2.Wash your hands clean. Take a small amount of cool water/oil into a cup. Take the above prepared meat mixture, the size of a golf ball into your hands. Make a well in the centre and add about a tablespoon of the relish prepared in the above step. Working gently with your hands, bring the edges together and cover the filling properly to shape into a flattened patty(as shown in the picture above).
3. In a small frying pan at medium high heat, pour little oil and shallow fry the Shikampur until crisp dark brown on each side. Shallow fry them in batches and serve warm.

***

To prepare Kofta:

1. Wash your hands clean. Take a small amount of cool water/oil into a cup. Take the above prepared meat mixture, the size of a golf ball into your hands. Wetting your palms with little water, shape the mixture into smooth balls and keep aside. Continue preparing the koftas until you get the number you need.
2. In a small frying pan at medium high heat, pour little oil and shallow fry the kofta’s, a few at a time, until crisp dark brown on their sides.
(Note: Koftas prepared this way are used in Kofte Ka Qorma)

***

You can also prepare Nagrisi Koftey using this same meat mixture.

Tip: If you feel like the meat mixture you have prepared for shaami, shikampur or kofta is very loose and not tight enough to hold a shape, dry roast about 2 tbsp or more of gram flour/besan for a few seconds, and once cool add it to the meat mixture. Mix well and you will now be able to shape it better. Add more if you require.

Luv,
Mona

AddThis Social Bookmark Button

Sojni ki Phalli Ka Dalcha

August 27th, 2008 Mona Posted in Canola Oil, Chane ki Dal, Cumin seeds/Zeera, Curry leaves (fresh), Dried Red Chillies, Drumsticks/Sojni ki phalli, Eid/Ramadhan/Iftaar, Garlic/Lahsun, Hyderabadi special, Red Chilli powder, Red Lentils/Masoor ki Dal, Salt/Namak, Tamarind/Imli, Tomato/Tamatar (fresh), Turmeric/Haldi, Yellow Lentil/Tuvar ki Dal/Toor dal 14 Comments »

‘Phalli’, in Urdu Lanaguage means beans or pods. 
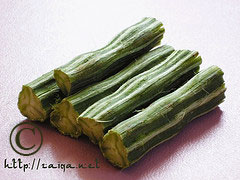
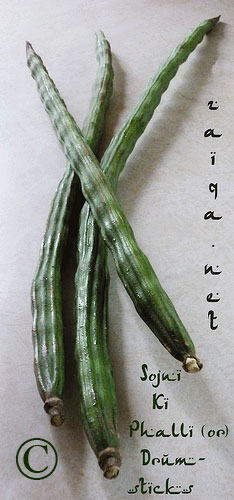
Sojni Ki Phalli in Urdu language, are also called as ‘Drumsticks’ in English language. They are long, green, slender and triangular pendulous pods which grow on the Drumstick tree or Moringa oleifera, its scientific name. The trees are drooping and are native to the Indian subcontinent mainly. The tree is very useful as it does not require any special conditions to grow well and the leaves and pods are high in nutrition. The tree is drought resistant and almost each and every part of the tree is useful to mankind. I have however never consumed the leaves of the plant, but I simply love the drumsticks.

The pods which are rich in vitamin C, iron, folic acid and calcium have an outer hard skin, winged and waxy seeds in the centre and a delicate delicious pith in between. They are very long in length, around 30 cm or more. Once cooked, the only parts of the pod consumed are the sweetish and delicate jelly like pith and the winged seeds. Be sure to look for younger looking ones which are bright green in color while you shop.Seeds show as knobbles in mature seeds, avoid these. They are available fresh at various Indian stores selling groceries, and are also sold canned. However canned or frozen drumsticks can only give you a faint impression of the real thing.

To prepare the pods, they are first washed and pat dried, top and bottom trimmed, and the outer skin is scraped slightly with knife, cut into 5-6 cm long tubes and then simmered in water and spices for 10 minutes to be added to any curry or dals and consumed. There is a particular method by which the pods are consumed. The pods are easily broken into three strips once cooked and each strip is scraped by a spoon or by running your teeth down the lenth of the strip. Some even chew the outer tough skin to extract the juices and the sweet pith and later the skin is discarded it at the side of the plate.

Among the various dishes in which these pods are added, the most favorite one enjoyed by me is Sojni ki Phalli Ka Dalcha. I remember I was a little kid when I tasted these for the first time, and I still love them immensely.

Sojni ki Phalli ka Dalcha- Drumsticks in a Tangy thin Lentil Soup

Ingredients:

Sojni ki Phalli/Drumsticks – 4, cut into small tubes-approx 5-6 cm in length (as shown in the picture above)
Tuvar ki dal/Yellow lentils (or) Masoor ki dal/Red lentils (or) Chane ki dal/Bengal gram – 1 cup
Red Chilli powder – 2 tsp
Salt – 2 tsp
Turmeric – 1/4 tsp
Tamarind concentrate – 3 tbsp
Canola Oil – 2 tsp
Curry leaves, fresh – 5-8
Dried Red chillies – 3
Garlic Cloves – 2, large, smashed
Tomato – 2, finely chopped

Method:

1. Soak the dal for about 2 hrs in surplus cool water. Later drain and boil the dal in a saucepan with 4 cups of fresh water along with a pinch of salt and turmeric until the dal is mushy. Add tamarind concentrate to the dal. With an immersion blender, puree the dal or whisk it alternatively until smooth.
2. Meanwhile, in a pressure cooker, pour oil, add the curry leaves and the dried red chillies, cumin seeds, garlic cloves and as soon as they start to splutter, add red chilli powder, turmeric, salt and the chopped tomatoes. Mix well. Add the drumsticks and pour in 2 cups water. Close the lid and pressure cook for 5 minutes or until the pods are done. To test doneness, try breaking a pod using a spoon, if it easily breaks, then it is done. Pour the pureed dal into the saucepan with the drunsticks and pour water to achieve the consistency you want. Add tamarind concentrate, and let it cook on medium for 5 more minutes. The dal is neither too thick or too thin in consistency. Serve warm.

Suggested Accompaniments: Basmati Chawal, and a Vegetarian or Non-vegeratian side dish.

This delicious dal is my entry to the event ‘Delicious Dals from India’ being hosted by Suma at her blog Veggie Platter.

Luv,
Mona

AddThis Social Bookmark Button

Kaddu Ke Chilke Ka Saalan

May 6th, 2008 Mona Posted in Bottle Gourd/Kaddu, Canned Tomato paste, Canola Oil, Chane ki Dal, Eid/Ramadhan/Iftaar, Fats and Oils/Tel, Hyderabadi special, Pasta Sauce, Red Chilli powder, Salt/Namak, Simple Kitchen Tips, Spices & Seasonings/Masaale, Vegetables/Tarkariyaan, Yellow Lentil/Tuvar ki Dal/Toor dal, Yellow Onion/Pyaaz 21 Comments »

Two Bottle Gourds/Opo squash

Bottle Gourd, aka Opo squash, is a very humble vegetable. Not many people like it, and it is not a favorite of many people. But it is quite nutritious, delicious, healthy, and perfect for weight watchers! Its delicate nutty flavor provides a great taste to dishes. This particular recipe uses the peels of bottle gourd and it is one no-fuss yummy curry which you will all love.

Kaddu Ke Chilke Ka Saalan – Bottle Gourd Peels with Lentils Curry

Tip : While I the peel the bottle gourd, I take care not to peel it too thin if I plan to prepare this curry out of the Peels. I peel them about half a centimetre thick (about 5 millimeters). This is because a little bit of the flesh (magz) along with the peel gives a great taste to this curry. Usually I prepare this curry with Split Bengal Gram/Chana Dal but you can prepare it even along with Yellow Lentils/Tuvar Dal. It truns out equally delicious.

Kaddu Ke Chilke Ka Saalan – Bottle Gourd Peels with Lentils Curry

Ingredients:

Bottle Gourd Peels/Kaddu Ke Chilke – 400 gms, cut into small bite size strips
Yellow Lentils/Tuvar Dal or Bengal Gram/Chana Dal – 1/2 cup
Fresh diced Tomato – 1, medium, finely chopped
Red Chilli Powder – 1 1/2 tsp
Salt – 2 tsp or to taste
Canola Oil/Sunflower Oil – 1 tsp
Fried Yellow Onions paste – 1 cup

Method:

1. Soak the dal in two cups water overnight(optional). Drain and cook the dal in two cups of fresh water till they are soft but still can hold their shape well. Drain and reserve.
2. In an another saucepan, put the cut bottle gourd peel strips with around 3 cups water and a pinch of salt and let it boil once, then simmer it with closed lid until the peels are tender. This can take about 30 minutes. Or you can simply pressure cook for a little while until they are tender.
3. Later add fresh diced tomatoes, red chilli powder, salt, oil and fried onions to it. Give a good stir.
4. Gently add the cooked dal and mix it well. Cover the lid and let it cook for 3-5 minutes. Keep checking it in between if it is sticking to the bottom of the pan. You can add a little water if it becomes too dry. Serve it warm.

Suggested Accompaniments: This simple curry taste delicious along with a warm Roti or Paratha.

Luv,
Mona

AddThis Social Bookmark Button

Chanay ki Dal

October 1st, 2007 Mona Posted in Black Peppercorns, Chane ki Dal, Cilantro/Kothmir (fresh), Eid/Ramadhan/Iftaar, Green Chillies, Hyderabadi special, Lemon/Nimbu, Salt/Namak, Simple Kitchen Tips, Turmeric/Haldi 12 Comments »

Fall’s here! My first Fall here in Toronto insallah. I love the trees in this season, with colors of the leaves ranging from red, orange, yellow and some shades of green, nature’s beauty I must say! Earlier I only got to witness these beautiful sceneries in movies, but now I am able enjoy it all right in front of my house! I love to go out on walks, perceiving it all, and I thank my God for making Earth a beautiful place to live in, with all sorts of visual pleasures for humans to enjoy, admire and be thankful.

It has also become cold, and I look forward to the winter, again.. will be my first winter here. My hubby sometimes scares me, telling me about the temperatures going very cold, and it being shivering cold here during the peak in winter. I just am looking forward to see snow all around, hoping it wouldnt be so terrible as described inshallah.

Well, this recipe is one of the most easiest recipes, a Ramadan special served at Iftaars. Its an instant light snack and very nutritious.

Tip: While you are preparing dals, it is always necessary to pre-soak them in surplus water for 4-6 hours preferably. And then to drain and discard the water and wash the dal well in fresh water. The water in which the dal was soaked should never be used for cooking and should always be thrown away coz if you use that water, chances of intestinal gas (flatulence), bloating and abdominal cramps are higher, and you do not want to end up with that. If you do not have time to presoak the dal, you can use it as it is, but you should throw away the water in which you boil the dal.. losing some of the vital water soluble vitamins, so I always only pre-soak my dals. In the later case, you need not throw away the water used to boil it, as the water while soaking them was already thrown away.

Here goes the recipe:

Chanay ki Dal – Lemony Boiled Split Bengal Gram

Ingredients:

Split Bengal Gram/Chana Dal – 1 cup
Turmeric – 1/2 tsp
Salt – to taste
Black Pepper Powder – to taste
Finely chopped small green chillies – 1 tbsp
Cilantro – 1/2 cup, finely chopped
Mint leaves – 2 tbsp, finely chopped
Lemon Juice – to taste

Chanay ki Dal

Method:

1. Wash and soak the dal for 4-6 hours preferably. Drain the water away and wash them well.
2. Now boil them in warm water, taking care you do not add too much of water to it. When the dal has softened up, make sure it not mushy and still in its shape, (the water shouldn’t be there, it should be dry). So, while boiling water, add only a cup of water and if it dries up before the dal being softened, add little more amount of warm water to it.
3. Remove the dal and add black pepper powder, salt, cilantro, lemon juice and chopped green chillies. Serve it warm.

This delicious dal is my entry to the event ‘Delicious Dals from India’ being hosted by Suma at her blog Veggie Platter.

Luv,
Mona

AddThis Social Bookmark Button