Upma

June 24th, 2008 Mona Posted in Beef Stock, Black Gram/Urad Dal, Blog Events/Entries/Polls, Canola Oil, Cashewnuts/Kaaju, Chicken Stock, Cilantro/Kothmir (fresh), Curry leaves (dried), Curry leaves (fresh), Dals (Pulses & Legumes), Dried Red Chillies, Fats and Oils/Tel, Fruits/Phal (fresh), Ginger/Adrak, Green Chillies, Green Gram/Moong ki Dal, Lamb/Beef/Mutton/Veal/Sheep, Lemon/Nimbu, Mustard seeds/Rai, Non-Vegetarian/Gosht, Onion/Pyaaz, Salt/Namak, Semolina/Sooji/Suji, Simple Kitchen Tips, Spices & Seasonings/Masaale, Turmeric/Haldi, Vegetables/Tarkariyaan, Yellow Onion/Pyaaz 14 Comments »

Upma is an another Indian dish which can be had as a snack or can even be had as a filling breakfast.  

Tip: Indian cuisine is versatile. Simple techniques and and a marriage of various kinds of spices and flavors makes the Indian cuisine flexible and sapid. Indian women know very well to use the left overs and whip up delicious meals using them. One such dish where I usually use the leftover curries is Upma. If the left over curry is a dry dish, I often mix it in the preperation of the Upma which makes it even more delicious and healthier. And if the left over curry is thin (soupy) in consistency, then I use it to serve along with Upma.  

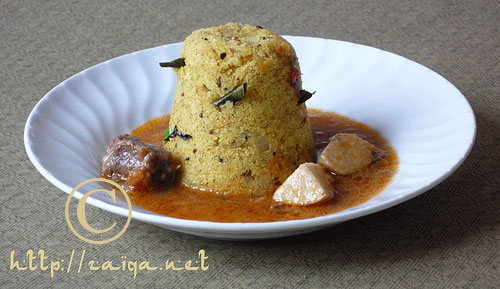
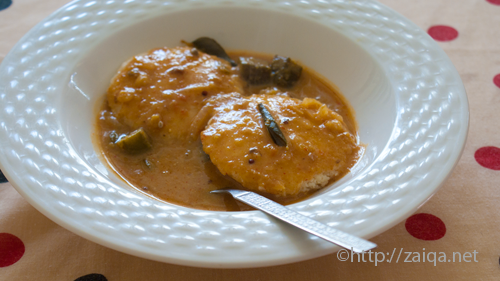
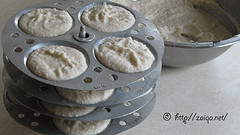
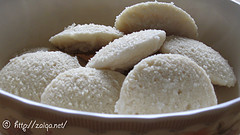
Upma – Semolina cake, served along with leftover Colocasia/Arvi in a tangy sauce

Upma is comfort food for me. It is a filling healthy breakfast to start a new day, quite easy to prepare and gets prepared swiftly. Upma Rawa or Semolina or Sooji is available at many Indian stores very easily.

Serves – 4

Upma – Semolina cake

Ingredients:

  • Semolina/Sooji/Upma Rawa – 1 1/2 cups
  • Canola oil – 3 tbsp
  • Black Mustard seeds – 2 tsp
  • Whole dried red chilli – 1 
  • Small Green chillies – 4, finely chopped
  • Fresh grated ginger – 1 tbsp
  • Fresh or dried Curry leaves – 10
  • Urad Dal – 1 tsp
  • Moong Dal – 1 tsp
  • Turmeric – 1/2 tsp
  • Yellow Onion – 2, large, finely chopped
  • Salt – 2 tsp or to taste
  • Water/Chicken or Lamb Stock – 3 1/2 cups
  • Lemon juice – 3 tbsp
  • Cilantro – 1/2 cup, finely chopped
  • Fried Cashewnuts – 1/2 cup, chopped

Method:

  • In a non-stick saucepan at medium heat, pour oil and as soon as it gets warm, throw in the mustard seeds. Cover the saucepan with a splatter screen and as soon as the seeds begin to pop, add in the green and red chillies, dals, ginger, turmeric and curry leaves. Saute them for 3 minutes and later add the chopped onion and salt to it. Let the onions sweat out a little. Fry them all for about 5 minutes stirring it continually. Add the Upma Rawa and fry the whole mixture for 5-8 minutes more again stirring frequently (if you have any dry curry left-overs, you can add it too at this stage, read the notes above)
  • Now pour the water/stock and mix throughly to that no lumps form. Reduce the heat to low and cover the saucepan. Let it cook for 3 minutes more. 
  • Remove from heat and add lemon juice, cashewnuts and cilantro. Fluff and mix it all using a fork and spoon the mixture into whatever molds you like, press the mixture well. Invert them onto warm serving plates and serve them for a yummy breakfast. 

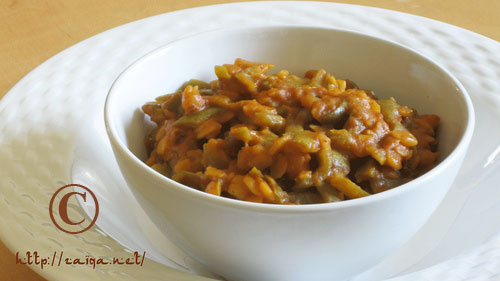
Suggested Accompaniments: I and my family enjoy it along with Lemon/Lime or Mango pickle prepared Indian style, or with any thin (soupy) leftover Curry/Saalan. I also love to savor it along with Khatti Dal. My Mother used to serve it us when I was a kid along with a handful of shallow fried groundnuts. 

This goes as an entry to the event, Click Yellow for Bri, being held this time as a Cancer Fundraiser by Jai and Bee for Briana Brownlow.

This also goes all the way to Raaga of The Singing Chef for the WBB#23 Express Breakfast Event she is holding this month.

Luv,
Mona

AddThis Social Bookmark Button

Khatti Dal

June 20th, 2008 Mona Posted in Canola Oil, Cumin seeds/Zeera, Curry leaves (dried), Curry leaves (fresh), Dals (Pulses & Legumes), Dried Red Chillies, Eid/Ramadhan/Iftaar, Garlic/Lahsun, Green Gram/Moong ki Dal, Hyderabadi special, Kabuli Chana, Red Chilli powder, Red Lentils/Masoor ki Dal, Salt/Namak, Spices & Seasonings/Masaale, Tamarind/Imli, Turmeric/Haldi, Yellow Lentil/Tuvar ki Dal/Toor dal 16 Comments »

Hyderabadi Khatti Dal is kind of like a lentil soup with a slight tangy flavor due to the addition of tamarind concentrate. Tamarind is the traditional souring agent used for the Khatti dal. Sometimes upon its unavailability, lemon/lime juice or raw green mango puree is also used. This distinct and popular dal preparation is usually a side dish at meals in most Hyderabadi households to wet their rice and enjoyed with an another vegetarian or a non-vegetarian side dish.

Tamarind pods – Imli

Hyderabadi Khatti dal is distinct and different from other Indian dals. Khatti dal has origins from the Mughal era of the Qutub Shahs. The North Indians use whole grain dals (sabut dal), and Andhra dals are usually thin and the baghaar (tadka) consists of mustard seeds, whereas Khatti dal has the baghaar of dried red chillies and cumin seeds, and the consistency of the dal is neither too thick or too thin.

***

Baghaar:
The technique of baghaar (in Urdu) reminiscent to Indian cuisine, also often referred to as seasoning/tempering or chaunk/tadka in Hindi is an important step towards flavoring a dish. It helps brings out the best flavors from dry spices. The process involves heating some oil in a small frying pan, to which dry spices are added one by one and stir fried until they pop. This hot oil with spices is then poured, hissing over the partially cooked or completely cooked dish to impart flavors and aroma. As soon as this is done, cover the dish with a lid so as to trap all the aroma and flavor inside. Different spices are used for different dishes. Usually baghaar is done at the end of cooking, but sometimes it is also done right at start or in the middle of cooking a dish.

Baghaar for khatti dal – sliced garlic, curry leaves, dried red chillies and cumin seeds

Below are a few precautions to be taken while doing baghaar:
1. The process requires attention, and takes just a few minutes.
2. Take care not to overheat oil or else spices will burn.
3. Keep a splatter screen nearby before you start the process as few spices begin to pop and jump.

***

Adding garlic in the baghaar or tempering process for this dal gives it a unique flavor and makes it even more delicious. I like to prepare this dal using Tuvar dal/Yellow lentils or Masoor Dal/Red Lentils.

Imli ki Khatti Dal – Tangy Tamarind Dhal

Ingredients:

For the Dal:
Tuvar dal/Yellow lentils or Masoor Dal/Red Lentils – 1 cup
Salt – to taste
Red chilli powder – 1 1/2 tsp
Small green chillies – 4, roughly chopped
Haldi/Turmeric powder – 1/4 tsp
For Sourness:
Raw tamarind juice or tamarind concentrate – 2 to 3 tbsp or according to taste (if tamarind is unavailable, you can even add lemon/lime juice to taste for sourness)
For the Baghaar(tadka)/Tempering:
Canola Oil – 2 tsp
Garlic Cloves – 2, large, each cut lenghwise into two
Cumin seeds – 2 tsp
Dred Red chilliies – 2, each broken into two
Fresh/Dried Curry Leaves – 8
Fresh Cilantro – 2 tbsp, finely chopped


Khatti Dal – Sweet and Sour Lentils

Method:

1. Wash and soak the dal in surplus water for 2-3 hrs. Later, drain the dal and wash it in fresh changes of water. Drain and add it to a pressure cooker along with 3 cups of fresh cool water, turmeric powder, red chilli powder, chopped green chillies and salt and pressure cook it till the dal is very soft. Pour the contents of the pressure cooker into a blender container and blend it till pureed. (My Ammi used a Dal Ghotni to mash the dal) Or you can even simply puree it using an immersion blender.
2. Meanwhile in a small non stick frying pan at medium heat, pour oil and as soon as it gets warm, add the cumin seeds. As they begin to splutter, cover with a splatter screen and reduce heat to medium low, and throw in the remaining ingredients for baghaar/tempering and remove from heat.
3. Pour the contents of the blender container back into the pressure cooker and bring it to a boil. Add the tamarind juice (or lemon/lime juice), the baghaar, and stir to mix. You can add more water if you want to achieve the consistency you desire. Some people like a thin consistency and some prefer a slightly thick consistency. Adjust salt and serve warm.

Suggested Accompaniments: Khatti dal goes very well along with Tala hua Gosht and Khushka.

This delicious dal is my entry to the event ‘Delicious Dals from India’ being hosted by Suma at her blog Veggie Platter.

A list of few other delicious dals from the Hyderabadi repertoire:

1. Khadi Dal
2. Daalcha
3. Tamatar ki Dal
4. Kairi ki Dal
5. Mitthi Dal

***

Suggested Accompaniments: It is a side dish to meals to wet rice and had along with a vegetarian or non-vegetarian side dish.

A while ago Meeso of For the Love Of Food! awarded me with the ‘Rockin Girl Blogger’ award. I rock! 🙂 Thanks Meeso.

I pass on this award to all those talented bloggers in this ever growing world of food blogosphere.

Luv,
Mona

AddThis Social Bookmark Button

Rajmah Masala

May 22nd, 2008 Mona Posted in Canola Oil, Coconut milk, Curry leaves (dried), Dals (Pulses & Legumes), Fats and Oils/Tel, Garam masala powder, Onion/Pyaaz, Red Chilli powder, Red Kidney Beans/Rajmah, Salt/Namak, Tomato/Tamatar (fresh), Vegetables/Tarkariyaan, Yellow Onion/Pyaaz 9 Comments »

Red kidney beans are one of the gorgeous beans among the Beans and Lentils food group. They are very nutritious too.

Rajmah Masala

Whenever I prepare this dish, I make it a point to savor them along with Palak Pooris, the combo I love to have for a meal or a filling breakfast. You can even have this red bean curry along with rice and a side dish, or prepare Rajmah Pulao for a one-dish meal.

Rajmah Masala

Serves: 4-6

Ingredients:

  • Canola Oil – 2 tbsp
  • Yellow Onion – 1, large, finely sliced
  • Dried Red Kidney Beans – 1 cup (or) Canned Red KidneyBeans – 1 can (173 gms, Red Kidney beans in Water), drained
  • Tomatoes – 2, finely chopped
  • Thick Coconut Milk – 4 tbsp
  • Garam Masala – 1 1/2 tsp
  • Red Chilli powder – 2 tsp
  • Salt – 1 1/2 tsp
  • Dried Crushed Curry Leaves – 2 tbsp (or) Fresh Curry leaves – 8-10

Method:

  • Wash and soak the Red kidney beans in surplus water overnight. The next day, drain them and in a saucepan, bring two litres of water on boil and add the soaked and drained beans and cook them along with half tsp salt till they are just soft. Do not make them mushy. Drain and keep aside
  • Pour oil into a saucepan at medium heat and as soon as it warms ups, throw in the sliced onion. Stir fry them till they are golden. Add the drained Red kidney beans, chopped tomatoes, coconut milk, red chilli powder and salt. Stir gently to mix well and cover the lid. Simmer for about 10 minutes stirring it two times in between.
  • Open the lid and mash the mixture a little bit with the back of a wooden sppon. Throw in the crushed dried curry leaves and the garam masala. Gently give it a stir and cook for 4-5 minutes more. Serve warm.

Suggested Accompaniments: It tastes delicious along with Palak Poori, my favorite combo. You can also have it along with Roti or Parathas or Rice.

I am sending this to as an entry to the Click:Beans ‘n Lentils event hosted by Jai and Bee at Jugalbandi.

Luv,
Mona

AddThis Social Bookmark Button

Kaddu Ke Chilke Ka Saalan

May 6th, 2008 Mona Posted in Bottle Gourd/Kaddu, Canned Tomato paste, Canola Oil, Chane ki Dal, Eid/Ramadhan/Iftaar, Fats and Oils/Tel, Hyderabadi special, Pasta Sauce, Red Chilli powder, Salt/Namak, Simple Kitchen Tips, Spices & Seasonings/Masaale, Vegetables/Tarkariyaan, Yellow Lentil/Tuvar ki Dal/Toor dal, Yellow Onion/Pyaaz 21 Comments »

Two Bottle Gourds/Opo squash

Bottle Gourd, aka Opo squash, is a very humble vegetable. Not many people like it, and it is not a favorite of many people. But it is quite nutritious, delicious, healthy, and perfect for weight watchers! Its delicate nutty flavor provides a great taste to dishes. This particular recipe uses the peels of bottle gourd and it is one no-fuss yummy curry which you will all love.

Kaddu Ke Chilke Ka Saalan – Bottle Gourd Peels with Lentils Curry

Tip : While I the peel the bottle gourd, I take care not to peel it too thin if I plan to prepare this curry out of the Peels. I peel them about half a centimetre thick (about 5 millimeters). This is because a little bit of the flesh (magz) along with the peel gives a great taste to this curry. Usually I prepare this curry with Split Bengal Gram/Chana Dal but you can prepare it even along with Yellow Lentils/Tuvar Dal. It truns out equally delicious.

Kaddu Ke Chilke Ka Saalan – Bottle Gourd Peels with Lentils Curry

Ingredients:

Bottle Gourd Peels/Kaddu Ke Chilke – 400 gms, cut into small bite size strips
Yellow Lentils/Tuvar Dal or Bengal Gram/Chana Dal – 1/2 cup
Fresh diced Tomato – 1, medium, finely chopped
Red Chilli Powder – 1 1/2 tsp
Salt – 2 tsp or to taste
Canola Oil/Sunflower Oil – 1 tsp
Fried Yellow Onions paste – 1 cup

Method:

1. Soak the dal in two cups water overnight(optional). Drain and cook the dal in two cups of fresh water till they are soft but still can hold their shape well. Drain and reserve.
2. In an another saucepan, put the cut bottle gourd peel strips with around 3 cups water and a pinch of salt and let it boil once, then simmer it with closed lid until the peels are tender. This can take about 30 minutes. Or you can simply pressure cook for a little while until they are tender.
3. Later add fresh diced tomatoes, red chilli powder, salt, oil and fried onions to it. Give a good stir.
4. Gently add the cooked dal and mix it well. Cover the lid and let it cook for 3-5 minutes. Keep checking it in between if it is sticking to the bottom of the pan. You can add a little water if it becomes too dry. Serve it warm.

Suggested Accompaniments: This simple curry taste delicious along with a warm Roti or Paratha.

Luv,
Mona

AddThis Social Bookmark Button

Idli anyone?

April 17th, 2008 Mona Posted in Baking powder, Basmati Rice/Chawal, Black Gram/Urad Dal, Canola Oil, Dals (Pulses & Legumes), Eid/Ramadhan/Iftaar, Food Additives, Hyderabadi special, Idli rawa, Salt/Namak, Simple Kitchen Tips, Spices & Seasonings/Masaale, Vegetables/Tarkariyaan 14 Comments »

Idli, also spelled as Idly or Iddly is a food native to Southern India. It is the most favorite South Indian breakfast next to Dosa, Wada and Samabar. Idlis have been compared to the moon and jasmine flowers in literature. They are steamed cakes of dehulled black gram dal and cream of rice or wheat. These soft and fluffy cakes are easy to digest and rich in proteins and carbohydrates. They are prepared in many hotels, homes and restaurants almost every day for the morning breakfasts especially in South India and elsewhere too. It is a healthy and nutritious probiotic pure South Indian breakfast.

Idlis served along with Sambar generously poured over them

The ‘Idli Rawa‘, which is the cream of rice or wheat is available in any Indian stores. The Idli mould is also easily available in most of the Indian stores, and are sold in almost every stainless steel utensils shop in India. The Idli plates in a Idli mould have depressions  to pour the batter in those. These depressions vary in sizes in different stores. I have a medium size Idli mould which is perfect for my family.

To prepare Idli, I start its preperation from a day ahead. Like for example if I plan to prepare it on Sunday for breakfast or brunch, I start its preparation from Saturday morning. On the Saturday morning, I wash and soak the urad dal in plenty of water, and before I go to sleep in the night I drain away the water and grind the dal well, then mix it with the washed idli rawa in a bowl and keep the bowl in a warm and dark place to ferment night long. Then on Sunday morning the fermented batter is ready to prepare yummy Idlis. I use equal amounts of idli Rawa and dal for Idli preparation.

Idli – Steamed Rice-Lentil Cakes
Makes : approx 40 Idlis

Ingredients:

Urad Dal (or) Mask ki dal/Split husked Black gram – 1 1/2 cups
Cream of Rice (Idli Rawa) – 1 1/2 cups
Baking powder – 1/2 tsp
Salt –  1 tablespoon
Canola Oil – to grease the Idli Plates

Idli batter in the Idli Mould & Cooked Served Idlis

Method:
(Note: Read the entire post before you proceed to prepare the Idli)

1. Wash the Urad dal in several changes of water and soak it in surplus water for about 6-8 hours. Later, drain the dal. In a wet grinder, or a food processor, blend the Urad dal adding just a little of water to aid in the blending to a very smooth and fluffy paste. Do not add to much water, it should be added just so that the mixer/grinder motor runs smoothly. The fluffier the batter, the better it is, so grind well for 10-15 minutes. Transfer the batter to a very large stainless steel mixing bowl (as the batter will ferment and rise and overflow if the container is small).
2. While the urad dal is grinding, wash the idli rava with water about 2-3 times and drain it completely. There is no need to soak the idli rava in water. Make sure no excess water remains after draining the water. Add this to the urad dal batter. Also add baking powder and mix it all completely using a spoon without any lumps. The batter should be as thick as possible. Cover and leave the batter undisturbed overnight so that it ferments and doubles in size. If you are not living in India or live in cold temperature places, you could use the oven to ferment the batter: Set the oven on to minimum (lowest setting/warm) for about 5-10 minutes, then turn it off. Cover and keep the mixing bowl with the batter in the warmed oven so that it ferments for about 8-15 hours or overnight.
3. The next morning the batter should have fermented well and the volume almost doubled. Once the batter has risen it can be used immediately to prepare idlis. If you are not going to make idlis immediately, store the batter in the refrigerator or else the idlis will be very sour. Add salt to the batter and mix it well. The consistency of the batter should be like condensed milk, not too thick nor too thin. You can add more water if needed to achieve that consistency.
4. Grease all the Idli plates with a few drops of oil and pour about 2-3 tablespoon of batter in each depression in the Idli plates.
5. Before filling the idli plates, add some water in a large pressure cooker and switch on the stove. So by the time you are done with the batter the water will start boiling and you can place the idli stand in the cooker and close the lid. Make sure the water does not touch the lowest idli plate in the stand. The water level in the pressure cooker should be well below it. Close the lid of the cooker and do not put the weight on it. In about 10 minutes you will see steam escaping from the vent of the cooker. Using an oven mitt remove the idli stand from the cooker and place it on the countertop. Scoop the Idlies out of the plates using a spoon in a big serving bowl. Cover the serving bowl with lid to keep the idlis warm. Repeat this process with the next batch adding water to the cooker as necessary until the batter is all used up.

Suggested Accompaniments: Serve them hot along with Sambar, Coconut chutney, Hara Dhaniya aur Pudina Ki Chutney at breakfast or as a brunch or a snack.

Tips:

  1. If you live in warmer places, you need not add baking soda to the batter.
  2. If you live in a cold place,  it happens that the batter has not fermented at all. If the batter has not fermented and doubled in size by next day, do not use it for Idli. Instead make Dosa out of it.
  3. If you do not find Cream of Rice, you can even use Cream of Wheat as the Idli Rawa.
  4. This is the basic recipe for the prepartion of Idli. You can alter it by adding a few chopped french beans, carrots, cilantro to the batter.
  5. Adding a dollop of butter to the steamed idlis while having them hot along with sambar makes it even more delectable.
  6. These Idli moulds are the traditional methods to prepare Idli at home. If you are somehow not able to find the Idli Mould, you can use little metal bowls which can be kept in a steamer or an egg poacher or tiny aluminium molds for cakes and muffins. I have however never used these. I only use the Idli Mould each time I prepare Idli.
  7. You don’t need a pressure cooker for steaming idlis. Simply use any vessel with a vent on the lid which is big enough to fit the idli plates stand you are using. Add some water to the vessel and heat it while you fill the batter. Place the stand inside the vessel and close it with a lid. If the lid does not have vent for the steam to escape, leave a small portion of the vessel open. Steam it for 10-15 minutes. Insert a toothpick or a knife in the center of the idli and if it comes out clean the idlis are ready. Switch off the stove and serve it after a couple of minutes.
  8. You can even freeze the leftover idlis to be used some other day. Simply place cooled idlis on a tray seperately and let them freeze for 3 hours. Once frozen, transfer them all to a zip lock freezer bag and store until needed. When you want to have them, simply place the frozen idlis in a plate and microwave for 2 minutes approx.

Luv,
Mona

AddThis Social Bookmark Button