Vegetable Curry Puff

August 18th, 2010 Mona Posted in Canola Oil, Carrot/Gajar, Cilantro/Kothmir (fresh), Coriander seeds, Cumin seeds/Zeera, Eid/Ramadhan/Iftaar, Garam masala powder, Ginger/Adrak, Hyderabadi special, Kasuri methi, Lemon/Nimbu, Mustard seeds/Rai, Peas/Matar, Red Chilli powder, Salt/Namak, White Potato/Aloo 13 Comments »

Puffs are one easy to make snacks when ready made puff pasty is available, perfect for tea-time, or at iftaar.

freshly baked vegetable puffs, ready to be eaten

Bakeries in Hyderabad sell puffs that vary in shapes and the fillings used. Egg puffs, chicken puffs, paneer puffs and vegetable puffs are a few examples. You can even prepare puff pasty at home if ready made puff pasty is not available at stores.

Vegetable Curry Puffs

Ingredients:

Frozen Puff Pastry – 1 package (2 sheets) [available in the freezer section of most grocery stores or supermarkets]
For Filling:
Canola oil – 1 tsp
Cumin seeds – 1/4 tsp
Black mustard seeds – 1/2 tsp
Fresh Ginger – 1 tsp, finely grated
Potatoes – peeled and chopped, 1 cup
Carrot – peeled and chopped, 1/2 cup
Red chilli powder – 1/2 tsp
Dry roasted Coriander powder – 1/4 tsp
Dry roasted Cumin seed powder – 1/8 tsp
Kasuri methi – 1 tbsp
Salt – to taste
Frozen green peas – 1/4 cup
Lemon juice –2 tbsp
Garam masala powder  – 1/4 tsp
Cilantro – 1 tbsb, finely chopped

Method:

1. Prepare the filling just as you prepare for Samosas.
2. Defrost the frozen puff pastry sheets according to directions. Using a pizza slicer, cut a sheet horizontally in the center. Then again cut the sheet vertically into 3 strips. Place a small ball of the filling on one side of each strip. Cover with the other side of the strip and gently seal the sides. Brush with some cold milk and bake according to instructions. Serve warm along with tomato ketchup.

This is my second entry to the The Hyderabadi Ramadan Food Festival that I am hosting on my blog.
For more details about the event, click here.

Luv,
Mona

AddThis Social Bookmark Button

Gosht ka Achaar

August 14th, 2010 Mona Posted in Canola Oil, Cumin seeds/Zeera, Curry leaves (fresh), Dried Red Chillies, Eid/Ramadhan/Iftaar, Fenugreek/Methi seeds, Ginger-Garlic paste, Hyderabadi special, Lamb/Beef/Mutton/Veal/Sheep, Lemon/Nimbu, Mustard seeds/Rai, Red Chilli powder, Salt/Namak 18 Comments »

Ramadan Mubarak everyone!

I was very little when I had first tasted this pickle at one my aunts place, but I still remember the burst of flavors that made me fall in love with this pickle~ tangy, spicy and simply ambrosial. Since then I have tried to replicate this recipe handed to me by one of my dear grandmother in the family. She had only given me andaaza (rough estimate) amounts of the ingredients being used, a mutti (handful) of that, a mutti of this.

This is one of my most treasured recipes, simple and straightforward procedure, very close to my heart, and that which I have been enjoying since times past. Enjoy this spicy, lemony meat pickle that is sure to entice your taste buds. I hope you all like it as much I do.

Gosht ka Achaar – Veal Meat Pickle

Ingredients:

Boneless Beef/Veal meat – 800 gms, washed, drained, pat dried and cut into small bite-size pieces
Lemon juice – 2 cups, fresh
Garlic cloves – 150 gms, pureed into a smooth paste (with addition of as less water as possible to puree)
Canola oil – 1/2 cup
Curry leaves – 20-25, fresh, chopped
Cumin seeds – 1 tbsp
Dried red chillies – 4
Dry roasted Cumin seed powder – 3 tbsp
Dry roasted Mustard seed powder – 2 tbsp
Dry roasted Fenugreek seed powder – 3 tbsp
Red chilli powder – 2 1/2 tbsp
Salt – 2 tbsp

Gosht ka achar – Veal Meat Pickle

Method:

1. In a deep glass mixing bowl, add the meat pieces and pour in lemon juice. See that all the meat pieces are nicely covered in the lemon juice. Add more if needed. Cover and let marinate in the refrigerator overnight.
2. The next day,add garlic paste to the marinating meat.
3. In a large non-stick heavy saucepan pour in oil, and as soon as it warms up add the curry leaves, cumin seeds and dried red chillies. Within a few seconds add the cumin seed powder, mustard seed powder, fenugreek seed powder, red chilli powder, salt and mix. Immediately add the marinating meat+garlic with all its juices from the mixing bowl and mix well. Let cook partially covered stirring occasionally until the meat is tender. This will take about 35-45 minutes depending on various factors. You can even pressure cook the meat if you want it cooked quick. Keep an eye and remove from heat as soon as the meat is cooked and gravy is thick and clinging to the meat.
4. Let it cool down completely. Transfer to a sterilized glass canning jar and store it in the refrigerator. Use a dry spoon whenever fancied.

Note: Use only Beef/Veal meat for this recipe. I do not suggest using lamb meat or even chicken meat instead.

Enjoy the pickle along with your meals on the side.

This is my first entry to the The Hyderabadi Ramadan Food Festival that I am hosting on my blog.

Luv,
Mona

AddThis Social Bookmark Button

Chaandi ka Varq

March 25th, 2010 Mona Posted in Eid/Ramadhan/Iftaar, Hyderabadi special 7 Comments »

Shimmering with gold or silver tops are seen various desserts at mithai~sweet shops in India. The stunning embellishments are actually butterfly-wings like delicate edible silver, called as Chaandi ka Varq meaning Silver leaf; the gold leafs are called as Soney ka Varq. Varq-also pronounced as warq, vark, varkh, varaq, varak, is an Urdu word which means ‘leaf’. Chaandi ka Varq is most commonly used. These very fragile foils are lustrous, with no aroma or taste, but perfectly edible and are used as a garnish for sweets (mithai), supari (betel nut), paan (betel-leaf), and fruits in India.

Chaandi ka Varq~
it is usually sold stacked in between local telephone directory pages

Making these delicate adornments involves a backbreaking job. Prepared with great caution in workshops in India, usually in Ahmadabad, Lucknow, Delhi and Hyderabad, minute nuggets of silver or gold are placed between tissue paper and placed in leather pouch and beaten repeatedly with a heavy hammer until it becomes a dainty leaf fit to adorn the tops of Indian desserts or biryani, kawabs etc. They are available very easily in India at most stores and at most leading Indian stores outside of India.

Sooji ka Halwa~Semolina Dessert, adorned with Chaandi ka Varq~Silver leaf

To use as a garnish, hold the paper with the silver leaf and carefully invert and dab onto the surface of food while it is still warm so that the the silver sticks to the food as you peel away the paper.

Head over here to go through the process in brief.

Luv,
Mona

AddThis Social Bookmark Button

Aloo kay Samosay

March 23rd, 2010 Mona Posted in All-Purpose Flour/Maida, Canola Oil, Carom seeds/Ajwain, Carrot/Gajar, Cilantro/Kothmir (fresh), Cumin seeds/Zeera, Eid/Ramadhan/Iftaar, Garam masala powder, Ghee, Ginger/Adrak, Hyderabadi special, Kasuri methi, Lemon/Nimbu, Mustard seeds/Rai, Nigella seeds/Kalonji, Peas/Matar, Red Chilli powder, Red Potatoes, Roasted Coriander powder, Roasted Cumin powders, Salt/Namak, Turmeric/Haldi, White Potato/Aloo, Whole Wheat Flour/Durum Atta 17 Comments »

Chai shops, bakeries, mithaiwala shops, cart vendors, chat bhandars along the length and breadth of the Indian subcontinent, all sell these magical pastries. Originated and traveled to India possibly from the Middleeast, Samosas are triangular pastries, a popular street food, usually stuffed with minced meat, or a potato mixture. They are the usual appetizers that make their presence at the Nizami Hyderabadi meals, and also enjoyed throughout India and also all over the world by everyone. Samosas are also very famous in Toronto and loved by people here.

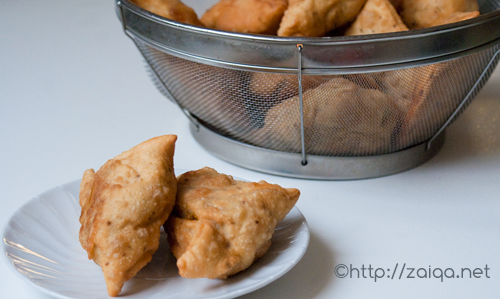
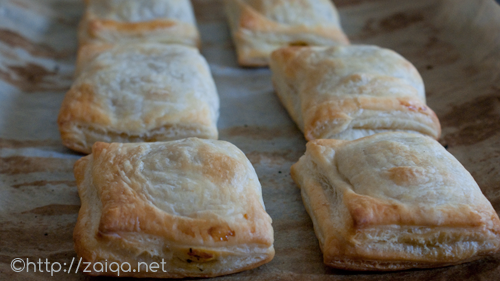
Samosas – ready to be eaten

This classic Indian snack food appears in different avatars and types within the Hyderabad city, and also all over India with minor regional variations, some differing in the fillings used, others varying in shapes. For example Luqmi, a rectangular qimah-minced meat stuffed appetizer commonly eaten in Hyderabad, is a royal cousin of samosa. Other regional variants of samosas include the sambusak, samusak or shingara etc.

Today I had prepared some aloo samosas~potato stuffed pastries that are just as good as the Qimah Samosas – minced meat stuffed samosas. You can even bake them if you wish, bit I like to deep fry and prepare them the way they were supposed to be made. The crisp outer texture of samosa is what I love the most.

Aloo kay Samosay – Potato Stuffed Triangular Pastries

Ingredients:

Canola Oil to deep fry
For Filling:
Canola oil – 2 tbsp
Cumin seeds – 1 tsp
Black mustard seeds – 1 tsp
Fresh Ginger – 1 tbsp, finely grated
Potatoes – 4, peeled and chopped
Carrot – peeled and chopped, 1 cup
Red chilli powder – 1 tsp
Dry roasted Coriander powder – 3/4 tsp
Dry roasted Cumin seed powder – 1/4 tsp
Kasuri methi – 3 tbsp
Salt – 1 tsp
Frozen green peas – 1/2 cup (or) Dried green peas – 1/2 cup, soak them in surplus water overnight and pressure cook until soft the next day, drain and keep aside to use
Lemon juice – 4 tbsp
Garam masala – 1/2 tsp
Cilantro – 2 tbsb, finely chopped
For Covering:
All-purpose flour/Maida – 1 cup
Whole wheat flour/Durum flour – 1 cup
Carom seeds/Ajwain – 1 tsp
Nigella seeds/Kalonji – 1/2 tsp
Canola Oil or Ghee – 2 tbsp
Water
Salt to taste

Method:

1. In a saucepan, heat oil and as soon as it warms up add the cumin seeds, mustard seeds and ginger and let them splutter. In a few seconds add the chopped potatoes and carrots. Add water to cover the vegetables and add red chilli powder, salt, cumin seed powder, kasuri methi and cover with a lid. As soon as the potatoes are done, uncover and add the frozen peas or cooked dried peas, garam masala, chopped cilantro and lemon juice. Cook while stirring until the mixture is dry. Keep aside.

2. Now prepare the dough. Add maida, ajwain, kalonji and salt in a mixing bowl and mix. Add canola oil or ghee and mix well using fingers. Gradually add water and knead to form a smooth and pliable dough. Turn the dough onto a floured work surface and knead until elastic. Cover with a towel and keep aside for 30 minutes for the dough to rest. Later shape the dough into 8 balls and cover them with a towel.
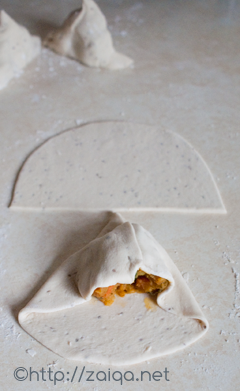
3. One by one roll the balls into thin ovals. Using a pizza cutter or a knife cut each oval in the center into two halves, thus a total of 16 half-ovals will be produced. Cover the rest with a towel while filling others. Take a half-oval and brush half of each straight edge using your fingertip with water. Fold the second half of the straight edge over the fist half to form into a cone. Pinch close the seam. Hold the cone with the open end up and fill the cone with some of the filling. Cut off any excess dough and use it later. Brush one side of the open end with water. Pinch to seal the top edges enclosing the filling. Prepare all the samosas the same way and keep them covered under a towel.
4. Once all are ready, heat oil in a deep saucepan or kadai. To test if the oil is ready to be used, drop a pinch of dough into the hot oil, the dough should come up within a few seconds. Deep fry the samosas a few at a time until golden. Using a slotted spoon remove them into a strainer. Serve warm along with tamarind chutney or ketchup. Once cool, they can even be stored in the refrigerator for 2-3 days and reheated in the oven.

To Bake the Samosa:
After step 4, place the samosas in a greased or non-stick baking tray. Bake in a pre-heated 220° C oven for 20 minutes or until light brown in color. Serve immediately

Note:
1.If you are finding it difficult to enlcose the filling in the dough this way, please head over to Qimah Samosa-Minced meat stuffed samosa where I have explained an easier way to assemble samosas.
2. If there is any left over dough and the filling has been used up, you can make namakpaare out them.
3. If there is any left over filling and the dough has been used up, use the filling to make vegetable curry puffs.

This month Sailaja is on a chaat spree and she is dishing out varieties of chaat items on her blog. Head over her blog to go though them all.

Luv,
Mona

AddThis Social Bookmark Button

Ande ka Meetha

January 26th, 2010 Mona Posted in Cardamom/Elaichi, Egg/Anda, Eid/Ramadhan/Iftaar, Ghee, Hyderabadi special, Khoa, Milk and Milk Products, Sugar/Shakkar 29 Comments »

At the very onset, I wish all my dear Indians, a very happy Republic Day! Mera Bharat Mahaan!

During my childhood, somedays when suddenly cravings for this meetha would tingle my dear Papa’s taste buds, he would roll up his sleeves and get ready to prepare his favorite dessert, Ande ka Meetha (also referred to as Ande ka Halwa or Ande ke Lauz). My Ammi preferred it, because the preperation of this delicious dessert involves a rigorous stirring throughout the process which required a manly strength.

Papa often used to prepare this meetha in the winter months so that we get to enjoy it the season long. Crumbly, sweet with a taste of eggs and milk solids roasted in ghee, this meetha will surely become of your favorites.

So, here’s the recipe for Ande ka Meetha. Today I prepared a small quantity of this meetha, according to the instructions my Papa gave me on phone this morning. Love you Papa, this is for you!

Ande ka Meetha – Crumbly Egg Squares Dessert

Ingredients:

Milk – 500 ml
Home-made Khoa – 200 gms (or equal quantity milk powder)
Eggs – 6, large
Granulated white sugar – 250 gms (1 cup) (you can add more if you want)
Green cardamom/Elaichi powder – 1/2 tsp
Home-made Ghee – 125 ml (1/2 cup)

Method:

1. In a saucepan, boil milk. Once boiling, add the khoa and let it dissolve. Keep stirring continuously and let the milk cook until the amount is reduced to 500 ml, and the khoa has completely dissolved and the milk has slightly thickened. Remove from heat and let it cool.
2. Once the cooked milk+khoa is cool, pour into a mixing bowl. Add all the remaining ingredients and whisk using a fork until well blended.
3. In a thick bottomed non-stick saucepan at medium heat, add the above whisked mixture and cook it stirring continuously throughout. It takes about one hour of continuous stirring throughout the process at medium heat to cook this meetha. After every 10 minutes you will start observing the changes, first the mixture becomes thick, then it starts leaving sides and comes together, then it becomes dryer and dryer with a change in color, then it begins to get granular and browner as you keep roasting it.

Ande ka Meetha

Now is the time to remove the mixture into a thali or a flat platter/tray greased with a bit of ghee. Using the back of a spoon, immediately flatten it clean, and cut it into squares using a greased knife of pizza cutter. Garnish with varq and let it cool completely and store in air tight food storage boxes in the refrigerator. It keeps well for a long time.

Luv,
Mona

AddThis Social Bookmark Button