Perhaps one of the most simplest yet ambrosial meat preparations, made very often in Hyderabadi households, that I love to prepare for my family is Tala huwa Gosht, which means Sautéed meat. Simple seasonings, an aromatic baghaar, and lemon juice are the main flavoring ingredients.
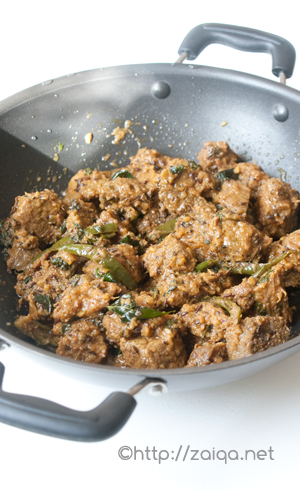
Tala huwa Gosht – Sautéed meat in aromatic spices and herbs
Enjoy this delicious Hyderabadi meat preperation along with Tamatar ki dal, or Khatti dal and Baghara Chawal or plain Khushka.
Tala huwa Gosht – Sautéed meat in aromatic spices and herbs
Ingredients:
Boneless Veal/Mutton meat – 650 gms, washed and drained, cut into small bite size pieces
Sliced yellow onions – 100 gms
Water – 1/2 cup
Red chilli powder – 1 tsp
Salt – 2 tsp
Turmeric powder – 1/4 tsp
Ginger-garlic paste – 2 tbsp
For Baghaar:Canola oil – 2 tbsp
Cumin seeds – 1 tbsp
Curry leaves – 1 sprig
Cilantro – 1/4 cup, finely chopped, loosely packed
Mint leaves – 1/4 cup, finely chopped, loosely packed
Green chillies – 4, each cit into two, then slit into halves in the middleBlack papper powder – 1/2 tsp
Kawabchini – 1/2 tsp, dry roasted in a stovetop frying pan and cooled; once cooled, finely powdered
Lemon juice – 2 tbsp
Method:
1. In a pressure cooker, add the meat, onion, water, red chilli powder, salt, turmeric and ginger-garlic paste. Mix well. Cover and pressure cook for a few minutes until the meat is soft and tender. Make sure it not tough at all.
2. Meanwhile, in a kadai or wok at medium high heat, prepare Baghaar. Pour in oil and as soon as it warms up add the cumin seeds. As the seeds splutter, add the curry leaves, finely chopped cilantro and mint, slit green chillies and fry for just a few seconds and remove from heat. Keep aside.
3. Once the meat is done, let it cook uncovered until all of the liquid has been evaporated. Once almost dry, add it all to the baghaar in the kadai and mix well. Add black pepper power, kawabchini powder and lemon juice. Cook it for 5-10 minutes in the kadai at medium heat and serve immediately.
This recipe is also being featured in the HomeAway.co.uk Travel Cookbook.
Luv,
Mona