Basic How To’s: Series V~ Home-Made Ghee

July 8th, 2009 Mona Posted in Ghee, Home-Made Ghee 10 Comments »

Basic How To: Ghee

Ghee (Clarified Butter) (also referred to as ‘Maska’) is an essential flavoring ingredient in most of the Indian culinary preperations. It is also added as a dollop on warm Khichdi, Idli etc for delicious flavor. Ghee also is used as the culinary fat in some Indian dishes, especially sweets, for richness and lovely aroma and flavor. It is lactose free and rich in Vitamin A. I have never brought Ghee from stores. I always use my own Home-made Ghee.

Ghee is prepared from butter, butter is prepared from cream, and cream is obtained from milk. Back in India my Ammi always prepares Ghee from scratch. Accumulated cream was daily skimmed off milk brought by the doodhwallahs/door to door milk vendors, until the container with cream was full and ready to be made into Ghee (I have explained her procedure below). But here in Toronto, I prepare ghee from store bought unsalted butter for ease of use.
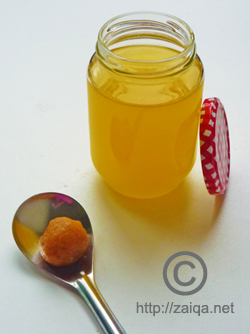
Warm Ghee,
and the strained left over milk solids in the spoon

Ghee from Scratch:

1. Boil milk and then let it cool uncovered. Once it is cool, you will observe that a layer of cream has been accumulated on the top of the milk. Transfer the vessel to the refrigerator very carefully without disturbing the top layer. After about 2-3 hours, using a spoon carefully collect the cream and transfer it to a clean and dry air tight food storage container. Cover and store the container in the refrigerator. Continue collecting cream in this way for a week to 10-15 days until the container is full.

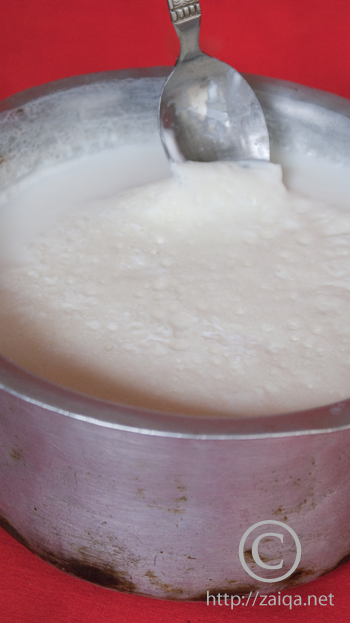
Cream accumulated as the top layer on cooled boiled Milk

2. Once the container is full, using a wood churner or a dal ghotni, or a hand mixer, churn the cream until you see that the butter and whey has started to separate. You can even churn the cream at room temperature in a mixer using ice and cold water until the soft white butter and clear whey has separated. Use this whey which is highly nutritious in other recipes instead of water. Using your hands remove the formed soft butter from the whey and place it in a clean bowl.

Churning collected cream using a dal ghotni

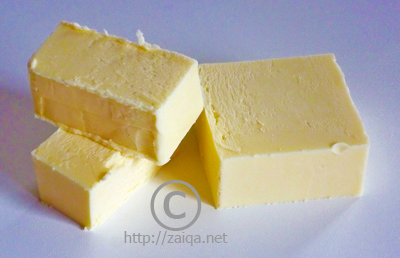
Butter separated from Cream after churning

3. Add the separated butter into a saucepan and follow the steps below under the heading ‘Ghee from Store Bought Unsalted Butter Blocks’.

Note: You can also skip step 2, and directly add the cream at room temperature to a stainless steel saucepan at medium heat. and continue with step 3.

Ghee from Store Bought Unsalted Butter Blocks:

The amount that I have prepared lasts for around 2-3 months in my house (although it can be stored without getting spoiled indefinitely). It may vary depending on the number of members in your house and also on the frequency of use. Always use a dry clean spoon for Ghee whenever you want to use it.

Required:

Finest Quality Organic Unsalted Butter – 1 lb, 454 grams cut into small size blocks
Fine Wire Mesh Strainer
Heat proof canning or bottling glass jar like the Mason jar, or food safe glazed ceramic jar or stone jar or a terrine or stainless steel container, with tight fitting lid

Unsalted Store Bought Butter Blocks

Method:

In a heavy bottomed medium size stainless steel saucepan, heat the butter blocks on medium high heat.
Once melted, you will observe a large amount of froth/foam on the top. This takes about 6-8 minutes on medium high heat. Immediately lower the heat to lowest and let cook uncovered for 40-45 minutes. During this time the froth/foam will slowly dissapear, the milk solids have seperated and will sink to the bottom. Using a spoon very gently push aside the foam to check the color of the milk solids in the bottom. You will notice the milk solids have begun to turn into beige brown in color. Keep a close eye and do not let the milk solids turn into dark brown in color. The Ghee will also start emanating a pleasing nutty aroma. If a drop or two of cool water is dropped into the cooking ghee, a crackling sound is produced. (This is because all the water from ghee has been boiled off)

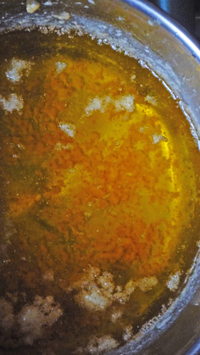
Ghee Solids turned into beige brown color and settled in the bottom.
Notice the foam has also been almost disappeared

Immediately at this stage, remove the ghee from heat and let cool slightly. Strain the ghee using a fine wire mesh into a completely dry jar to store. Reserve the left over milk solids in the strainer for later use. Do not cover the jar until the ghee is completely cooled at room temperature, it will take a few hours. The ghee solidifies into opaque beige-golden colored granulated mass when no longer warm. Ghee has a very long shelf life. Store it refrigerated in air-tight jars with care and it will last very long (during winters I store my Ghee jar at the countertop, and in summer i store the Ghee jar in the refrigerator).

You can add the reserved milk solids to any curry, rice, dessert, or to the dough while you prepare Roti/Paratha or any other flat bread for delicious flavor.

This post is my contribution to the event Back to Basics originally stated by Jaya, and currently being hosted by Aqua at Served with Love.

Luv,
Mona

AddThis Social Bookmark Button

Shakkarpaare

June 17th, 2009 Mona Posted in All-Purpose Flour/Maida, Canola Oil, Ghee, Salt/Namak, Sugar/Shakkar 7 Comments »

Shakkar-paare are deep fried sweet confectionary bites made out of refined flour, ghee/oil, and a simple sugar syrup. A similar kind, which are savory are called as Namak-paare, in which salt and cumin seeds are added for taste instead of sugar.

Shakkarpaare

Your truly loves Shakkappaare, he has a big sweet tooth. So, I occasionally prepare a small batch upon his request. Kids will also enjoy this sweet treat.

Shakkarpaare – Sweet Bites

Ingredients:
Makes: 1 cup approx

All purpose flour/Maida – 1/2 cup
Sugar – 3 tbsp
Water – 1/4 cup
Canola oil/Ghee – 1 tsp
Salt – 1 pinch

Method:

1. In a saucepan, add water and sugar. Boil for 3 minutes. Remove from heat and let cool until lukewarm.
2. Sift flour into a bowl along with salt. Pour oil/ghee and add lukewarm sugar syrup, a little at a time, and mix well to form a soft dough. Knead the dough for a minute, and cut the dough into two equal halves. Cover the dough halves with a damp kitchen towel.

Doughball

3. Meanwhile heat oil in a kadai or a non-stick deep saucepan or a wok to deep fry.

Rolled out dough cut into squares

4. Take one half of the dough and using a rolling pin roll it into a disc, about half cm in thickness. Sprinkle a little bit of flour only if needed. Cut the rolled out dough into squares using a knife or a pizza cutter.
5. Deep fry the cut squares until golden brown in color. Remove using a slotted spoon into a wire mesh strainer for the oil to drain away. Enjoy as a snack.

Interesting Read: Losing Food Identity by Cynthia.

Luv,
Mona

AddThis Social Bookmark Button

Puran ke Laoz

March 14th, 2009 Mona Posted in Chane ki Dal, Ghee, Jaggery/Gud, Khoa, Pinenuts/Chilgoze, Pistachios/Pista, Sugar/Shakkar 12 Comments »

Chana dal, or split bengal gram are an essential item among Pulses in Indian cooking. The other dals most commonly used by indians in their everyday cooking are Tuvar dal or yellow lentils, Masoor dal or Red lentils. These three pulses or dals are the basic source of protein intake in an Indian, chiefly vegetarian diet. Mostly savory dishes are prepared out of dals, but a few of the sweet dishes like the one I am writing today are my favorites.

Chana dal and a block of Jaggery/Gud

My Ammi prepares the following halwa a lot. It brings back many sweet memories from my childhood. It is a simple meetha, which everyone will enjoy, and it is healthy too. It has got chana dal which are rich in proteins, ghee which has got many health benefits and lots of nuts to add flavor and richness.

This meetha is quite subtly sweetish in taste. Once this meetha is done, it is spread out evenly on a flat greased dish and left to set until cool. It is then cut into diagonal pieces, hence called laoz. You can always add more sugar or khoa for flavor according to your preferences. The prepared chana dal or split bengal gram paste is called as ‘Puran’. It is also used as a stuffing for Parathas, just like Aloo Parathas, to prepare ‘Mitthi Roti’, and also as a filling in the ‘Halwa/Puran Puri’ which are the halwa stuffed deep fried pastries/puri which I will write about soon. Khoa and nuts are added to the Puran for that purpose.

Kadai

It is better to prepare this meetha in a non-stick heavy bottomed kadai or saucepan, so that it wont stick to the bottom and burn. A kadai is a deep Indian kitchen utensil. It is wok shaped, has thick walls, usually used to for deep frying purpose. Mine is a new addition to my kitchen utensils, recently gifted to me by my MIL.

Puran ke Laoz – Bengal gram Halva

Ingredients:

Chana Dal – 1 cup
Sugar – 75 grams
Jaggery – 40 grams
Powdered cardamom pods – 1/4 tsp
Khoa – 3 tbsp
Ghee – 2 tbsp
Finely chopped nuts (walnuts, pistachio, almond, pine nut) – 1/8 cup
Slivered nuts – for garnish

Puran ke Laoz – Bengal gram Halva

Method:
-Soak the dal for about 3-6 hours in surplus cool water. Later, drain and wash the dal. Pressure cook the dal in fresh cool water, until it is soft. Let cook until there is little or no water left. Once cool, puree it to a fine paste in a blender.
-Grease a stainless steel thali or any swiss roll tin with a little oil/ghee. Keep aside.
-Put the paste into a non-stick Kadai at medium heat. Add the powdered cardamom powder, ghee, jaggery, sugar and khoa. Mix well and keep stirring continously and let it cook until it thickens, no longer sticks and leaves sides of the pan. It will take around 20 minutes (time depends on the amount of water in the paste). Once done, stir in the chopped nuts. This is the Puran. Put the puran on the greased thali or swiss roll tin and spread it evenly to a thickness of 1 cm or half inch. Flatten the surface using a flat spatula. Once a little bit cool, put it in the refrigerator for an hour to serve later.
You can store these meetha stacked in an air tight food storage box for upto a month.

Luv,
Mona

AddThis Social Bookmark Button

Chuqandar ka Halwa

March 10th, 2009 Mona Posted in Beetroot/Chuqandar, Confectionary, Eid/Ramadhan/Iftaar, Ghee, Half and Half Cream, Hyderabadi special, Pistachios/Pista, Raisins/Kishmish, Sugar/Shakkar 13 Comments »

Chuqandar, in Urdu, also called as Beetroot in English are one of my favorite veggies. This nitrate rich, gorgeous root vegetable is best eaten as a salad, roasted, boiled or steamed and then seasoned lightly for added flavor. They are high in fibre, calcium, potassium, folate, antioxidants, vitamin A and C, minerals and other micro nutrients and quite low in calories. They are also used to treat hypertension and hence maintain a healthy cardio vascular system.

Beetroot – Chuqandar

Be careful when you are working with these ground vegetables, as its juices tend to stain whatever comes in contact, like your hands, chopping board etc.

Beetroots are also commonly referred to as Sweet Beets, as they are very sweet in taste. They have a unique earthy sweetness in them, and are hence perfect for halwa or a dessert to serve on special occasions.

Serves – 2 to 4

Chuqandar ka Halwa – Beetroot Dessert

Ingredients:

Beetroot – 1, medium sized, washed, peeled and coarsely grated
Fat free Half and Half cream – 1 cup
Sugar – 4 to 5 tbsp or according to taste (the amount of sugar depends on the size and sweetness of the beets)
Ghee – 1 tsp
Finely slivered blanched almonds+pistachios – 1 tsp
Raisins + chopped walnuts – 1 tsp

Beetroot Dessert -Chuqandar Halwa

Method:

-Heat a thick bottomed non-stick saucepan at medium heat and add the grated beetroot.
-Pour in the cream and let simmer uncovered on low until most of the cream has been absorbed by the beetroot. Keep stirring it occasionally.
-During the mean time, heat ghee in a pan at medium heat and throw in the prepared dry fruits and nuts. Roast them until they turn golden brown. Reemove from heat and keep aside.
-Add sugar to the cooking beetroot and let cook for a furthur 5 minutes or until the halwa is thickened.
-Serve warm or cold garnished with the roasted dry fruits and nuts in ghee.

I am sending this royal halwa over to RCI-Lucknow cuisine.  

For some more ideas on how to use beets, head over to the healthnut blog.

Luv,
Mona

AddThis Social Bookmark Button

Sabut Zafraani Murgh

February 19th, 2009 Mona Posted in Butter/Makhan, Carrot/Gajar, Egg/Anda, Ghee, Ginger-Garlic paste, Lemon/Nimbu, Poultry/Murgh, Red Potatoes, Rosemary (dried), Sea Salt, Sugar/Shakkar, Thyme (dried) 11 Comments »

Baking during the winter season gives a lot of pleasure to me. It provides the warmth needed and enlivens the arid spirit inside us during these dull and cloudy days. I thank my god that I have a conventional oven that I love to use during these icy days.

Carved Roasted Chicken
served along with Roasted Veggies and Lemon slices

Roasting a whole chicken is not as laborious and redoubtable is it is considered to be. I love to roast whole chickens. Roasted chicken is perfect for a party dinner and comforting in the cold weather. Roasted red potatoes and carrots also bring seasonal color and nutrition to the dish.

Tip: To remove the skin of the chicken, use paper towels. Hold the chicken skin with a paper towel and pull it. This way your hand wont get slippery and the task is a piece of cake.

Sabut Zafrani Murgh – Saffron infused Whole chicken

Serves: 4 to 6

Ingredients:

For Brine:

2.5 litre fresh water
Salt – 3 tbsp
Sugar – 2 tbsp
Garlic pods – 2, crushed
Bay leaves -2

For Chicken

1 medium whole roasting chicken, skinned/Sabut Murgh (Preferably Fresh)
Black Pepper powder/Kali mirch, used liberally
Sea Salt/Namak, used liberally
Ghee/Butter – 3 tbsp (you can subsbitute it with Canola oil)
1/4 tsp Saffron/Zafraan, pounded
1 tsp Ginger-Garlic/Adrak-Lahsun paste
1/2 tsp Dried thyme
1/2 tsp Dried rosemary
1 large Egg/Anda, hard boiled and peeled
1 large Lemon/Nimbu, cut into two halves (one half used as stuffing and the other half juiced to season the chicken)

For Vegetables

5 Red Potatoes, quartered/Aloo
1 cup baby Carrots/Gajar (you can even use large carrots, peel  and cut them into pieces)
Black Pepper powder/Kali mirch, used liberally
Salt/Namak, used liberally
Ghee/Butter – 3 tbsp (you can subsbitute it with Canola oil)
Dried thyme
Dried rosemary

Stuffed and Seasoned Whole Chicken
on the bed of spiced veggies ready to be roasted

Method:

-Remove the giblets and neck from the chicken and discard or freeze for future use.
In a large pot pour 2.5 litres of cold water. Add the remaining ingredients for brine and let the water boil once. Remove from heat and let it cool down completely. Once cooled, place the chicken in the brine, breast side down. Cover and refrigerate overnight if possible or atleast for 2 hours.
-With the rack in the middle position, preheat an oven to 450°F.
-Remove the chicken from the brine. Wash with cool water and pat dry throughly both inside and out with paper towels.
-Pound the saffron with ginger-garlic paste, ghee/butter, lemon juice, salt, black pepper powder, rosemary and thyme in a mortar and pestle until well combined and keep aside.
-Rub the chicken inside and out with the prepared saffron+spices paste and place the boiled egg, a halve of the lemon in the cavity of the chicken.
-Truss the bird. This means binding the legs and wings close to the body of the bird so that the meat is protected during cooking and the finished shape of the roasted bird is pleasing.
-Combine carrots and potatoes in a large oval ceramic baking dish with a rack. Spread into one layer in bottom above the rack. Douse them with ghee/butter and liberally sprinkle with black pepper powder and salt. Carefully place the stuffed chicken, breast side up, on the bed of seasoned vegetables.
-Roast the chicken at 450°F for the first 20 minutes and then lower the oven to 350°F for another 45 minutes or until juices run clear when pricked with knife, and thermometer insterted at thickest part of thigh next to body registers 180°F. Keep basting the chicken with ghee/butter and with the juices collecting below the rack in the baking dish and turn the chicken for even cooking every 20 minutes.
-Once done, remove the chicken from the oven and place in a warm place, loosely covered with aluminium foil and let rest for 5 to 10 minutes. Remove the trussing thread and carve to serve.

I have recently updated a new theme for my blog. Hope you all like it like I do.

Luv,
Mona

AddThis Social Bookmark Button