Chanay ki Dal

October 1st, 2007 Mona Posted in Black Peppercorns, Chane ki Dal, Cilantro/Kothmir (fresh), Eid/Ramadhan/Iftaar, Green Chillies, Hyderabadi special, Lemon/Nimbu, Salt/Namak, Simple Kitchen Tips, Turmeric/Haldi 12 Comments »

Fall’s here! My first Fall here in Toronto insallah. I love the trees in this season, with colors of the leaves ranging from red, orange, yellow and some shades of green, nature’s beauty I must say! Earlier I only got to witness these beautiful sceneries in movies, but now I am able enjoy it all right in front of my house! I love to go out on walks, perceiving it all, and I thank my God for making Earth a beautiful place to live in, with all sorts of visual pleasures for humans to enjoy, admire and be thankful.

It has also become cold, and I look forward to the winter, again.. will be my first winter here. My hubby sometimes scares me, telling me about the temperatures going very cold, and it being shivering cold here during the peak in winter. I just am looking forward to see snow all around, hoping it wouldnt be so terrible as described inshallah.

Well, this recipe is one of the most easiest recipes, a Ramadan special served at Iftaars. Its an instant light snack and very nutritious.

Tip: While you are preparing dals, it is always necessary to pre-soak them in surplus water for 4-6 hours preferably. And then to drain and discard the water and wash the dal well in fresh water. The water in which the dal was soaked should never be used for cooking and should always be thrown away coz if you use that water, chances of intestinal gas (flatulence), bloating and abdominal cramps are higher, and you do not want to end up with that. If you do not have time to presoak the dal, you can use it as it is, but you should throw away the water in which you boil the dal.. losing some of the vital water soluble vitamins, so I always only pre-soak my dals. In the later case, you need not throw away the water used to boil it, as the water while soaking them was already thrown away.

Here goes the recipe:

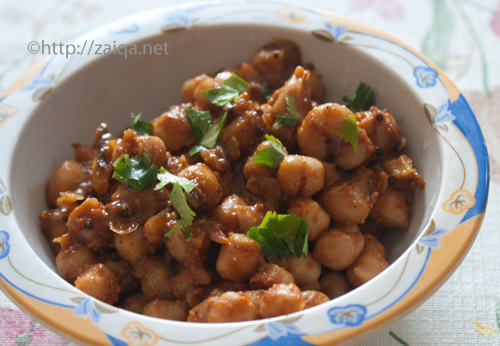
Chanay ki Dal – Lemony Boiled Split Bengal Gram

Ingredients:

Split Bengal Gram/Chana Dal – 1 cup
Turmeric – 1/2 tsp
Salt – to taste
Black Pepper Powder – to taste
Finely chopped small green chillies – 1 tbsp
Cilantro – 1/2 cup, finely chopped
Mint leaves – 2 tbsp, finely chopped
Lemon Juice – to taste
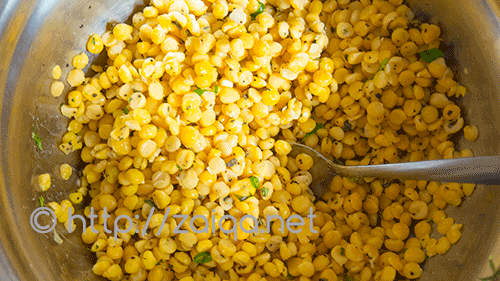
Chanay ki Dal

Method:

1. Wash and soak the dal for 4-6 hours preferably. Drain the water away and wash them well.
2. Now boil them in warm water, taking care you do not add too much of water to it. When the dal has softened up, make sure it not mushy and still in its shape, (the water shouldn’t be there, it should be dry). So, while boiling water, add only a cup of water and if it dries up before the dal being softened, add little more amount of warm water to it.
3. Remove the dal and add black pepper powder, salt, cilantro, lemon juice and chopped green chillies. Serve it warm.

This delicious dal is my entry to the event ‘Delicious Dals from India’ being hosted by Suma at her blog Veggie Platter.

Luv,
Mona

AddThis Social Bookmark Button

Tandoori Murgh

September 10th, 2007 Mona Posted in Butter/Makhan, Coriander seeds, Cumin seeds/Zeera, Eid/Ramadhan/Iftaar, Garam masala powder, Ginger-Garlic paste, Hyderabadi special, Lemon/Nimbu, Milk and Milk Products, Poultry/Murgh, Red Chilli powder, Saffron/Zafraan, Salt/Namak, Turmeric/Haldi, Yellow Onion/Pyaaz, Yogurt/Dahi 15 Comments »

Tandoori Chicken is a classic Indian dish. The chicken is marinated in yogurt spiced with ginger garlic and other aromatic spices and some edible food colour. It is left to marinate for minimum 6-8 hours, or for best flavor~overnight, in the refrigerator. During Ramadhan, you can marinate the chicken pieces a day ahead, and just before the iftaar time, you will have to grill them up, and keep them warm in an oven.

Tandoori Murgh – Chicken Marinated in a mixture of Yogurt seasoned with Spices

Traditionally the Tandoori chicken is made in a Tandoor(Indian clay oven) but today I prepared it in the oven. During summer I prepare it in a Charcoal BBQ Grill for a delicious smoky flavor.

Tandoori Murgh – Chicken Marinated in a mixture of Yogurt seasoned with Spices

Ingredients:

Chicken – 1, skin removed, cut into big 8 pieces (approx)
Lemon juice – 6 tbsp
Salt – 3 tsp
Yellow Onion – 1, large, roughly chopped
Ginger-garlic paste – 3 tsp
Saffron threads – 1 big pinch
Milk – 1 tbsp
Butter – 2 tbsp
Roasted Coriander seed powder – 2 tsp
Roasted Cumin seed powder – 2 tsp
Thick Yogurt – 1 cup
Red Chilli powder – 2 tsp
Kasuri Methi – 2 tbsp
Garam masala – 1 1/2 tsp
Turmeric Powder – 1 tsp
Butter – for basting the chicken

Method:

1. Wash and pat dry the chicken with paper towels, then make incisions on the chicken pieces at the thick parts. Soak Chicken in lemon juice and salt for 2 hours. This is the first marination.
2. Meanwhile prepare the second marination mixture. Grind the roughly chopped onion into a smooth paste and keep aside. Warm the milk slightly and add the saffron threads to it. Let them steep into the milk for again two hours, till the chicken has marinated in the first marination mixture. Now, in a bowl, mix the processed onion paste, thick yogurt, saffron threads with milk, and all the other ingredients except the last one, with the chicken marinating in salt and lemon juice. Rub the mixture well into the chicken. Cover and put the bowl in the refrigerator for 8 hours or preferably overnight, for a great taste.
3. Remove the chicken from the marinade. Preheat the charcoal BBQ and grill the chicken pieces, turning and basting them with butter as needed. Grill and cook chicken for 25 minutes till done and but still tender. Alternatively, you can grill/broil/bake it in the oven at low heat again turning and basting them with the butter as needed. Bake it in the oven for 25 – 30 minutes at 400°F turning them once after 15 minutes and basting them with butter. Pierce the chicken with fork to check if it is done. Garnish with onion rings, lemon wedges, sliced green chillies and serve.

Note: 1. The tempetarures and time used to cook chicken depends entirely on the size of the chicken pieces and the type of oven used. So, it varies. Keep a check on the chicken and make sure you not burn it or do not under cook it.
2. Usually for Tandoori chicken an edible red food color is used during marination for appeal, but I have avoided using it.
3. You can also use a whole skinned chicken to prepare a whole roasted tandoori chicken. For this purpose, make incisions on the chicken on the breast part, thighs and legs. Then let marinate covered in the refrigerator overnight. The next day, bake in a roasting pan with rack uncovered at 400°F for 30-45 minutes, turning the chicken once in the middle. Once done, carve and serve along with salad.

Luv,
Mona

AddThis Social Bookmark Button

Garma-Garam Qimah Samosa

August 25th, 2007 Mona Posted in Blog Events/Entries/Polls, Butter/Makhan, Canola Oil, Coriander seeds, Cumin seeds/Zeera, Eid/Ramadhan/Iftaar, Garam masala powder, Ginger-Garlic paste, Green Chillies, Lamb/Beef/Mutton/Veal/Sheep, Lemon/Nimbu, Mint/Pudina (fresh), Nutmeg, Red Chilli powder, Salt/Namak, Turmeric/Haldi, Whole Wheat Flour/Durum Atta, Yellow Onion/Pyaaz 24 Comments »

Samosas are triangle shaped Indian pastries that are filled with meat or vegetables, or both. The filled pastries are generally deep-fat fried but can also be baked. These pastries are eaten as snacks or appetizers. I’m a BIG fan of Samosas. I and my hubby usually go and get potato stuffed samosas for us all from the Samosa King Embassy Restaurant here, but today I thought of preparing them at home, Hyderabadi style.

This non-veg version of Samosas are my favorite,, which I prepare occasionally at home. I will also post the recipe of Aloo/Potato Samosas very soon in the coming days. I remember the wonderful aromas of all kinds of snacks and appetizers and the fast foods… tempting us to stop by from the road side stalls on the way home from College back in India. My Mom also used to make these samosas in large quantities in the month of Ramadhan, when we all Muslims fast, and at occasions or celebrations. This is my Mom’s recipe, and here it goes:

Qimah Samosa – Spicy Ground Meat Samosas

Ingredients:

For the Dough
Wheat Flour (Durum Atta) – 1 cup + Extra flour while rolling the dough
Salt – 1/2 tsp
Canola oil – 2 1/2 tbsp (optional)
Warm Water – 1 cup
For the Filling
Canola Oil – 2tbsp
Yellow Onion – 1, chopped
Ginger-Garlic Paste – 1 1/2 tsp
Coriander seed/Dhaniya powder – 1 tsp
Cumin seed/Zeera Powder – 1 tsp
Tumeric/Haldi powder – 1/2 tsp
Red Chilli powder – 1/8 tsp
Garam Masala powder – 1/2 tsp
Minced Lean Lamb meat – 200 gms
Salt – 1 tsp
Lemon juice – 1 tbsp
Mint leaves – 1 tbsp, finely chopped
Green chilli – 2, small, finely chopped
Canola Oil for deep frying the Samosas.

Method:
For the Dough
1. Sift the flour and salt together in a bowl. Rub in oil and gradually add water.
2. Knead and mix the dough, preferebly 10 minutes, until it is soft and leaves the side of the bowl.
3. Cover the bowl with a plastic wrap and keep aside at room temperature for 30 minutes.
For the Filling
4. Pour oil in a heavy bottom pan over medium heat and fry the onion till it changes color. Add the ginger garlic paste and stir fry. Lower the heat and add the cumin, coriander, turmeric powder, red chilli powder, salt and garam masala powder and mix well. Add the minced meat and stir it well, mashing it against the walls of the pan, with the spoon to prevent it from forming lumps. Add lemon juice, chopped mint leaves, green chilli and stir well. Cover and cook it until the mixture is dry. Remove from heat and let it cool.
5. Now, Lightly knead the rested dough. Divide into 8 balls and press each ball and cover with a plastic wrap.

The Dough Balls

6. Now roll out each ball, one by one, on a lightly floured work surface woth a rolling pin into approx 12 cm circles.
7. Cut each circle into semi circles and brush the edges with water.

Preparing Samosas

8. Put a generous teaspoon of the filling on one half of the semi circle and fold the free half over the filling to form a triangle.
9. Press the edges firmly to seal.
10. Fold until all the samosas are ready.

Prepared Samosas ready for frying

11. Heat oil in a wok or kadai or a deep, heavy bottomed sauce pan until it begins to sizzle.
12. Fry the Samosas, a few at a time, on medium heat, gently, until they are golden brown in colour.

Frying Samosas

13. Remove with a slotted spoon and drain on absorbent paper. The Samosas are ready to be served.

To Bake the Samosa:
After step 10, place the samosas in a greased or non-stick baking tray. Bake in a pre-heated 220° C oven for 20 minutes or until light brown in color. Serve immediately

This recipe goes as a contribution to Hima for the event ‘Whats Your Favourite..’ she is holding. For this time, the theme is ‘Whats your favourite Snack’. I’m sure her inbox will soon be overflowing with lots of snacks. So, it will a snack party at Hima’s place in the month of September. Be sure to drop by at here place! Eagerly and impatiently waiting for the round up Hima.

These Samosas make great Snacks, or you also serve them as Appetizers. Enjoy.

Luv,
Mona

AddThis Social Bookmark Button

Poori aur Cholay

August 19th, 2007 Mona Posted in Blog Events/Entries/Polls, Canned Tomato paste, Canola Oil, Cumin seeds/Zeera, Eid/Ramadhan/Iftaar, Hyderabadi special, Kabuli Chana, Lemon/Nimbu, Red Chilli powder, Salt/Namak, Turmeric/Haldi, Vegetables/Tarkariyaan, White Potato/Aloo, Whole Wheat Flour/Durum Atta, Yellow Onion/Pyaaz 11 Comments »

Soft deep fried Pooris along with delicious spicy Cholay was my breakfast today, or call it a lazy weekend brunch.

There’s something about Poori’s that everyone loves. This breakfast is a favorite in my house. The prepared dough is rolled into a circular disc just like it is done for parathas or chapatis, but instead of being cooked on a hot griddle, they are deep fried till nicely puffed like a baloon.

I had posted the last time about the Palak Poori, in which spinach in added to the dough of poori for a different flavor. Today’s poori’s are plain poori’s, which people usually enjoy alongside a potato curry, or a chickpea curry called cholay. It is a classic Indian breakfast.

This recipe goes as a contribution to Anita of ‘A Mad Tea Party’ for holding this Party of Poori’s.

Poori – Deep Fried Puffed Bread
Makes: 14 pooris

Ingredients:

Durum Wheat Flour – 3 cups (or) 1 1/2 cups whole wheat flor + 1 1/2 cups all purpose flour
Salt – 1/4 tsp
Canola oil – for deep frying
Lukewarm Water – about  1 1/2 cups

Golden deep fried puffed Pooris ready to be eaten

Method:

1. Add flour and salt in mixing bowl and mix. Add water a little at a time and mix to form a kneadable but stiff dough. Soft dough will absorb more oil while deep frying. Knead the stiff dough for 5-8 minutes until soft. Divide the dough into 3 parts. Roll each part into a cylinder. Cut/pinch each cylinder into 8 pieces. Roll each piece into smooth and even balls between palms of your hands. Cover the balls with a damp towel.
2. Roll out all the dough balls one by one on a lightly floured board to a circular disk (approx 12 cm diameter) and arrange them on a tray. Turn the disk several times to make even circles. Use as less flour as possible while rolling the pooris. Do not roll the poori’s too thin, or else they will not puff up like a baloon.
3. Heat approximately 2 inch of oil in a deep frying pan or kadai/wok. (Never use non-stick pan for deep frying). Drop a tiny ball of dough into the hot oil, if it rises quickly then the oil is ready to deep fry the pooris. Slip a rolled out poori into the hot oil, making sure it does not fold over. Using a slotted spoon gently press the poori in the centre into the oil while rotating it and spoon hot oil continually over the cooking poori. Within seconds it puffs and swells and turns into a lovely light golden color. Turn over and fry other side in the same way. When both sides are pale golden brown, remove to a paper lined tray and continue frying until all the pooris are cooked. Do not stack them. Stacking deflates the puffed up pooris and makes them soft. My hubbby likes soft pooris so I stack a few especially for him. Serve immediately while still hot along with Cholay. Pooris can be kept warm for a few minutes in 200°F oven if stood on their sides without crushing them. The pooris will deflate eventually if left uneaten, but they will still taste great. You can also use them as a great snack along with any curry of your choice for picnics and while travelling.

Cholay – Chickpeas in a spicy sauce

Ingredients:

Dried whole Chickpeas/Garbanzo beans/Kabuli Chana – 1 cup
Ginger garlic paste – 2 tsp
Salt – to taste
Turmeric – 1 tsp
Dry roasted Ground Cumin seed powder – 1 tsp
Dry roasted Ground Coriander seed powder – 1 tsp
Turmeric powder – 1/4 tsp
Red Chilli powder – 1/2 tsp
Green chillies – 3, finely chopped
Tomatoes – 3, medium sized, finely chopped
Yellow Onion – 2, medium sized, chopped
Oil – 2 tbsp
Cilantro – 1 tbsp, for garnishing
MDH Chana Masala – 1 tsp
MDH Chaat masala – 1 tsp

Cholay – Chickpeas in a spicy sauce

Method:

1. Soak dried chick peas overnight in plenty of water.
2. Next day, drain the old water and add about 4 cups fresh water, 1 tsp salt and pressure cook until soft. Drain the chickpeas in a colander but reserve the liquid in a bowl.
3. In a heavy bottom pan, pour oil and add the onions, reserving a little amount for garnishing. Cook until they are lightly golden bown. Add the ginger garlic paste and fry along for a minute. Add tomatoes, salt, turmeric, red chilli powder, chana masala, chaat masala, green chillies, cumin powder, coriander powder and cook until the tomatoes are mushy and well cooked. Add the boiled chickpeas, 2 cups of the reserved water and mix well. Mash up a few of the chickpeas to impart a gravy consistency. Let it cook for 10 minutes and remove from heat. Garnish with chopped coriander leaves and chopped onions. Serve along with poori or just as a snack.

Luv,
Mona

AddThis Social Bookmark Button

Chicken with Lychees

August 16th, 2007 Mona Posted in Blog Events/Entries/Polls, Canned Tomato paste, Canola Oil, Capsicum, Ginger-Garlic paste, Gram Flour/Besan, Lychee, Poultry/Murgh, Red Chilli flakes, Red Chilli powder, Salt/Namak, Sugar/Shakkar, Yellow Onion/Pyaaz 1 Comment »

This recipe is my contribution to the event – A fruit a month’ AFAM, which the lovely Sig, of Live to Eat, has hosted for this month with Lychee as the fruit of the month. Many people do not know what Lychee are. Lychee is a fruit, mostly grown in China, and known for its sweet tart flavour. This fruit has a rose coloured skin when young, but as it matures, it develops a hard and leathery rind, which is inedible. It comes off easily leaving behind the jelly like, pearly white flesh with a single inedible seed inside. They are available fresh or canned in most asian stores. Anyways, here’s my entry for the event :

Ingredients:

Marination Ingredients-

  • Boneless Chicken Breast Pieces – 500 gms, cut into 2 cm cubes
  • Salt – 2 tsp
  • Black Pepper – 1 tsp
  • Canola Oil – 1 tsp
  • Sugar – 1/2 tsp

Gravy Ingredients-

  • Gram Flour – 5 tbsp
  • Canola Oil – 3 tbsp
  • Red Capsicum – 1/2 of a large capsicum, chopped
  • Green Capsicum – 1/2 of a large capsicum, chopped
  • Ginger Garlic paste – 2tsp
  • Yellow Onions – 1, finely chopped
  • Canned Lychee in Syrup – 1 can, 565 gms
  • Tomato paste – 3 tbsp
  • Water – 2 tbsp
  • Red Chilli flakes – 1 tsp
  • Red Chilli Powder – 2 tsp

Chicken with Lychees

Method:

  • Drain and reserve all the lychees and a cup of syrup individually in two bowls.
  • Marinate the Chicken in the marination ingredients for preferably 30 minutes.
  • Roll the chicken breast pieces in 4 tbsp gram flour and fry till golden brown. Make sure you do not fry them for too long as breast pieces toughen up too quickly.
  • In a pan on medium heat, in a tbsp of oil, stir fry the red and green capsicum for about 7 minutes. Remove and keep aside.
  • In the same pan add the remaining oil and fry the onions till light brown.
  • Add the ginger garlic paste and fry it along.
  • Add the reserved cup of lychee syrup to it and simmer covered for 5 minutes.
  • Now add the tomato paste and the stir fried capsicum to it and mix well.
  • Dilute the remaining one tbsp gram flour in a 2 tbsp water and pour this into the pan. Let it cook till the mixture begins to thicken up.
  • Add the Chicken pieces and the drained lychees, chilli flakes and red chilli powder and give a good stir.
  • Let it cook on simmer uncovered for 5 minutes.
  • Once ready, Serve it hot.

Luv,
Mona

AddThis Social Bookmark Button