Instant Light Chicken Biryani

August 9th, 2007 Mona Posted in Basmati Rice/Chawal, Blog Events/Entries/Polls, Canned Tomato paste, Canola Oil, Confectionary, Coriander seeds, Cumin seeds/Zeera, Drinks/Sharbat, Eid/Ramadhan/Iftaar, Garam masala powder, Ginger-Garlic paste, Lemon/Nimbu, Poultry/Murgh, Quick fix meals, Yogurt/Dahi 22 Comments »

My earlier version of Chicken Biryani was the traditional kind, but I learnt this version from my Mother in law and is very light and has lesser calories and gets prepared quite quickly when compared to any other type of Chicken Biryani’s. As this Express Cooking Event calls for a meal to get ready in less than 30 minutes, I have used left over cooked plain rice, you guys can always make it fresh if you do not have left over rice. Its a complete meal with Biryani, a dessert, and a juice, and is filling but light on stomach.

My Version of ‘Instant Light Chicken Biryani
Serves – 2

Ingredients:

Canola Oil – 1 tbsp
Chicken Breast – 200 gms, washed, and cut into 2 cms cubes
Salt – to taste
Red Chilli powder – 1 tsp
Yogurt – 1 tbsp
Tomato paste – 2 tsp (optional)
Ginger Garlic paste – 1 tsp
Garam Masala – 1 1/2 tsp
Dry roasted Cumin seed/Zeera powder – 1 tsp
Dry Roasted Coriander/Dhaniya seed powder – 1 tsp
Water – 1/2 cup
Lemon Juice – 2 or 3 tbsp ( as you like)
Saffron threads – a pinch, soaked in 1/4 cup warm milk
Cooked Plain White Rice – 3 cups
Crispy Fried Onions – 2 tbsp

Method: ( Target time to prepare the whole meal – 30 minutes )

1. Put a heavy bottom pan on medium heat, and pour oil into it.
2. Add the chicken pieces, salt and red chilli powder, and fry till golden brown on all sides. This takes probably 7 minutes. When the chicken cubes has been browned properly, adjust the heat to medium high add the yogurt, tomato paste (optional) and ginger-garlic paste and the three dry masalas and stir well. This will take about 5 minutes. Now add half cup water and lemon juice. Cover the lid of the pan for 2 minutes until the water dries up.
3. Now arrange the half of the rice in a microwave safe bowl in a layer, add the cooked chicken breast from the pan on top of the rice in a layer, again arrange the remaining rice layer on top. Sprinkle the fried onions on top and pour the milk with saffron threads evenly on top of rice. All this takes about 5 more minutes
5. Cover and microwave for 3 minutes. The Biryani is ready.
6. Serve the Biryani along with and a Juice and Ice Cream for a heartful meal for two ready in about in less than 30 minutes.

Tip: Adding salt to the water in which you cook rice is essential, or else the whole taste of Biryani turns upside down. One tip if you have forgotten to add salt to the water while boiling rice is – stir the required amount of salt in a little quantity of hot water, about half cup or a few tablespoons, and pour this on the biryani evenly. Warm the biryani in microwave and serve immediately.

Luv,
Mona

AddThis Social Bookmark Button

Bhendi aur Gosht Ka Khatta Salan

August 5th, 2007 Mona Posted in Canola Oil, Cilantro/Kothmir (fresh), Coriander seeds, Cumin seeds/Zeera, Curry leaves (fresh), Eid/Ramadhan/Iftaar, Garlic/Lahsun, Ginger-Garlic paste, Ginger/Adrak, Hyderabadi special, Lamb/Beef/Mutton/Veal/Sheep, Lemon/Nimbu, Okra/Bhindi, Onion/Pyaaz, Red Chilli powder, Salt/Namak, Tamarind/Imli, Tomato/Tamatar (fresh), Turmeric/Haldi, Vegetables/Tarkariyaan, Yellow Onion/Pyaaz 8 Comments »

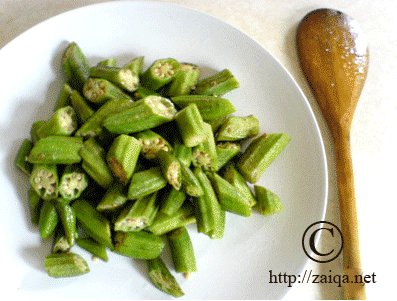
Bhendi, or Okra, is one of my favourite vegetables. It is available very easily in the markets, fresh as well as frozen. I keep buying it from the market very often to cook it for everyone in my home. But, you should always be careful while buying fresh Okra. I always like to buy tender baby okra. Larger pods are tough and fibrous, so look for brightly colored pods smaller than 3 inches (9cm) long, with smooth, unblemished skin and firm texture. Refrigerate okra in a plastic bag for up to three days. Wash okra just before using it.

Bhindi – Okra

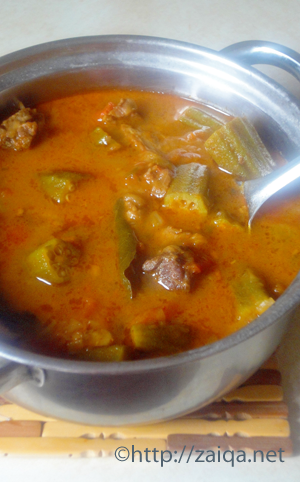
Khatta Salan/Shorba means ‘soured stew’. The sourness from the tomatoes and tamarind, a slight heat from red chilli powder and the subtle sweetness from the roasted onions along with the roasted spices impart an aromatic and delectable flavor to this okra stew. This same base is used in many other versions of the khatta shorba, which are Karele ka Khatta Shorba, Aloo-Gosht ka Khatta shorba , Arvi-Gosht ka khatta shorba etc.

When boiled, okra gives off a viscous substance that can add smooth thickness to stews or soups. It can be a bit difficult to cook as it sometimes is very slimy. In this recipe, the sourness from tamatoes and tamarind helps while cooking to get rid of the sliminess. It is an excellent sourse of vitamin-C, folate, and magnesium.

Bhindi aur Gosht Ka Khatta Salan – Okra and Lamb meat Stew
Serves – 6-8 people

Ingredients:

Canola Oil – 8 tbsp
Yellow Onion – 3, large, sliced
Ginger Garlic paste – 1 tsp
Tomatoes – 5, large, diced
Curry leaves – 2 sprigs, fresh
Salt – 2 1/2 tsp
Roasted Cumin seed powder – 1/2 tsp
Red Chilli Powder – 1 tbsp
Lamb meat with bones – 650 gms
Cilantro – 3 tbsp, finely chopped
Okra/Bhendi – 700 gms, washed, dried and cut into approx 5 cm pieces with top and bottom removed
Tamarind concentrate – 2 tbsp (or) Lemon/Lime juice – 2 tbsp


Bhindi aur Gosht Ka Khatta Salan – Okra and Lamb meat Stew

Method:

  • Heat oil a pressure cooker and fry the sliced onions till lightly browned. Add the ginger garlic paste and sauté it along for a minute. Add curry leaves, red chilli powder, salt, cumin and coriander seed powder and turmeric powder. Mix well. To it add the diced tomatoes and cilantro and let cook cook for 3-5 minutes until the tomatoes are soft and the oil has separated. Add meat and cook along until no longer pink. Pour water to cover the meat and pressure cook until the meat is tender.
  • Once done, add tamarind concentrate or lemon/lime juice and okra and 2-3 cups water (as per your wish, depending on the consistency you desire) to the stew. Stir well and cover the lid. Let it cook on simmer until the okra is cooked. Serve warm.

Suggested Accompaniments: Naan / Afghani Roti / Basmati Chawal / Paratha

Luv,
Mona

AddThis Social Bookmark Button

Butter Chicken with no Butter – Makhani Murgh

July 26th, 2007 Mona Posted in Butter/Makhan, Canned Tomato paste, Coriander seeds, Cornflour, Cumin seeds/Zeera, Eid/Ramadhan/Iftaar, Garam masala powder, Heavy Cream, Hyderabadi special, Lemon/Nimbu, Light Cream, Mint/Pudina (fresh), Poultry/Murgh, Red Chilli flakes, Red Chilli powder, Salt/Namak, Turmeric/Haldi, Yellow Onion/Pyaaz 5 Comments »

Butter chicken is one of the famous North-Indian dishes that made its way on the menu card of almost every Indian restaurant all over the world. Each person/household has their own style of cooking this delectable dish, but I prefer this procedure, its simple, healthy and gets prepared soon, and its delicious.

Butter Chicken – Makhani Murgh

Butter Chicken can be enjoyed along with parathas, naan or with plain rice.

Butter Chicken – Makhani Murgh
Serves: 6-8

Ingredients:

For Marinade
Chicken – 1 (large) whole, cut into pieces
Ginger garlic paste – 1 tbsp
Yogurt (thick) – 1/2 cup
Red chilli powder – 1 tsp
Salt – 1 tsp
Turmeric powder – 1/4 tsp
Lemon juice – 1 tbsp
For Curry
Cloves – 3
Green Cardamom – 4
Cinnamon stick – 2 inch long stick
Ginger garlic paste – 1 tbsp
Fresh tomato puree – 5-6 cups
Red chilli powder – 2 tsp
Salt – 2 tsp
Half and half – 1 1/4 cups (or) equal amounts heavy cream or light cream
Garam masala – 1 tsp
Kasoori methi – 1/4 cup
Canola oil

Method:

1. Mix all the ingredients under the heading ‘for marinade’, and keep aside for 2-3 hours or overnight. Bring it back to room temperature before you start cooking. Heat a stove top grill pan and grill the marinated chicken pieces until lightly charred on both sides. Baste with canola oil whenever needed.
If using boneless chicken, marinate them as above directions. Skewer them onto bamboo skewers and grill them both sides until charred as shown here.
You can even grill the chicken on a charcoal grill for best flavors.
Cover and keep the grilled chicken aside in a bowl.
2. Heat 3 tbsp oil in a saucepan, add cloves, cardamoms, and cinnamon stick. As the spices begin to sizzle, add ginger garlic paste and stir fry for a few seconds. Add pureed tomatoes, red chilli powder, salt. Cover and let it cook until the puree is thick. Give a stir every once in a while. Add half and half or whatever using and let it come to a boil. Once boiling reduce heat and add the grilled chicken, kasoori methi, garam masala and water according to the consistency of the curry you desire. Cover and let cook until the chicken is tender and thoroughly cooked. Transfer to a serving dish and garnish with drizzles of cream.

Suggested Accompaniments: Parathas, Naan, Basmati Chawal, Pulaos.. or even in between toasted bread as sandwiches.

Luv,
Mona

AddThis Social Bookmark Button

Arvi aur Gosht Ka Khatta Salan

July 23rd, 2007 Mona Posted in Canola Oil, Cilantro/Kothmir (fresh), Coriander seeds, Cumin seeds/Zeera, Curry leaves (fresh), Eid/Ramadhan/Iftaar, Hyderabadi special, Lamb/Beef/Mutton/Veal/Sheep, Lemon/Nimbu, Onion/Pyaaz, Red Chilli powder, Red Potatoes, Salt/Namak, Spices & Seasonings/Masaale, Tamarind/Imli, Taro/Colocasia/Arvi, Tomato/Tamatar (fresh), Turmeric/Haldi, Turnip/Shalgam, Vegetables/Tarkariyaan, White Potato/Aloo, Yellow Onion/Pyaaz 4 Comments »

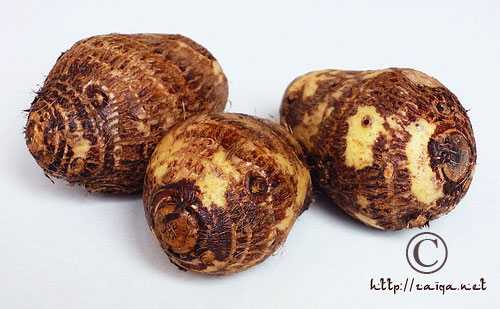
Weekends are usually grocery shopping days. I love the sight of fresh fruits and vegetables. This week I had bought a few taro root and decided to prepare this ambrosial curry using them.

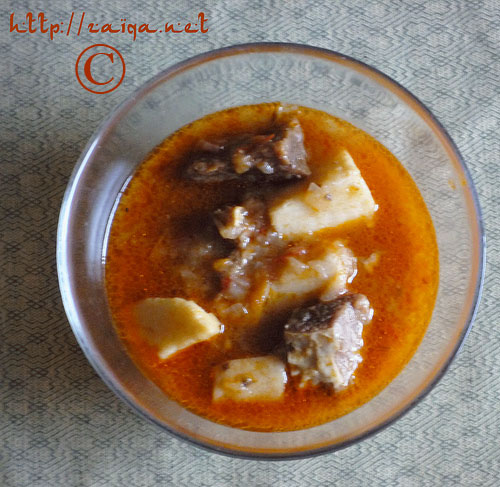
Arvi Ka Khatta Salan – Colocasia (or) Potatoes and Lamb Stew

Khatta Salan means ‘soured stew’. The sourness from the tomatoes, a slight heat from red chilli powder and the subtle sweetness from  caramelized onions along with the roasted spices impart an aromatic and delectable flavor to this Taro stew. This same base is used in many other versions of the khatta shorba, which are Bhendi Ka Khatta, Karele ka khatta, Aloo-Gosht ka Khatta etc.

The consistency of this curry is slightly thin and not like a thick gravy. Replace potatoes with colocasia to make it ‘Aloo aur Gosht ka Khatta Salan – Potatoes and Meat in a tangy sauce’.

Arvi aur Gosht Ka Khatta Salan – Colocasia (or) Potatoes and Lamb meat Stew

Ingredients:

Colocasia/Taro root/Arvi –  4-5, large sized, peeled, and cut into 1.5 cm cubes (or) Potatoes – 5, large sized, peeled, and cut into 1.5 cm cubes
Lamb meat with bones – 600 gms, cubed into bite size pieces
Curry leaves – 2 sprigs, fresh
Ginger garlic paste – 1 1/2 tsp
Yellow Onions – 3, large, sliced
Tomatoes – 5, large, diced finely
Salt – 2 1/2 tsp
Turmeric – 1/4 tsp
Red chilli powder – 1 tbsp
Roasted Cumin seed powder – 1/2 tsp
Roasted Coriander seed powder – 1/2 tsp
Tamarind concentrate/Lemon or Lime juice – 2 tbsp
Cilantro/Kothmir – 3 tbsp, chopped finely
Oil – 8 tbsp

Method:

  • Take a pressure cooker and put it on medium heat and add oil. As soon as it heats up, add onions and fry until they are light brown in color. Add ginger-garlic paste and fry for a minute. Add the meat, curry leaves, red chilli powder, salt and turmeric powder, cumin and coriander seed powder and cook until meat is no longer pink. Add the chopped tomatoes and cook along for a furthur 3-5 minutes until the tomatoes are soft and oil starts to leave. Now pour in water to cover and pressure-cook till the meat is tender.
  • Later, open the lid of the cooker and add the colocasia/potatoes and stir well. Also add the tamarind paste/lemon or lime juice and around 4 cups of water. Half cover the lid and let it cook on simmer for 15-20 minutes or until the tuber has become soft. You can test it by piercing one cubed colocasia/potato with a fork. It should be soft. If it isnt, let it simmer for a little more time. Garnish with cilantro and serve immediately along with rice or parathas.

Note: You can replace colocasia with peeled and quartered turnips to make it ‘Shalgam aur Gosht Ka Khatta Salan’ – Turnip and Lamb meat in a Tangy Sauce.

Luv,
Mona

AddThis Social Bookmark Button

Hyderabadi Dum Pukth (Pakki) Murgh Biryani

July 17th, 2007 Mona Posted in Almonds/Badaam, Basmati Rice/Chawal, Butter/Makhan, Canola Oil, Caraway seeds/Shahzeera, Cardamom/Elaichi, Cashewnuts/Kaaju, Cilantro/Kothmir (fresh), Clove/Laung, Cumin seeds/Zeera, Dry Bay Leaf/Tej Patta, Eid/Ramadhan/Iftaar, Garam masala powder, Ginger-Garlic paste, Green Chillies, Hyderabadi special, Lemon/Nimbu, Milk and Milk Products, Mint/Pudina (fresh), Poultry/Murgh, Red Chilli powder, Saffron/Zafraan, Salt/Namak, Tomato/Tamatar (fresh), Turmeric/Haldi, Yellow Onion/Pyaaz, Yogurt/Dahi 22 Comments »

Mazadaar!! (meaning ‘yummy’ in English) is what everyone in my house say when they have just had thier first niwaala/morsel of my Dum Pukth Murgh Biryani.

Chicken Biryani is an exotic one-dish meal, served usually at large get-togethers, occasions and parties like weddings, ceremonies and festivals in the city of Hyderabad, India. The method of cooking involves a layering process of half cooked rice with the cooked till done spiced chicken mixture. Hyderabadi people have a great fondness for Biryanis and it is seen at almost every restaurant in the menu cards as the speciality item.
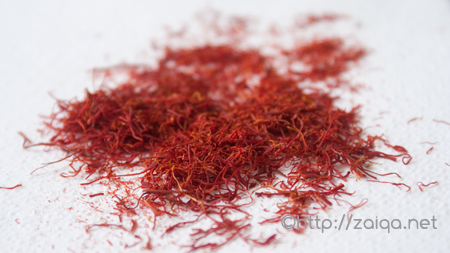
Saffron strands

Basically, there are two kinds of Biryani: Pakki Biryani, and Kachchi Biryani.

Pakki Biryani: where are half Basmati cooked rice is layered along with completely cooked chicken or lamb meat and then cooked till done on slow heat on dum.
1. Pakki Gosht ki Biryani
2. Pakki Murgh Biryani

Kachchi Biryaniwhich is the true Hyderabadi Biryani – where are half cooked Basmati rice is layered along with raw marinated meat and then finished on slow heat till done on dum.
1. Kachchey Gosht ki Biryani
2. Kachche Aqni ki Dum Murgh Biryani

The following is the procedure how I prepare Pakki Murgh biryani in my house on a regular basis. In this recipe you can use a whole chicken with bones, cut into pieces; but I usually prefer to use boneless Chicken, as my family prefers boneless breast pieces of Chicken, which has minimal fat in it, hence a healthier option. Check out my Instant Light Chicken Biryani, which is light on stomach, and gets prepared in less than 30 minutes.

The caraway seeds, garam masala powder, saffron strands, and all other spices used in this recipe can be easily found in most Indian grocery stores which sell spices. My family prefers to have Biryani a bit hot and lemony with a little bit of an acetous flavor, so I’ve added red and green chilli and lemon juice according to our tastes. You can alter those according to your tastes.

Do not worry if you have never prepared Biryani till now by yourselves. I have tried here to explain each step in as simpler method as possible. Do write to me if you have any doubts regarding the procedure. Go ahead and prepare this for your family, Enjoy.

Hyderabadi Dum (Pakki) Murgh Biryani – Fragrant Rice-Chicken Casserole with Spices
Serves: 8

Ingredients:

Ginger-Garlic Paste – 2 tbsp
Garam Masala – 1 1/2 tsp
Yogurt -1 1/2 cup
Tomatoes – 2, large and ripe, pureed into a smooth paste (or) Canned tomato paste – 5 tbsp (optional)
Turmeric – 1/4 tsp
Red chilli powder – 2 tsp
Lemon juice – 6 tbsp
Salt – to taste
Almonds – 1/2 cup, slivered
Cashew nuts – 1/2 cup
Yellow Onions – 5, large, sliced
Chicken – 900 gms, Boneless, skinless breast pieces, cut into 2 cms cubes
Basmati, Long Grained Rice – 5 cups
Water – 8 cups
Canola Oil -9 tbsp
Caraway seeds/ShahZeera – 1 tbsp
Warm Milk – 1/2 cup
Saffron strands – one big pinch
Bay leaves – 1
Green cardamom – 3
Green Chillies – 5, small sized, slit lengthwise
Home-made Ghee – 3 tbsp
Fresh Mint leaves/Pudina – 2 tbsp, wahsed, chopped finely
Fresh Cilantro/Kothmir – 2 tbsp, washed, chopped finely
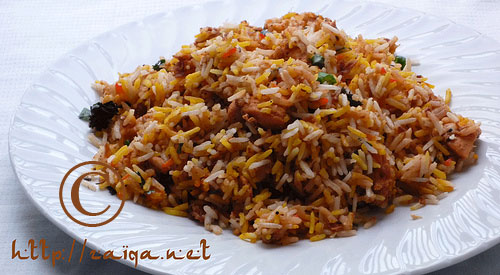
Hyderabadi Dum Pukth Murgh Biryani

Method:

1. Marinate the chicken with the first 8 ingredient for about 6-8 hours maximum or one hour minimum covered in the refrigerator.
2. Start by pouring 1 tbsp oil into a large heavy bottomed non-stick frying pan and fry the almonds and cashewnuts till they are golden brown and remove them into a bowl.
3. In the same pan add 8 tbsp oil and add the sliced onions. Fry them till the onions are brown and crisp. Make sure not to burn them. Remove from heat. Remove about a cup of the fried onions with a slotted spoon onto a paper towel in a platter.
4. Take out the chicken from the refrigerator, bring it to room temperature. In the pan with oil and fried onions, dump the whole bowl consisting of the marinating chicken and all its juices into it and put the pan on medium high heat. Let it cook uncovered until the gravy is dry and dense and the chicken is done. Keep stirring it occasionally. This might take about 20-30 minutes. Remove from heat and keep aside.
5. Meanwhile take half a cup of warm milk, and add a few strands of saffron. Let them soak  for an hour.
6. Wash and soak the rice in water for preferably half an hour. Later, drain the rice and keep it in the sieve. Boil 8 cups of water and add cinnamon sticks and caraway seeds/shah zeera, bay leaves, green cardamom and salt (I use the proportion:1 tsp salt for 1 cup rice). Once the water is boiling add the strained rice, give it a stir and let the rice soften up a bit. Once the rice is half done, strain the rice and throw away the water. Discard the bay leaves and the cinnamon stick.
7. Arrange half the amount of rice as the bottom layer layer in a large dish. Next, add the chicken mixture prepared earlier in a layer. Now add the remaining rice above the chicken layer, covering it completely.
8. Garnish with mint, cilantro, fried onions, slit green chillies, and fried nuts from step 2. Now pour evenly the milk with saffron strands and two tablespoons of ghee over the layered and garnished rice. Cover the dish with a lid or aluminium foil.
9. Preheat the oven to 350°F and put the dish in the oven for 10-12 minutes, till a nice steam has formed inside the dish, and the rice has been done. Serve hot for a delicious meal.

Tip: Adding salt to the water in which you cook rice is essential, or else the whole taste of Biryani turns upside down. One tip if you have forgotten to add salt to the water while boiling rice is – stir the required amount of salt in a little quantity of hot water, about half cup or a few tablespoons, and pour this on the biryani evenly. Warm the biryani in microwave and serve immediately.

Suggested Accompaniments: Biryani goes very well along with Mirchi Ka Salan or Baghare Baingan, or Tamatar Ki Chutney and Dahi Ki Chutney.

Luv,
Mona
AddThis Social Bookmark Button