Chicken Tikka Pizza

November 14th, 2012 Mona Posted in All-Purpose Flour/Maida, Capsicum, Hyderabadi special, Long Sweet Peppers, Mozzarella Cheese, Olive Oil, Olive/Zetoon, Poultry/Murgh, Salt/Namak, Sugar/Shakkar, Sun-Dried Tomatoes 9 Comments »

A while back I got a request from hubby dear that I am not preparing specials that often as I used to before babyjaan happened.

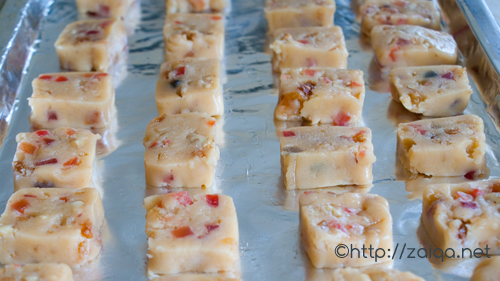
Chicken Tikka Kawabs – Murgh Tikka

So one weekend I adorned my chef hat and got onto making something especially to please him. I had prepared chicken tikka a day earlier and there was some leftover. The idea to make a pizza immediately popped in my mind and I am glad he thoroughly enjoyed what I made for him.

Chicken Tikka Pizza

Ingredients:

All purpose flour – 4 cups
Yeast – 1 packet – 7 gms
Warm water – to make a dough
Salt – 2 tsp
Sugar – 1 tsp
Olive oil – 4 tbsp
(Store-bought) Pasta Sauce [or] Tomato Chutney – 3/4 cup
Sun dried tomatoes – 1/2 cup, cut into small pieces
Chicken Tikka – 1 cup, cut into small pieces
Green/Red Bell Peppers – 1/2 cup,
Green Olives – 1/2 cup, sliced
Mozzarella Cheese – grated, 1 cup

Method:

1. In a cup of warm water, add one packet of yeast and mix using a spoon. Add salt and sugar and a cup of flour and mix to make a wet dough. Pour olive oil all over the dough. Cover with a wet towel and keep aside for an hour. Later you will notice that the dough has almost doubled in size.
2. Add the remaining flour to the dough and add water as needed to make a soft dough. Do not work the dough a lot. Mix it lightly ans make sure it is soft. Let it rest for 30 minutes while you prepare the toppings.
3. Preheat oven to 450 F.

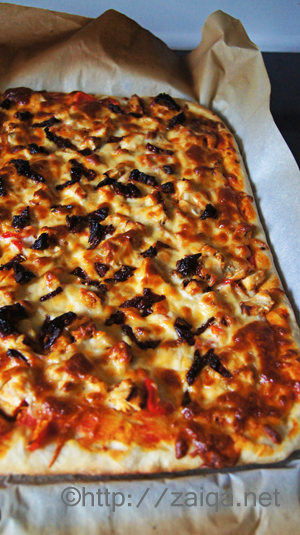
4. Line a large rimmed baking sheet using waxed paper. Dust lightly with flour all over it. Drop the ball of dough over it and working with your fingers spread the dough so that it completely covers the entire baking sheet. Slather the pizza with the pasta sauce or chutney whatever you are using, then add all the toppings spreading them all over the dough. Lastly add the grated cheese and transfer the baking sheet into the oven. Your pizza will be ready in about 20 minutes.

For Thin crust pizza: use a rolling pin and roll the dough to achieve the thinness you want. Then transfer the rolled dough to a baking sheet and add the toppings.

FREEZE: To freeze, set dough balls on a plate (they should not touch); freeze until firm, about 1 hour. Then freeze in a resealable freezer bag for up to 3 months. If you plan to use it in a recipe that calls for half a batch, divide it before freezing. Thaw overnight in refrigerator.

Luv,
Mona

AddThis Social Bookmark Button

Aloo aur Tamatoun kay Bhajiye

October 3rd, 2012 Mona Posted in Carom seeds/Ajwain, Cumin seeds/Zeera, Gram Flour/Besan, Red Chilli powder, Salt/Namak, Tomato/Tamatar (fresh), Turmeric/Haldi 11 Comments »

Cloudy weather and rains call for spicy deep fried snacks in my house. Back when I was in my parents house before marriage, my father’s request would almost always be Aloo ke bhajiye during the rainy season. I miss the monsoons in India. The fragrance of wet mud, the thunders, all I wanted to do was eat spicy bhajiyas along with chutney and a cup of hot chai of coffee during evening while sitting in the verandah. Pure bliss. Here in Toronto, I can enjoy rains while sitting at home only during the spring/summer season, when the air is heavy with the aroma of fresh grass and greenery.

Tamatoun ke bhajiye are my absolute favourite! No chutney or dipping sauce is needed along with these yummy fritters. They are delicious just as they are!

Aloo aur Tamatoun ke bhajiye – Potato and Tomato Fritters

Ingredients:

Firm Red Tomatoes or Potatoes – 5 to 6 (use a few of potatoes or tomatoes if you want them both)
Gram Flour/Besan – 1 1/2 cup
Red chilli powder – 1 1/2 tsp
Salt – to taste
Turmeric powder – 1/4 tsp
Carom seeds/Ajwain – 1/4 tsp
Cumin seeds/Zeera – 1/4 tsp

Method:

For Tomato fritters:
1. Wash the tomatoes, and pat dry. Slice them into medium thick roundels and keep aside. For Potato fritters: Wash and peel the potatoes. Slice them into thin roundels and soak the roundels in a bowl of salted water. Keep aside.
2. Prepare Besan. In a bowl, add the besan, red chilli powder, salt, ajwain and turmeric powder and mix well. Add water, little by little and whisk until the batter is fairly thick and not runny. It should form thick coating around the tomatoes when they are dipped in the batter. Also, there should be no lumps in the batter. Keep aside.
3. Heat oil to deep fry in a kadai or a frying pan. Once the oil is hot, dip the tomato slices into the batter, cover it entirely with the batter, then deep fry. Make sure the tomato slices are completely covered with the batter before dropping it into the hot oil. Deep fry both sides for just a few minutes until golden brown on both sides. Remove into a wire mesh strainer and continue until all are done.

For Potato fritters:
1. Wash and peel the potatoes. Slice them into thin roundels and soak the roundels in a bowl of salted water. Keep aside.
2. Prepare Besan. In a bowl, add the besan, red chilli powder, salt, ajwain and turmeric powder and mix well. Add water, little by little and whisk until the batter is not too thick or too runny. It should form a coating around the potatoes when they are dipped in the batter. Also, there should be no lumps in the batter. Keep aside.
3. Heat oil to deep fry in a kadai or a frying pan. Once the oil is hot, dip the potato slices into the batter, cover it entirely with the batter, then deep fry. Deep fry both sides for just a few minutes until golden brown on both sides. Remove into a wire mesh strainer and continue until all are done.

Enjoy the bhajiye warm along with a cup of hot chai on the side.

I also have an exciting news to share with you all today! My online store – Omee’s Boutique – has been featured in the October 2012 issue of Sisters-Magazine! I am featured on page 92. Very excited about this!! My first International Feature!!!
And to celebrate that, I am offering free shipping on all orders over $30 in the Greater Toronto Area (GTA)! Enjoy and take advantage of this limited time offer!

Luv,
Mona

AddThis Social Bookmark Button

Dahi Baday – Chickpea Flour Balls in Yogurt

July 25th, 2012 Mona Posted in Canola Oil, Cilantro/Kothmir (fresh), Dried Red Chillies, Gram Flour/Besan, Mustard seeds/Rai, Red Chilli powder, Salt/Namak, Turmeric/Haldi, Yogurt/Dahi 15 Comments »

Perhaps one of my favourite Iftaar snacks, for two reasons mainly: awesome taste, and quick preperation time. Make a batter with chickpea flour, deep fry the balls, then add them to yogurt, add a baghaar, and you are done! Simple as that.

Dahi Baday are just a different version of Dahi Wade. Dahi Wade are made with Urad Dal and Dahi Badey are make with Chickpea flour.

If you love Dahi ki Kadi, you will definitely enjoy Dahi Badey.

Dahi Baday – Chickpea Flour Balls in Yogurt

Ingredients:

Chickpea Flour/Gram flour/Besan – 1 cup
Baking Soda – a pinch
Red chilli powder – 2 tsp
Salt – to taste
Turmeric powder – 1/4 tsp
Yogurt – 1 cup
Canola oil
Cilantro – 4 tbsp, finely chopped
For Baghaar/Tempering:
Mustard seeds – 1 tsp
Dried Red chillies – 2-3, each broken into pieces

Method:

1. In a bowl, add chickpea flour and pour in a little water to make a smooth batter. The batter should be thick and pourable in consistency but not thin. Add baking soda, red chilli powder, salt and turmeric powder to the batter and mix.
2. In a separate bowl ,whip yogurt with 1/2 cup of water until smooth. Season with salt and pour this yogurt mixture in a serving tray.
3. Heat oil to deep fry in a pan or kadai. (Never deep fry in a non stick pan). As soon as it is hot, drop spoonfuls of the batter into the hot oil and deep fry them on both sides until they are nicely golden brown in colour. Remove with a slotted spoon to a plate lined with paper towel. The baday are ready.
4. Drop them into yogurt mixture. Make sure that the baday are well coated with yoghurt.
5. Prepare tempering by heating the oil in a small pan and add the ingredients in the list. When the mustard seeds and dried red chillies splutter, pour the sizzling tempering over the baday in yogurt. Allow to soak for an hour after tempering. After an hour serve the baday on individual plates, garnish with chopped cilantro and sprinkle of chaat masala on each of the vada.

This recipe is my contribution to my very onw Hyderabadi Ramadan Food Festival 2012 (Season IV) that I hosting on my blog, and also to the Joy From Fasting ToFeasting – V that Lubna is hosting on her blog.

Luv,
Mona

AddThis Social Bookmark Button

Suhali

July 21st, 2010 Mona Posted in All-Purpose Flour/Maida, Canola Oil, Salt/Namak 8 Comments »

Deep fried, crisp and sweet. This is how I how I describe my childhood favorite tea time snack~Suhali (plural – suhaliyaan). They are just like poori, but rolled a little thinner than poori for a crisp end result and sprinkled generously with powdered sugar after being deep fried.

Suhali – Deep fried Sweet Discs

Ingredients:

All Purpose flour/Maida – 3 cups
Salt – to taste
Canola oil – 3 tbsp
Water

Oil to deep fry
Powdered sugar as topping

Method:

Mix flour, oil and salt in a bowl. Add water little by little to make a soft dough. Knead for a couple of minutes. Cover the bowl with a kitchen towel and keep aside for 15-20 minutes. Knead again for 5 minutes. Pinch off walnut-size balls of dough and roll them between the palms of your hands to smooth round balls. Cover the balls with a kitchen towel. One by one roll the balls into thin discs using as little flour as possible.

Deep fry the discs in hot oil in a deep kadai/wok on both sides until golden and crisp. Remove them using a slotted spoon from hot oil and place on a platter. Immediately sprinkle the fried suhali with powdered sugar. Continue until all are done. Serve when cool. Store at room temperature. Finish within a week.

Note:
1. It is necessary that you roll the discs for suhali preparation thinner than you roll for poori.
2. You can add ghee and cold milk to the flour instead of oil and water respectively to make the dough if you wish. My aunt even adds a spoon or two of semolina to the dough.
3. Use as little flour as possible while rolling the suhali.

Luv,
Mona

AddThis Social Bookmark Button

Dry Fruits and Nuts Biscuits

April 19th, 2010 Mona Posted in All-Purpose Flour/Maida, Brown Sugar, Butter/Makhan, Canola Oil, Cashewnuts/Kaaju, Clove/Laung, Dry Fruits/Qushk Mewah, Egg/Anda, Fig/Anjeer (dried), Honey/Shahed, Hyderabadi special, Lemon/Nimbu, Nuts/Maghziyaat, Orange/Santra, Raisins/Kishmish, Salt/Namak, Sugar/Shakkar, Walnuts/Aqrot 25 Comments »

Just like Sharmila, and I believe many other Indians, I tend to get confused between cookies and biscuits. Back home in India, only those that are studded with chocolate chips were called as cookies, whereas all others are referred to as biscuits. So you are free to call them whatever you wish, fruit biscuits, or fruit cookies, these melt in mouth morsels studded with dry fruits and nuts are a treat.

dry fruits and nuts biscuits

The famous Karachi Bakery in Hyderabad city is popular for fruit biscuits, among many other baked food products that they are known for. I had always loved these when I was a little kid. These were perhaps one my most early loves. So you can imagine my joy when I discovered a recipe for fruit biscuits at one of my favorite TV chefs website, Ina Garten. I have tried and took delight in many of her recipes, her homely style of cooking is something that I can identify with.

Simple to prepare and delightful to taste, these biscuits have become a regular in my house. Ofcourse I miss those that were available at Karachi Bakery, but these have been successful enough to win my heart and rock my tastebuds. I have made a few changes to the original recipe so that it suites me. For an eggless version, try Priya’s version.

Dry Fruits & Nuts Biscuits/ Cookies
Adapted from this original recipe

Ingredients:

Dried fruits – 1 cup [I used a mixture of tutti frutti and raisins. You can use whatever dry fruits you fancy, like dried berries, candied cherries (or any fruits) etc]
Dried nuts – 3/4 cup [I used a mixture of cashewnuts and walnuts]
Honey – 1 tbsp
Fresh orange juice – 2 tbsp
Fresh lemon juice – 1 tbsp
Unsalted butter – 1/2 cup (at room temperature)
Canola oil – 1/2 cup
Powdered cloves – 1/4 tsp
Light brown sugar – 1/3 cup
Granulated sugar – 1/2 cup
Eggs – 2, large
All purpose flour – 2 2/3 cups
Salt

Method:

1. Chop the dried nuts and fruits roughly. Place them in a mixing bowl, add orange juice, lemon juice, honey and a pinch of salt. Mix well. Cover with a plastic wrap and let sit at room temperature overnight.
2. In a mixing bowl add butter and oil, powdered cloves, granulated sugar and brown sugar. Using a whisk or an electric hand mixer, beat for 3-4 minutes. Add eggs and beat for a minute or two until mixed. Add the the dried fruits and nuts, including any liquid in the bowl. Now add the flour and 1/4 teaspoon salt just until combined. Don’t over-mix! Divide the dough in half. Place the half on a wax paper and using the long edge of the paper as a guide, shape them into logs. Cover the logs with plastic wrap entirely if you plan to freeze them now to use later. Or else, refrigerate the logs wrapped in wax paper for 1-2 hours or until firm (you can even freeze them for just 15-20 minutes) so that you can easily cut them into slices.

biscuit dough logs

biscuits, cut and ready to be baked

3. Preheat the oven to 350°F. With a small, sharp knife, cut the logs into 1/2-inch-thick slices. Place the slices 1/2-inch apart on aluminium foil lined cookie sheets and bake for 14 to 20 minutes, until lightly golden on the edges. Mine were done in just 14 minutes. Once done, transfer the biscuits immediately on a rack and let cool. Once cool, store in air tight food storage containers.

Luv,
Mona

AddThis Social Bookmark Button