Sir-e-Paaya ki Nihari

December 15th, 2008 Mona Posted in Canola Oil, Cilantro/Kothmir (fresh), Cornflour, Eid/Ramadhan/Iftaar, Ginger-Garlic paste, Gram Flour/Besan, Green Chillies, Hyderabadi special, Lamb/Beef/Mutton/Veal/Sheep, Potli Ka Masala, Red Chilli powder, Red Onion/Lal Pyaaz, Saffron/Zafraan, Salt/Namak, Turmeric/Haldi, Yellow Onion/Pyaaz 28 Comments »

It snowed here very heavily this year on Eid-ul-Adha, and I thought it would be best to cook a warming and nourishing brunch for the next day in the morning. My father in law recalled his good old times while we were having Nihari as our breakfast. He recollected that when he was a school going kid, his father would ask him to get up very early if he would like to join him for a breakfast of Nihari at Shehran Hotel, beside Charminar in Hyderabad. He also added he always loved the Nihari at Shahran and devoured it and still remembers the scrumptious taste. Always so many memories associated with food.

Some of the traditional dishes prepared by muslims just after Qurbani on Eid-ul-Adha are Nihari, Maghaz MasalaOrgan meat and various kinds of the red meat preparations from the Qurbani ka gosht.

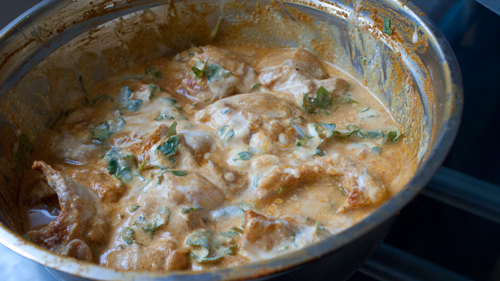
Nihari, also sometimes referred to as Nahari or Sir-e-Paaya (plural is Sir-e-paaye) (sir means head and paaya means legs), is a rich broth, made out the bones and meat of a sheep or lamb’s cheek and head bones and the tongue meat and shanks. It has a special mention in the must-taste list of travelers visiting the city around Eid. In Hyderabad, after the Qurbani, my father would take the sheep’s head and feet to the butcher for further preparations so that we could prepare Nihari. The butcher used to roast the ‘whole head with skin and hairs on’ (sir) and the legs (paaya) in open fire to kill all the disease-causing agents if present, and to burn the hairs, and roast the skin to intensify its flavors. The butcher would then scrape off the burnt hairs, discard the waste parts and whack them all up into small pieces. The meat from the sheep’s cheeks is substantial and most tender and delectable. Its tongue takes a longer time to get cooked, but is a delicacy. The butchers here in Toronto do sell the head and legs of the sheep, but with the skin removed. The real taste of the Nihari is due to the fire roasted skin which is not available here, so I really enjoy the true Nihari whenever I visit my parents in Hyderabad.

Nihari prepared using fire-roasted lamb trotters and head pieces with skin

Nihari is prepared by boiling or slow cooking the sheep bones and meat along with a range of ambrosial spices and herbs. Earlier, people used to slow cook it on coal in large pots the whole night long, until the broth was thick and flavorsome by morning ready for the breakfast, the the bones so soft you can literally chew them. Today, women use pressure cookers to save time.

The Hyderabadi Potli ka Masala or bouquet garni for Nihari contains a mixture of around 20 or more aromatic herbs and exotic spices which are tied in a muslin cloth and tossed into the saucepan to infuse wonderful flavors and a beautiful fragrance into the boiling broth. The Potli ka Masala contains but is not limited to spices such as:

1. Coriander seeds  (Dhaniya)
2. Bayleaf  (Tej Patta)
3. Sandalwood powder (Sandal ka powder)
4. Stone Flowers (Pathar ka Phool)
5. Star Anise (Dagad Phool)
6. Dried Rose Petals (Sukhe Gulab ke Phool)
7. Roots of the Betel plant  (Paan ki jad)
8. Black Peppercorns (Sabut Kali Mirch)
9. Chinese Cubeb (Kawabchini)
10. Spiked Ginger Lily (Kapoor Kachri)
11. Black Cardamom (Badi Elaichi)
12. Salt (Namak)
13. Garam Masala
14. Cinnamon sticks (Dalchini)
15. Fennel seeds (Saunf)
16. Cloves (Laung)
17. Mace
18. Cumin seeds (Zeera)
19. Roasted Chana Dal (Phula Chana)
20. Dried Vetevier roots (Khas ki Jad)

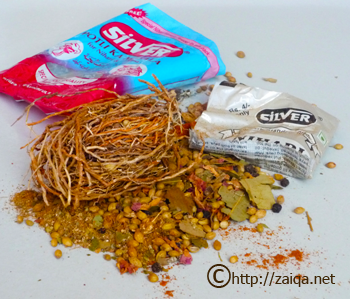
Ready made Potli Ka Masala from a store in Hyderabad,
containing various aromatic dried herbs and spices

You do not have to go searching for all these herbs to make your own Potli ka Masala. It is available ready made at many specialty stores in Hyderabad, especially in the Old city, a 25 gm potli ka masala costs around 10 Indian Rupees per packet. This Potli ka Masala or Nihari masala is also easily available in Indian grocery stores. I do not recommend buying the ‘Nihari powder’ from the market, instead go for the one that also contains the whole spices. Use any of the brands that you get your hands on. In the ready made Potli Ka Masala packets available in the markets, there is again a small packet inside called as the Nihari Masala powder, which consists of the powdered masala  used in the second stage in the cooking process for Nihari.
What I do is, whenever I visit Hyderabad, I buy many packets from Hyderabad and get them with me here, so that they last me a long time, and freeze them to store and use whenever fancied.

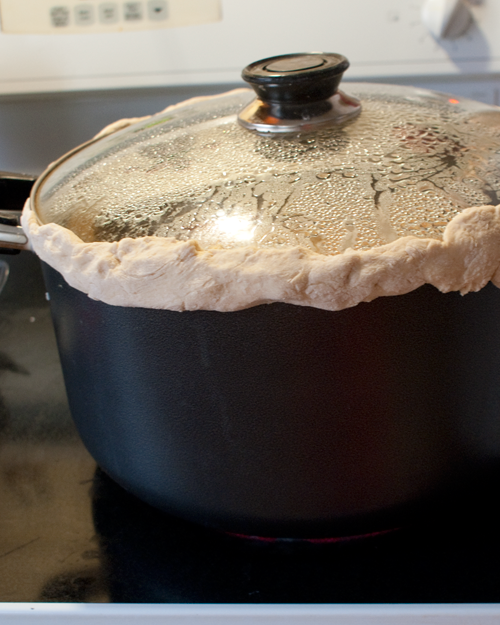
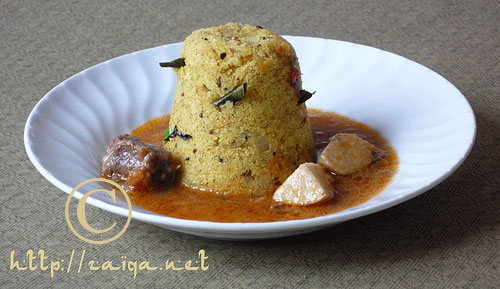
Almost every household in Hyderabad prepares Nihari as breakfast or brunch at the second or third day of Eid. Nihari is enjoyed by sousing soft and warm Kulcha or Naan or Paratha, or by dunking in crusty breads into the highly flavored and nourishing broth containing all the goodness.

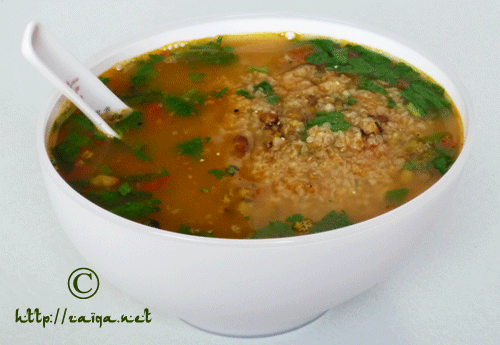
Nihari, prepared using deskinned lamb trotters,
served along with warm Parathas in the Hot-Pot

Nihari is always prepared out the head bones, tongue & cheek meat and the shanks or trotters of a lamb or a sheep. The traditional Nihari is never prepared of boneless lamb meat or chicken. However people add the same Nihari masala to chicken and boneless meat broths to simulate the dish in other simpler forms.

Sir-e-Paaye ki Nihari – Aromatic Slurpy Broth of Lamb Shanks and Cheek Meat

Ingredients:

4 legs and a head of a sheep – cleaned (and fire roasted if using the trotters with skin), and whacked into pieces + a sheep’s Tongue/Zabaan – cleaned (or) Lamb Shoulder meat with bone cut into big chunks – 1 kg
Potli ka Masala – half the quantity in a 25 gm packet
Red onion (or) Yellow Onion – 1, large, roughly chopped
Cornflour/Gram flour – 3/4 cup, mixed with a small amount of water to make a smooth paste
Red chilli powder – 2 tsp
Salt – 2 1/4 tsp
Turmeric/Haldi – 1/4 tsp
Small green chillies – 6, each slit into half

For Tempering, Baghaar:

Canola oil – 2 tbsp
Yellow onion – 1, large, finely sliced
Ginger garlic paste – 1 1/2 tsp

For Garnish:

Cilantro – 1/2 cup, finely chopped
Ginger juliennes – 2 tsp
Lemon wedges – 1 cup
Saffron threads – a pinch
Lemon juice – 1/3 cup

Method:

1. Wash the sheep’s head bones, tongue and trotters or the shoulder meat in surplus water. Put them in a strainer for the water to drain away. Meanwhile, in a pressure cooker, add the roughly chopped red onion, the washed bones, tongue and trotters or the shoulder meat from the strainer and pour in 1.5 liter of water, red chilli powder and green chillies. Make a bouquet garni of the required amount of potli ka masala (not the powdered masala from the small packet, read about it above). Add this bouquet garni along with salt and turmeric and close the lid to pressure cook until the meat is tender. Later, open the lid and add corn/gram flour paste. Half cover the lid and let it slow cook for 15 minutes more. The broth is ready. Cover with lid and keep aside
2. During that time, prepare the baghaar. Take a medium sized non-stick frying pan at medium high heat and pour oil into it. Throw in the sliced onions, and stir fry them until they are golden brown in colour. Now add the ginger garlic paste to the fried onions and fry it along for about 2 minutes more stirring continously. Remove the pan from heat and keep aside.
3. Just before you are ready to serve it to everyone, add half the quantity of the nihari masala powder from the small packet of the store brought potli ka masala, and the baghaar to the broth in the pressure cooker and bring to a boil. Lift out the bouquet garni and squeeze it thoroughly. Discard it later. Let it cook half covered for 15 more minutes. Close the heat and pour the Nihari into a large serving bowl. Add lemon juice, saffron threads and ginger juliennes. Serve the lemon wedges in a separate small cup if anyone wishes for an extra zing. Enjoy!

Suggested Accompaniments: Enjoy Nihari along with warm Parathas or Naan for a sumptuous breakfast.

Luv,
Mona

AddThis Social Bookmark Button

Aloo Bonda

September 10th, 2008 Mona Posted in Black Gram/Urad Dal, Canola Oil, Cashewnuts/Kaaju, Cilantro/Kothmir (fresh), Curry leaves (dried), Eid/Ramadhan/Iftaar, Ginger/Adrak, Gram Flour/Besan, Green Chillies, Hyderabadi special, Lemon/Nimbu, Mint/Pudina (fresh), Mustard seeds/Rai, Red Chilli powder, Salt/Namak, Turmeric/Haldi, White Potato/Aloo 13 Comments »

After a good afternoon siesta during the humid and sultry Indian Summer days, a few Aloo Bondas along with a cup of warm tea while going through the days newspaper would be perfect. It is also savored during the rainy days in India. Oh, it brings back many cherished memories..

Aloo Bondas – Potato Croquettes

Aloo Bondas are balls of mashed lightly spiced potatoes dipped in chickpea flour and deep fried till golden brown. They are the most loved snacks in India, sold in most of the ready made food stalls, and also as a street food by the bandiwalas in small carts by the road side.

I often prepare Aloo Bondas for Iftaar in Ramadhan. These are our favorite snacks.

Aloo Bondas – Potato Croquettes

Makes -About 20

Ingredients:

For the Tempering/Baghaar:

  • Canola Oil – 1 tbsp
  • Split Black Gram/Urad Dal – 1 tbsp
  • Black Mustard seeds/Rai – 1 tsp
  • Dried Curry leaves – 6, crushed (optional)
  • Ginger – 1 tbsp, finely chopped

For the Potato filling/Aloo:

  • Potatoes – 4, medium sized, boiled, peeled and diced into 1/4 inch pieces
  • Red chilli powder – 1/2 tsp
  • Salt – 1 tsp
  • Turmeric – 1/4 tsp
  • Lemon juice – 2 tbsp
  • Finely chopped Cilanto, Mint leaves and Small Green chillies/Hara Masala – 1/2 cup, loosely packed
  • Roasted Cashewnuts – 1/4 cup (optional)
  • Frozen peas (thawed) – 1/2 cup (optional)

For the Chickpea flour batter/Besan:

  • Chickepea flour/Besan – 1 cup
  • Water – 150 ml
  • Canola Oil – to deep fry

Method:

Prepare Popato Filling/Aloo:

  • Pour oil into a small frying pan at medium heat, and add the black mustard seeds, split dal and chopped ginger. Cover with a splatter screen. Saute for 30 seconds or until the seeds stop popping. Add the dried crushed curry leaves. Remove from heat. This is the ‘Baghaar’.
  • Add red chilli powder, salt, turmeric and the prepared baghaar to the chopped potatoes. Also add the cashewnuts and peas, if using, and mix well. Take a little bit of the potato mixture at a time in your hands and shape them into walnut sized balls pressing them between your palms. Keep doing this until the whole potato mixture is completed. Keep them aside.

Prepare the Batter/Besan:

  • In a bowl, add the chickpea flour, water, red chilli powder, salt and turmeric to it and whisk it till there are no lumps and it is a smooth, pancake or buttermilk like batter of pouring consistency.

Deep frying the Croquettes/Bondas:

  • In a kadai or a wok at medium heat, pour oil and let the oil heat up. After a little while, drop about 1/4 tsp of the chickpea flour batter into the hot oil. If it floats on surface the oil is ready for deep frying.
  • One at a time dip the potato balls into the chickpea flour batter. With the help of a tablespoon, bath them well so they are covered all over with the batter. (Note: The potato balls should be completely covered with the batter or else they will disintegrate during deep frying)
  • Carefully drop them, one at a time, into the hot oil. Deep fry about 4-6 balls depending upon the size of the Kadai or wok. They need to be turned for even frying. Once they are golden brown in colour, remove them on a tray lined with paper towel. Continue doing this until all the potato balls are done. Discard excess chickpea flour batter. Serve warm.

Suggested Accompaniments: Enjoy them along with Tomato ketchup, Kothmir-Pudina ki Chutney or any of your favorite Chutney as a dipping sauce along with a cup of warm tea.

This goes to ‘Joy from feasting to Fasting’. Takecare everyone and enjoy your weekend!

Luv,
Mona

AddThis Social Bookmark Button

Daliya Soup

September 5th, 2008 Mona Posted in Beef Stock, Broken Wheat/Daliya, Butter/Makhan, Chicken Stock, Cilantro/Kothmir (fresh), Coriander seeds, Eid/Ramadhan/Iftaar, Ginger-Garlic paste, Green Chillies, Green Gram/Moong ki Dal, Hyderabadi special, Lemon/Nimbu, Red Chilli powder, Salt/Namak, Tomato/Tamatar (fresh), Turmeric/Haldi 21 Comments »

Daliya Soup is a very usual item for Iftaar in Ramadhan in my house. I had first tasted it in my Khala/Aunt’s house and since then loved it always. It is highly nutritious and useful for a body which has been fasting throughout the day providing it with vital nutrients and comforting it.

Daliya/Broken Wheat and Whole Green Gram/Sabut Moong Dal

Daliya is Broken wheat. It is also used to prepare Haleem, an another Ramadhan special dish for Muslims.

Do not serve serve it piping hot when you break the fast at Iftaar. Serve it lukewarm. Your kids will also enjoy this healthy and nutritious soup.

Daliya -Broken Wheat and Lentils Soup

Ingredients:

Home made Ghee/Clarified Butter – 2 tsp
Ginger Garlic Paste –  1 tbsp
Tomato – 2, medium sized, finely chopped
Red Chilli powder – 1 tsp
Salt – 2 tsp
Dry roasted Coriander/Dhaniya powder – 1/4 tsp
Turmeric/Haldi – 1/8 tsp
Broken Wheat Kernels/Daliya – 1 cup, washed and soaked for 30 minutes
Whole Green gram/Sabut Moong Dal – 1/2 cup, washed and soaked for 30 minutes
Water – 1.5 litre
Lemon juice- 1/8 cup
Chopped Cilantro/Kothmir – 5 tbsp

Method:

1. In a pressure cooker at medium heat pour ghee and as soon as it warms up, add ginger garlic paste and stir fry it till it golden bworn in colour. Add 4 tbsp chopped cilantro and mix well. Immediately add chopped tomatoes and red chilli powder, salt, turmeric and coriander powder. Stir to mix and half cover the lid for 3 minutes.
2. Drain the soaked dal and wheat kernels.
3. Add the drained dal and wheat to the pressure cooker and give it a stir. Pour in water and pressure cook it for 10 minutes or until the dal and the wheat kernels are done.
4. You can add more water if needed at this point. Let the soup boil uncovered for 3-4 minutes. Garnish with remaining chopped cilantro, add lemon juice and serve lukewarm.

This goes to ‘Joy from feasting to Fasting’. Luv, Mona

AddThis Social Bookmark Button

Kachchi Aqni ki Dum Murgh Biryani

August 23rd, 2008 Mona Posted in Almonds/Badaam, Basmati Rice/Chawal, Blog Events/Entries/Polls, Canola Oil, Caraway seeds/Shahzeera, Cardamom/Elaichi, Cashewnuts/Kaaju, Cilantro/Kothmir (fresh), Cinnamon/Dalchini, Clove/Laung, Coriander seeds, Cumin seeds/Zeera, Dry Bay Leaf/Tej Patta, Egg/Anda, Eid/Ramadhan/Iftaar, Garam masala powder, Ghee, Green Chillies, Hyderabadi special, Lemon/Nimbu, Milk and Milk Products, Mint/Pudina (fresh), Poultry/Murgh, RCI:Authentic Hyderabadi Cuisine, Red Chilli powder, Rose water/Gulab jal, Saffron/Zafraan, Salt/Namak, Tomato/Tamatar (fresh), Turmeric/Haldi, White Potato/Aloo, Yellow Onion/Pyaaz, Yogurt/Dahi 69 Comments »

Note – Read the whole post very carefully (also watch the video link I have posted at the end of the post) before you try preparing the Biryani, Please do not be overwhelmed by the length of the post. I have tried to explain each and every step briefly and as efficient as possible. Do write to me, if you have any queries. I will be glad to help you out.

Biryani is one of the most famous Hyderabadi one-dish meals craved and devoured by people from all over the world. The basic process of preparing Biryani involves the layering of raw marinated or cooked meat along with half cooked long grained aromatic Basmati rice, and a range of fresh spices and herbs for exceptional flavor and aroma.

Basically, there are two kinds of Biryani: Pakki Biryani, and Kachchi Biryani.

Pakki Biryani: where are half Basmati cooked rice is layered along with completely cooked chicken or lamb meat and then cooked till done on slow heat on dum.
1. Pakki Gosht ki Biryani
2. Pakki Murgh Biryani

Kachchi Biryaniwhich is the true Hyderabadi Biryani – where are half cooked Basmati rice is layered along with raw marinated meat and then finished on slow heat till done on dum.
1. Kachchey Gosht ki Biryani
2. Kachche Aqni ki Dum Murgh Biryani (which I am writing about today)

The preparation process of Kachchi Biryani is rather simple compared to the Pakki Biryani. In Kachchi biryani all you have to do is to marinate the chicken for overnight preferably and the next day layer it along with half cooked Basmati rice and leave it cook on slow heat/dum until completely done; whereas in Pakki Biryani you have to stand in front of your stove attending the chicken as it cooks completely, and then layer it with half cooked Basmati rice and finish it until done on slow heat/dum.

As you use the raw marinated chicken in this method, while you slow cook the Biryani on dum, the flavor of the chicken intensifies and infuses with the rice and other aromatic fresh herbs and spices giving you a heavenly aroma in the end which will fills your kitchen and your entire house.

*****

Here is the outline of the steps involved in the preparation, so that it is simpler for you all to understand the detailed method, follow these steps while you prepare the Biryani:

Outline of the steps:

Day 1:
Marinate Chicken.
Day 2:
1. Add Fried onions to the Marinated Chicken.
2. Give a smoked flavor to the Marinating Chicken with Fried Onions (
optional, but gives a very good flavor to the Biryani).
3. Prepare Basmati Rice, also called as Adhaan.
4. Arrange layers and garnish.

*****

The Detailed method:

Kachchi Aqni ki Dum Murgh Biryani
Serves – 8-10Day 1Marinate Chicken:

Chicken marinating in a bowl

Ingredients:

Chicken – 1.4 kg, with bone, cut into medium size pieces
Red chilli powder – 1/2 tsp
Green chilli paste – 1 1/2 tsp
Salt – 2 tsp
Turmeric/Haldi – 1/2 tsp
Tomato – 2, medium sized, pureed (optional)
Ginger-Garlic/Adrak-Lahsun paste – 2 tbsp
Yogurt – 2/3 cup, lightly whipped
Freshly squeezed Lemon Juice – 1/2 cup
Garam masala – 2 tbsp
Green Cardamom powder – 1 tsp
Dry roasted Cumin seed powder – 1 tsp
Dry roasted Coriander seed powder – 1 tsp
Fresh Cilantro and Mint – 2 tbsp, roughly chopped

Method:

In a large bowl marinate the chicken with all the ingredients. Make sure all the pieces of chicken are coated in the marinade. Cover and leave in the fridge overnight.

Day 2.

1) Adding Fried onions to the marinated chicken:

Ingredients:

Canola Oil – 3/4 cup
Finely sliced Yellow Onions – 800 gms
Salt – 1 tsp

Method:

1. Remove the marinating chicken from the fridge and let it come to room temperature.
2. Meanwhile, pour oil into a large non-stick frying pan at medium high heat. As soon as it gets warm, throw in the sliced onions and add salt. Stir fry until they are evenly golden brown in color. Make sure they do not burn them. Using a slotted spoon, remove the onions from the oil into a platter. Divide the fried onions into two equal parts and add one half of the fried onions to the marinating chicken and mix well. Spread the other half on a tissue lined platter to be used later for garnish, until cool. Once they are cool, they crisp up. Also divide the oil in which the onions were fried into two equal parts. Add one part of the oil into the marinating chicken and mix well. Reserve the other half to be added to the rice as the top layer along with garnish later on.

2) Give a smoked Flavor to the Marinating Chicken (optional step, but gives a really good flavor to the Biryani. I recommend you try this atleast once. Skip to the step 3 if you want to avoid)

Ingredients:

3 or 4 Burning Charcoal briquettes
Canola oil/Ghee – 1 tsp
Disposable aluminium foil tray/loaf pan

Method:

1. Make a well in the center of the marinating chicken in the bowl so that the mini aluminium loaf pans fits into it perfectly. My Ammi uses an onion skin for this purpose. With the help of tongs, carefully put the burning charcoal briquettes into the aluminium loaf pan.
2. Pour about a teaspoon of oil/ghee onto the charcoal. You will see that dense fumes start forming.
3. Immediately cover the bowl with a lid, so that the fumes do not escape. Keep it aside until you prepare the rice.

3) Preparing Basmati Rice/Adhaan:

Ingredients:

Long grained Basmati Rice (preferably ‘Lal Qilla’ Brand) – 4 cups, presoaked in water for 30 minutes
Salt – 3 tsp
Bay leaf/Tej Patta – 1
Cloves – 3
Green cardamom – 4
Cinnamon stick – 3/4 inch
Caraway seeds/Shah Zeera – 1 1/2 tsp
Water – 9 cups

Method:

1. Wash the rice and soak it in surplus water for about 30 minutes.
2. In a large cooking pot pour in water along with cloves, bay leaf, cardamom, cinnamon, caraway seeds and salt. Give it a stir, cover and let it come to a boil. (While the rice is boiling, follow the steps below under ‘Arranging layers and Garnish’ until step 4 and be ready)
3. Once boiling add the rice and mix gently, let the rice cook until it is half done, 2-3 minutes. Drain the rice and keep aside.

4) Arranging layers and Garnish: (Work fast while the rice is still hot! and try not to let the rice cool down)

Ingredients:

Marinating Chicken
Boiled, Quartered and shallow fried Potatoes – 2 cups (optional)
Mint leaves/Pudina – 1/2 cup, loosely packed, roughly chopped
Half cooked rice prepared earlier
Cilantro/Kothmir – 1 cup, loosely packed, roughly chopped
Ghee – 2 tsp (optional)
Reserved Fried Onions for garnish
1/4 Saffron strands, crushed and steeped in 1/4 cup warm milk
Rose water/Gulab Jal – 1 tsp (optional)
Green Cardamom seed powder – 1/2 tsp (optional)
Toasted Almonds and Cashewnuts – 1/2 cup total (optional)
Shelled Hard Boiled Eggs – 6-8 (optional)
Dough to seal the edges of the Casserole dish (optional)

(I use the ingredients stated as ‘optional’ only during parties when guests are invited)

Method:

1. Preheat the oven to 550°F (only if using an oven to prepare it on Dum, read below)
2. Carefully lift the loaf pan containing the charcoal briquettes from the marinating chicken, and discard it.
3. In a heavy bottomed casserole dish (which can be used in Oven-if using the Oven method (or) which can be used on stove-top-if using the Stovetop method – read below), arrange the marinating chicken along with all its juices in a single layer. Do not crowd it. (Use two casserole dishes if needed)
4. Spread the chopped mint leaves and the shallow fried potatoes (if using) over it.
5. Now add the drained warm half cooked rice prepared earlier and spread it nicely to cover the chicken all over. Reserve about 1 1/2 cups cooked rice for the top most layer.
6. Next, spread the chopped cilantro, toasted almonds and cashewnuts, hard boiled eggs (if using), reserved fried onions, cardamom seed powder and pour ghee (if using) and the saffron soaked in milk and rose water all over the rice. Add the 1 1/2 cup reserved rice and spread as the top most layer to cover evenly. Now pour the reserved oil in which the onions were fried evenly all over the rice.( I do not add fried onions over the top layer of rice to avoid getting the onions and herbs blackened or burned by steam).
7. Cover the dish with an aluminium foil or a tight lid (or) seal the edges with a dough and cover with the lid tightly, you can use some weight over the lid, so that no steam escapes.

Lid sealed with dough and being cooked on stovetop

If using an oven to cook:
Put the sealed casserole in the preheated oven at 550°F for 20 minutes. Later, lower the heat to 300°F and leave the casserole dish in the oven for about 30 minutes. Remove from dish from oven once done.

If you are cooking on stove top:
1. Take a flat Dosa Tawa or a griddle pan and put it on the stove at high heat. As it gets warm, put the casserole dish on the tawa and let it cook for about 5 minutes on high heat.
2. Later, lower the heat to medium and let it cook for about another 15 minutes.
3. Now, reduce heat to very low and let cook for another 15-20 minutes and your Biryani will be done by now.

Once done, let the dish rest for 30 minutes. Later, open the lid and a heavenly aroma fills your house inviting all your house members. Carefully dig your spoon deep into the casserole dish until it touches the bottom, and gently mix the rice with the chicken until it is all completely mixed. Serve immediately.

Tip: Adding salt to the water in which you cook rice is essential, or else the whole taste of Biryani turns upside down. One tip if you have forgotten to add salt to the water while boiling rice is – stir the required amount of salt in a little quantity of hot water, about half cup or a few tablespoons, and pour this on the biryani evenly. Warm the biryani in microwave and serve immediately.

Suggested accompaniments: I enjoy my Biryani with Mirchi Ka Salan or Baghare baingan and Dahi ki Chutney as a side dish, and glass of chilled coke alongside. Yumm-O!

Note: You can also go through this video of ‘Khan Biryani’ showcased by VahChef, one of my favorite chefs, to get an idea on how to prepare Kachchi Murgh Biryani. His method for Khan Biryani is a bit different but quite interesting though.

I shared this recipe as part of the RCI:Authentic Cuisine of Hyderabad Event that I am hosting this month on my blog.

Be sure to read all the rules for the event and drop me your entries. The last date to send me your entries is September 15th’ 07.

Luv,
Mona

AddThis Social Bookmark Button

Upma

June 24th, 2008 Mona Posted in Beef Stock, Black Gram/Urad Dal, Blog Events/Entries/Polls, Canola Oil, Cashewnuts/Kaaju, Chicken Stock, Cilantro/Kothmir (fresh), Curry leaves (dried), Curry leaves (fresh), Dals (Pulses & Legumes), Dried Red Chillies, Fats and Oils/Tel, Fruits/Phal (fresh), Ginger/Adrak, Green Chillies, Green Gram/Moong ki Dal, Lamb/Beef/Mutton/Veal/Sheep, Lemon/Nimbu, Mustard seeds/Rai, Non-Vegetarian/Gosht, Onion/Pyaaz, Salt/Namak, Semolina/Sooji/Suji, Simple Kitchen Tips, Spices & Seasonings/Masaale, Turmeric/Haldi, Vegetables/Tarkariyaan, Yellow Onion/Pyaaz 14 Comments »

Upma is an another Indian dish which can be had as a snack or can even be had as a filling breakfast.  

Tip: Indian cuisine is versatile. Simple techniques and and a marriage of various kinds of spices and flavors makes the Indian cuisine flexible and sapid. Indian women know very well to use the left overs and whip up delicious meals using them. One such dish where I usually use the leftover curries is Upma. If the left over curry is a dry dish, I often mix it in the preperation of the Upma which makes it even more delicious and healthier. And if the left over curry is thin (soupy) in consistency, then I use it to serve along with Upma.  

Upma – Semolina cake, served along with leftover Colocasia/Arvi in a tangy sauce

Upma is comfort food for me. It is a filling healthy breakfast to start a new day, quite easy to prepare and gets prepared swiftly. Upma Rawa or Semolina or Sooji is available at many Indian stores very easily.

Serves – 4

Upma – Semolina cake

Ingredients:

  • Semolina/Sooji/Upma Rawa – 1 1/2 cups
  • Canola oil – 3 tbsp
  • Black Mustard seeds – 2 tsp
  • Whole dried red chilli – 1 
  • Small Green chillies – 4, finely chopped
  • Fresh grated ginger – 1 tbsp
  • Fresh or dried Curry leaves – 10
  • Urad Dal – 1 tsp
  • Moong Dal – 1 tsp
  • Turmeric – 1/2 tsp
  • Yellow Onion – 2, large, finely chopped
  • Salt – 2 tsp or to taste
  • Water/Chicken or Lamb Stock – 3 1/2 cups
  • Lemon juice – 3 tbsp
  • Cilantro – 1/2 cup, finely chopped
  • Fried Cashewnuts – 1/2 cup, chopped

Method:

  • In a non-stick saucepan at medium heat, pour oil and as soon as it gets warm, throw in the mustard seeds. Cover the saucepan with a splatter screen and as soon as the seeds begin to pop, add in the green and red chillies, dals, ginger, turmeric and curry leaves. Saute them for 3 minutes and later add the chopped onion and salt to it. Let the onions sweat out a little. Fry them all for about 5 minutes stirring it continually. Add the Upma Rawa and fry the whole mixture for 5-8 minutes more again stirring frequently (if you have any dry curry left-overs, you can add it too at this stage, read the notes above)
  • Now pour the water/stock and mix throughly to that no lumps form. Reduce the heat to low and cover the saucepan. Let it cook for 3 minutes more. 
  • Remove from heat and add lemon juice, cashewnuts and cilantro. Fluff and mix it all using a fork and spoon the mixture into whatever molds you like, press the mixture well. Invert them onto warm serving plates and serve them for a yummy breakfast. 

Suggested Accompaniments: I and my family enjoy it along with Lemon/Lime or Mango pickle prepared Indian style, or with any thin (soupy) leftover Curry/Saalan. I also love to savor it along with Khatti Dal. My Mother used to serve it us when I was a kid along with a handful of shallow fried groundnuts. 

This goes as an entry to the event, Click Yellow for Bri, being held this time as a Cancer Fundraiser by Jai and Bee for Briana Brownlow.

This also goes all the way to Raaga of The Singing Chef for the WBB#23 Express Breakfast Event she is holding this month.

Luv,
Mona

AddThis Social Bookmark Button