Tamatar ki Dal

August 18th, 2009 Mona Posted in Cilantro/Kothmir (fresh), Cumin seeds/Zeera, Curry leaves (fresh), Dried Red Chillies, Garlic/Lahsun, Ghee, Green Chillies, Red Chilli powder, Salt/Namak, Tomato/Tamatar (fresh), Turmeric/Haldi, Yellow Lentil/Tuvar ki Dal/Toor dal 10 Comments »

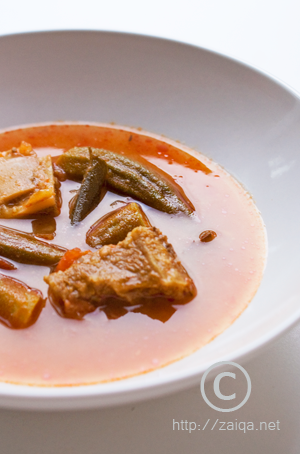
Simple dals like the old-time Tamatar Dal always reminds of home, my childhood and comforts a vexed being. Thin soup like consistency of pureed flavored dals with a delicious tempering of spices is a staple in my house, used to wet rice and enjoyed along with a vegetarian or a non-vegetarian dry dish on the side.

Indian tomatoes are naturally sour unlike the tomatoes available here, that are slightly sweetish in taste. The sourness of the tomatoes imparts a delicious flavor to the dal.

A baghaar of aromatic healing spices in a little amount of ghee adds a delightful flavor to the dal. You could also use vegetable or canola oil instead.

Tamatar Dal – Tomato Lentil Soup

Ingredients:

Tuvar Dal/Yellow lentils – 1 cup
Water
Large Red Tomato – 4, roughly chopped
Small Green chillies – 4, finely chopped
Red Chilli powder – 2 tsp
Salt
Turmeric – 1/4 tsp
Ghee – 2 tsp
Curry leaves – 10 fresh leaves
Cilantro/Kothmir – 3 tbsp, finely chopped
Mint – 1 tbsp
Cumin seeds/Zeera – 1 tbsp
Dried Red chillies- 3
Garlic pods/Lahsun – 2, each sliced into two if the pods are very large

Tamatar ki Dal

Method:

1. Wash and drain the dal. Add the drained dal in a saucepan and pour in about three cups of water. Add 1 tsp salt, green chillies, chopped tomatoes and bring it a boil. Lower the heat to medium, half cover the lid and let cook until the dal is soft and mushy. Add more water if needed.
2. At this stage, you can pour the dal contents into a blender and blend until pureed. This is entirely optional, only if you prefer a smooth consistency. Or you can just mash up the cooked dal using a ‘Dal Ghotni’. Pour it back into the same saucepan, and add red chilli powder, 2 tsp salt and turmeric. Mix well and add 2 glasses of water. Let cook on medium heat uncovered for 10-15 minutes, until you achieve a just slightly thick soup like consistency. Remove from heat. Add chopped cilantro and mint leaves.
3. Pour ghee into a pan at medium high heat. As soon as it gets warm, add the garlic pods, stir fry until the garlic pods are lightly reddish brown in color. Quickly mix in cumin seeds, dried red chillies and curry leaves. Remove the pan from heat. This is the baghaar or the tempering. Add the contents of the pan into the dal and mix well. Serve.

Suggested Accompaniments: Khushka and any vegetarian or non-vegetarian dish.

This delicious dal is my entry to the event ‘Delicious Dals from India’ being hosted by Suma at her blog Veggie Platter.

Luv,
Mona

AddThis Social Bookmark Button

Kariyapaak

August 12th, 2009 Mona Posted in Curry leaves (dried), Curry leaves (fresh) 2 Comments »

Fresh fragrant bright green colored leaflets of the Curryleaf tree, belonging to the citrus family, are extensively used in Indian cuisine in curries and chutneys preparations as the seasoning and flavoring. Curry leaves are called as Kariyapaak in Urdu language and Karipatta in Hindi. These edible leaves have a fresh, spicy and tangerine-like aroma and taste due to the abundant essential oils present in it.

A sprig of the Curryleaf plant

Having a fresh constant supply of curryleaf whenever you need a few leaves, is best for its flavor and appearance to do justice to your food. Both freezing or drying the fresh leaves for longer life compromises on its appearance and flavor, but nonetheless practiced to store the leaves for later use.

Fortunately, Indian stores here in Toronto sell fresh Curryleaf sprigs and I store a few fresh sprigs in a loose plastic packet with a few holes in the refrigerator, and use whenever required. This way they eventually dry out and can be stored as such for a long time. You could even spread some fresh leaves on trays in the sun to dry out and later store in air tight moisture free canisters/containers in the refrigerator. You can also pluck the fresh leaves from the springs and freeze them in small ziplock plactic bags. All these methods can extend the life of the leaves for up to 2 or 3 weeks. However use them up as soon as possible and I only recommend using fresh leaves for the best flavor and aroma.

This plant is quite commonly seen in most houses in India and can be propagated by root division, cuttings and from seeds.

Before you leave, have a look at the gigantic Curryleaf tree at Nupur’s parents house in India.

Luv,
Mona

AddThis Social Bookmark Button

Bitter, but better

July 31st, 2009 Mona Posted in Bittergourd/Karela, Canned Tomato paste, Canola Oil, Cilantro/Kothmir (fresh), Coconut Cream, Coriander seeds, Cumin seeds/Zeera, Ghee, Ginger-Garlic paste, Lamb/Beef/Mutton/Veal/Sheep, Mint/Pudina (fresh), Red Chilli powder, Salt/Namak, Tamarind/Imli, Turmeric/Haldi, Yellow Onion/Pyaaz 13 Comments »

Karela~Bittergourd, a not very favorite vegetable of kids as well as most adults, is full of medicinal properties. People, who have a liking and an acquired taste for bittergourd are doing themselves a great favor. Its peel, seeds and flesh, every part of this vegetable is laden with health benefits. This vegetable has remedial properties for illnesses such as Diabetes, Asthama, Hypertension, GI disorders, Urinary disorders, HIV/AIDS, and many other ailments by lowering blood sugar levels, helping the liver function better, and has a wonderful healing effect on blood. The smaller the size of the vegatable, the more nutritous it is.

Bittergourd ~ Karela

Fortunately, my family enjoys bittergourd, and I am always delighted to get this humble vegetable home whenever they appear in the market here. Today I prepared these two dishes for our meal and we all enjoyed it.

Usually, I shallow fry bittergourd chips, but today I tried them in a healthier way, Indira inspired, and they were perfectly good.

Bitter-Gourd/Karela Chips

Ingredients:

Bitter gourd/Karela – 2, medium sized, yound and tender
Red chilli powder – 1 tsp
Salt – 1/2 tsp
Turmeric – 1/4 tsp
Ghee – 1 tsp

Bittergourd cut into thin chips

Bittergourd chips

Method:

1. Preheat the oven to 350°C.
2.Wash the bittergourd well in several changes of water. Pat dry with paper towel.
3. Using a mandoline or hand slicer, slice the bittergourd into thin chips. There is no need to peel the skin.
4. In a mixing bowl, add the bittergourd and the rest of the ingredients. Gently toss the bowl to mix well.
5. Line a baking sheet with aluminium foil. Place the raw bittrgourd chips in a single layer on the baking sheet and place it in the middle rack in the preheated oven for 10 mins at 350°C. Later, turn the setting on broil for 3-5 minutes. Keep a close eye, and remove the baking sheet as soon as the chips are done. Serve immediately.

Suggested Accompaniments: Bittergourd chips can be enjoyed on the side along with any of your meals.

***

I love to cook Bittergourd along with Qimah. Bittergourd when cooked with minced meat brings out the flavor of the meat and and in turn its bitterness is amazingly neutralized by it.

Qimah bhare Karelay – Bitter-Gourd stuffed with Minced meat

Ingredients:

Bitter gourd – 4, medium sized, young and tender
Canola oil – 2 tbsp
Yellow Onion – 1, medium sized
Ginger-garlic paste – 2 tsp
Minced lamb/Sheep/Veal meat~Qaaeema – 1 pound
Red chilli powder – 2 tsp
Salt – to taste
Turmeric – 1/4 tsp
Roasted Cumin seed powder – 1/2 tsp
Roasted Coriander seed powder – 1 tsp
Coconut cream – 1 tbsp
Canned Tomato paste – 3 tbsp
Tamarind concentrate – 1 tbsp
Chopped cilantro and mint – to garnish

Bittergourd, lightly scraped, stuffed and tied close with twine

Method:

1. Wash and pat dry the bittergourd. Lightly scrape the skin using a knife (I scraped it for even searing). Cut off just the tips of the bittergourd with your kitchen shears.
2. With the tip of a knife, carefully open the bitter gourd to form into a boat shape, and remove the seeds from inside without tearing/damaging the bittergourd. Chop the bittergourd seeds roughly and keep the seeds and bittergourd aside in individual bowls.
3. In a pan at medium high heat, pour 1 tbsp oil and as soon as it warms up, add sliced onions and stir fry until golden brown. Add the ginger garlic paste and stir fry for a few seconds. Add the washed minced meat. Mix well and add the red chilli powder, turmeric and salt. Let cook uncovered until the meat is browned and the moisture has dried up. Keep stirring the meat every once in a while. Remove from heat once done.
4. Stuff the bittergourd with the prepared Qimaha and tie to close the bittergourds using a kitchen twine.
5. In a pan at medum high heat, pour remaining oil and as soon as it warms up, add the stuffed tied bittergourd. Stir fry them until lightly seared on all sides. Remove the bittergourds into a platter using a strainer and keep aside.
6. Add the left over prepared qimah into the same pan, and add the chopped bittergourd seeds, cumin and coriander powders, tomato paste, coconut cream and tamarind concentrate. Mix well and pour in 1 1/2 cup water. Close the lid and let it come to a boil. Lower the meat to medium and add the stuffed bittergourd. Close the lid and let cook for 10 minutes. Later, gently give a good stir and again close the lid and let cook for 10 minutes, until the qimah is fairly dry and the bittergourd is well cooked.
7. To serve, discard the kitchen twine and cut each bittergourd into two using a knife. Garnish with chopped cilantro and mint and serve immediately.

Qimah bhare Karelay – Bitter-Gourd stuffed with Minced meat

Suggested Accompaniments: Enjoy Qimah bhare Karelay along with Khatti dal and a dry vegetable curry on the side for a delicious meal.

Luv,
Mona

AddThis Social Bookmark Button

Palak ki Pakodi, Til ki Chutney

July 29th, 2009 Mona Posted in Canola Oil, Cilantro/Kothmir (fresh), Garlic/Lahsun, Ginger-Garlic paste, Gram Flour/Besan, Green Chillies, Mint/Pudina (fresh), Red Chilli powder, Salt/Namak, Sesame seeds/Til, Spinach/Palak ki bhaji, Tamarind/Imli, Turmeric/Haldi 12 Comments »

It has been raining since a few days here, and I was craving for some snacks. Palak Pakodi with Til ki Chutney is what I prepared today and we enjoyed it الحمد لله along with chai.

Palak ki Pakodi – Spinack Fritters

Ingredients:

Spinach – 100 gms

Palak – Spinach

For the batter:-

Gram flour/Besan – 1 cup
Cool fresh water – 1 cup
Red Chilli powder – 1 tsp
Salt – 1 tsp
Turmeric – 1/4 tsp
Ginger garlic paste – 1 tsp

Palak ki Pakodi – Spinack Fritters

Method:

1. Heat oil in a kadai to deep fry the fritters.
2. In a bowl, prepare the batter. Mix all the ingredients under the heading for the batter until the batter is smooth. Keep aside.

Spinach strips in batter

3. Wash and pat dry the spinach thoroughly. Discard stems and pile the spinach one above the other. Cut into strips and add it to the batter. Using a fork mix well and gently lift a small amount in the fork and drop it into the hot oil in the kadai. Deep fry on both sides until golden brown in color, around 3-5 minutes.
4. Remove the fritters into a large wire mesh strainer for the excess oil to drip off.

Til ki Chutney – Sesame seed Chutney

Ingredients:

Sesame seeds/Til – 1/2 cup
Small green chillies – 5, stems discarded, roughly chopped
Tamarind concentrate – 2 tbsp
Fresh Chopped Cilantro/Kothmir – 1 tbsp
Fresh Mint leaves/Pudina – 6 leaves
Garlic cloves – 2
Salt – to taste
Fresh cool water – 3/4 cup

Til ki Chutney – Sesame seed Chutney

Method:

1. In a pan at medium high heat, dry roast the sesame seeds until lightly golden brown in color. Remove the pan from heat and keep aside to cool.

Dry roasted Sesame seeds

2. Once the sesame seeds are completely cooled, add the rest of the ingredients and grind in a blender until smooth. Add more water if you need. Adjust salt to taste.
3. Prepare baghaar/tempering in a pan- pour 1 tbsp oil in a frying pan at medium hight heat. Add 1 tsp cumin seeds, 2 dry red chillies, and a few curry leaves. As they crackle, remove from heat and mix into the chutney. Serve.

Dip the Spinach fritters into the chutney and enjoy as a snack.

I also prepare this snack along with the chutney quite usually in Ramadan at Iftaar. This is my entry to the ‘Hyderabadi Ramadan Food Festival ’09’ that I am hosting on my blog.
Do send me your entries as soon as possible before Ramadan starts. The deadline is 20th August ‘09.

Luv,
Mona

AddThis Social Bookmark Button

Tamatar ki Kadi

July 27th, 2009 Mona Posted in Canola Oil, Coriander seeds, Cumin seeds/Zeera, Curry leaves (fresh), Ginger-Garlic paste, Lamb/Beef/Mutton/Veal/Sheep, Okra/Bhindi, Red Chilli powder, Rice flour, Salt/Namak, Tamarind/Imli, Tomato/Tamatar (fresh), Turmeric/Haldi 13 Comments »

Delightfully sweet, and subtly sour, is how I describe the taste of this curry. Memories of my childhood are closely yet again associated with this traditional dish that my Ammi used to prepare with so much love for us all.

Tamarind – Imli
AntiClockwise from top – Tamarind pod; inside the pod without shell; tamarind seeds; tamarind pulp shaped into ball; leftover fibre from the pod to be discarded

Tamarind, an essential ingredient in Indian cuisine, is used in this recipe for a sweet-sour flavor. The prepared curry is then subtly thickened with finely powdered rice and allowed to cook for a little while to impart a silky texture to the curry.

***

Pre-prererations for the curry: (you can prepare these a day before you plan to make the curry)
1. Tamarind pulp:

Remove the shell of the tamarind pod, and gently pull away the fibres meshed with the inner pulp and remove the seeds embeded inside. Discard the shell, fibre and seeds. Shape the pulp into a ball to use. (See the picture above for an idea)

2. Rice powder:

Soak rice for 2-3 hours in cool water. Drain the rice and spread on a cloth to air dry for a few hours. Once completely dry, powder the rice very very finely in a spice grinder to use. The texture of the rice powder should be similar to that of flour, or else coarsely ground rice results in an unpleasing gritty texture in the curry. This ground rice flour is used as the thickener in this curry.

***

Tamatar ki Kadi – Okra and Meat in tangy Tomato Sauce

Ingredients:

Canola Oil – 2 tsp
Ginger paste – 1/2 tsp
Garlic paste – 1 tsp
Fresh Curry leaves – 2 sprigs
Veal/Lamb/Goat/Sheep meat with bones – 600 gms (boneless meat is not recommended)
Tomatoes – 5, large, roughly chopped
Roasted Coriander seed powder – 1/2 tsp
Roasted Cumin seed powder – 1/2 tsp
Red chilli powder – 1 tbsp
Turmeric – 1/4 tsp
Salt – to taste
Okra – young and tender pods, 100 gms, tailed and topped
Tamarind pulp – lime sized ball of tamarind pulp, or as per taste (see above)
Very Finely powdered Rice – 4 tbsp (see above)

Tamatar ki Kadi

Method:

1. In a pressure cooker at medium high heat, pour oil, and as soon as it warms up, add the ginger and garlic pastes. Fry it for a few seconds. Add the curry leaves and as they splutter, add the meat and the tomatoes, salt, red chilli powder, turmeric,, cumin and coriander seed powders and mix well. Pour in 3 cups of water and pressure cook until the meat is tender.
2. Open the lid of the cooker, and add the okra. Half cover the lid and let cook for 8-10 minutes or until the okra is tender. Add the tamarind pulp and mix well.
3. In a small bowl, add 1/2 cup warm water and add the rice powder to it. Mix well so that it doesnt get clumpy, and gently pour this mixture into the pressure cooker stirring continously. Let it cook uncovered for 10-12 minutes until the sauce leaves oil and thickens gradually because of the rice powder. Remove from heat and serve warm.

Once the curry is no longer warm, it begins to thicken due to the thickener added. If the left over is refrigerated it turns into a slighty pasty consistency, but do not worry, as soon as it is reheated with the addition of a little water, its consistency will thin up again.

Luv,
Mona

AddThis Social Bookmark Button