Strawberry-Kiwi Jam

July 14th, 2009 Mona Posted in Kiwi, Lemon/Nimbu, Mint/Pudina (fresh), Strawberry, Sugar/Shakkar 13 Comments »

With Strawberry season at peak here, every farmers market seems to be flooded with these juicy beauties. I brought home a good quantity and have been enjoying them in various ways, and reserved a few to prepare some jam.


Chopped Strawberries and Kiwi

I also had a few kiwi sitting pretty in the refrigerator which I decided to add to the strawberry jam. The end result was a sweet+tart+delightful jam which my family enjoyed.

Strawberry-Kiwi Jam

Ingredients:

Strawberry – 750 gms, stems removed, cored and chopped
Kiwi – 6, peeled and chopped
Sugar – 600 gms
Fresh mint leaves – 8, finely chopped
Lemon juice – 1 tbsp

Strawberry-Kiwi jam on toast – my breakfast

Method:
1. Add sugar to the chopped strawberries and mix well in a mixing bowl. Cover and keep the bowl in the refrigerator overnight for the juices to extract.
2. The next day, pour the contents of the mixing bowl into a stainless steel saucepan and add all the remaining ingredients to it. Mix well and let it cook uncovered at medium high heat for 45-55 mins. Keep stirring and keep a close eye on it. During the last 15 mins, lower the heat to medium low. Remove from heat once done.
3. Spoon the prepared jam into a sterlised canning jar and seal the jar according to instructions. Once it is at room temperature, refrigerate the jar to store.

Note: This is a preservelike spread and not a true preserve and must be refrigerated to avoid spoilage, because it contains a higher proportion of fruit to sugar and retain more fresh fruit flavor.

**

Interesting reads on Jams and Jellies

****

Good Eats:
Rajeshwari at Raks Kitchen explains the detailed step by step tutorial to prepare Jahangiri jalebi at home. They look yummy!

Luv,
Mona

AddThis Social Bookmark Button

Turai Methi Gosht ka Salan

July 11th, 2009 Mona Posted in Lamb/Beef/Mutton/Veal/Sheep, Methi (fresh), Red Chilli powder, Ridged Gourd/Turai, Salt/Namak, Turmeric/Haldi, Yellow Onion/Pyaaz 5 Comments »

Fresh Fenugeek leaves~Methi patta, a cleansing and healing Indian herb, adds an earthy flavor when cooked. Every Summer, I religiously sow a few seeds of methi along with other herbs and veggies in the small patch of vegetable garden in my lawn and enjoy the summers bounty.

Freshly plucked matured fenugreek plants and chopped turai

Fenugreek leaves are rich in iron, protein, calcium, carotene (vitamin A). When steamed along with Turai and meat, it enhances their taste and makes the curry more flavorful and appealing.

Turai Methi Gosht ka Salan – Ridged Gourd in Meat+Fenugreek leaves sauce

Enjoy this mellow tasting curry along with something khatta/sour like the khatti dal or khatta salan for a delicious meal.

Turai Methi Gosht ka Salan – Ridged Gourd in Meat+Fenugreek leaves sauce

Ingredients:

Yellow onion – 2, large, peeled and roughly chopped
Red chilli powder – 1 tbsp
Turmeric – 1/2 tsp
Salt – 2 tsp
Sheep/Veal meat with bone – 650 gms
Turai – 6, medium sized, peeled, and sliced
Small Green chillies – 2 or 3, chopped (optional)
Fresh Methi leaves – 2 cups, loosely packed, finely chopped (discard stems and flowers)

Method:

1. In a pressure cooker, add chopped onions, red chilli powder, salt, turmeric and meat. Pour half cup water and mix well. Close the lid and pressure cook for about 10 minutes or until the meat is tender.
2. Open the lid and add the chopped turai. Mix well with a spoon. Half cover the lid and let it cook for 20 minutes.
3. Add the chopped green chillies (if using), and chopped methi and stir well to mix. Cook uncovered for about 10 minutes until most of the liquid has evaporated. Serve warm.

Luv,
Mona

AddThis Social Bookmark Button

Talahuwa Qimah

July 6th, 2009 Mona Posted in Canola Oil, Cilantro/Kothmir (fresh), Curry leaves (fresh), Ginger-Garlic paste, Lamb/Beef/Mutton/Veal/Sheep, Lemon/Nimbu, MDH Chat Masala powder, Mint/Pudina (fresh) 9 Comments »


Tala huwa Qimah

Sautéed minced meat/Talahuwa Qimah along with Kacchi Imli ki Khatti Dal and plain Basmati rice is ideal for a simple yet delicious meal. My Ammi always used to prepare Talahuwa Qimah as a change from the usual Qimah recipes and we all always relished it.

Tala Huwa Qimah – Sautéed Minced Meat

Ingredients:

Cumin seeds – 1 1/2 seeds
Ginger garlic paste – 1 heaped tbsp
Dried red chilli – 2, each split into two
Curry Leaves/Karyapaak – 10 fresh leaves
Minced Veal or Lamb or Sheep meat/Qimah – 800 gms
Red Chilli powder – 2 heaped tsp
Salt – to taste
Turmeric – 1/2 tsp
Coriander powder – 1 tsp
Juice of 1 Lime/Lemon
MDH Chat Masala powder – 1/2 tsp (optional)
Fresh Cilantro and Mint leaves – 1 tbsp, finely chopped
Canola oil

Method:

1. Wash Qimah and drain in a fine wire mesh strainer.
2. In a non-staick heavy bottmed Kadai/Wok, pour 2 tbsp oil and as soon as it warms up, add cumin seeds and ginger garlic paste and stir fry till it is lightly golden brown. Add the dried red chiili, karyapaak and quickly in a minute add the Qimah. Using a wooden spoon mix it all well and keep stirring it breaking the lumps of the Qimah for 3-5 minutes.
3. Let it cook uncovered at medium high heat until most of the moisture has been evaporated and the qimah is nicely cooked. Pour in about 3 tbsp oil and all the other ingredients and stir fry the qimah for 25-30 minutes more, stirring continously. Keep sprinkling a few drops of water if it tends to stick on the bottom of the Kadai. Fry the Qimah well and serve warm.

Suggested Accompaniments: Enjoy the Talahuwa Qimah along with Kacchi Imli ki Khatti Dal and Plain boiled rice for a delicious meal. 

Luv,
Mona

AddThis Social Bookmark Button

Kothmir-Cilantro

June 30th, 2009 Mona Posted in Cilantro/Kothmir, Cilantro/Kothmir (fresh) 13 Comments »

Cilantro (Coriander leaves), also called as Kothmir or Hara Dhaniya in Urdu language, is my favorite, most quintessential culinary herb with a wonderful aroma, which I love to add in most of my vegetable and meat preperations while I cook. The leaves are rich in vitamin C, vitamin A, the B vitamin riboflavin and dietary fiber.
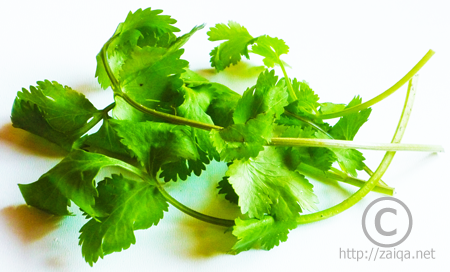
Cilantro or Kothmir

To plant and harvest:
Growing this fragrant herb is easy. Every Indian kitchen is stocked up with coriander seeds. Just sow a few of them into soil, water a little daily to keep the soil moist. They sprout in about 10 days time. I sowed a handful seeds in railing planters, as well as in a few used yogurt boxes (which I washed throughly, and made two holes in the bottom, before adding soil and sowing) and they grew beautifully.

Cilantro growing in planter

Cilantro blooms are the most fragrant. If you pluck a few, the strong fragrance lasts in your fingers for a long time for everybody to notice.
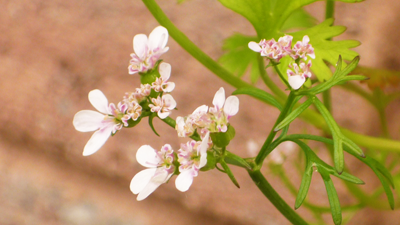
Cilantro Blooms

Cilantro Blooms developing into Coriander seeds

I sow a few coriander seeds, once every two months (optional: and fertilize them with manure), so that I have cilantro at hand whenever I need it. Place the pots outdoors in summers, and sow them indoors in pots in front of bright windows in winters. Make sure to harvest the Cilantro before it goes into the blooming stage.

To store Cilantro – I usually follow the subsequent ways to store fresh cilantro:

1. Discard the tough stem ends and spread out the tender (unwashed) cilantro over a paper towel as shown in the picture below.

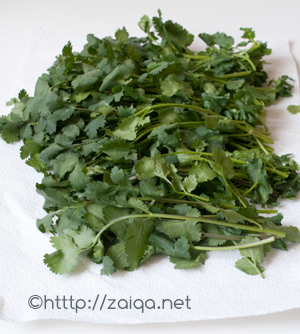
Gently roll the tender cilantro snugly in paper towel.

Transfer this roll to a zip-lock plastic bag, squeeze out air and store refrigerated. Before using, wash required amount thoroughly in water, pat dry and use as required. Use the roll within 2-3 weeks. Keep checking, if the paper towel has become damp or needs a change, replace it with a fresh paper towel for the cilantro to last longer.

2. Discard the tough stem ends and store the tender (unwashed) cilantro in a plastic box. Place two raw eggs in shell in the box and cover with a tight fitting lid.

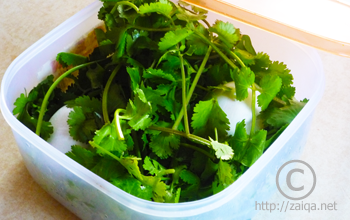
The egg absorbs the excess moisture and keeps the cilantro fresh for almost 2 or 3 weeks. Discard the egg after 3 weeks of use, and replace with new if required. Before using cilantro, wash required amount thoroughly in water, pat dry and use as needed.

3. An another way to store fresh cilantro is to freeze it, just like I do with fresh mint leaves. This way you can store fresh cilantro indefinitely.

Discard the tough ends of cilantro. Wash the bunch in a sink of fresh cool water. Swish it vigorously. Plunge it in and out. Remove from water and shake off excess water. Spread on a kitchen towel and let dry for 30 minutes. Now chop them all up roughly. In an ice-cube tray, tightly pack roughly chopped cilantro along with its tender stems into each of the molds of the tray. Cover with water and freeze overnight. The next day, working quickly, unmold the frozen cilantro cubes from the ice-cube tray and transfer them to a zip-lock bag. Squeeze out air and freeze immediately. To use, add the frozen cubes to the curries during the last stages of cooking.

Luv,
Mona

AddThis Social Bookmark Button

Kaddu ka Dalcha

June 24th, 2009 Mona Posted in Bottle Gourd/Kaddu, Canola Oil, Chane ki Dal, Cilantro/Kothmir (fresh), Cumin seeds/Zeera, Curry leaves (fresh), Dried Red Chillies, Red Chilli powder, Salt/Namak, Tamarind/Imli, Tomato/Tamatar (fresh), Turmeric/Haldi, Yellow Lentil/Tuvar ki Dal/Toor dal 16 Comments »

I am so in love with the bottle gourds that I get here in the Asian stores in Toronto. Young and tender with bright spring-bud green color is how I describe the bottle gourds that I get here.

Kaddu, Split Chana Dal, Tomato

Kaddu, aka ‘Bottle gourd’ or ‘Opo squash’ in English

Dalcha refers to soupy dal preparation from Hyderabad. It can be prepared with only a vegetable, which I am writing about today, or along with meat with bone combination, also called as Daalcha Gosht. The dal with either of the combination is then simmered gently in a tomato with tempering/baghaar spices sauce that impart a beautiful aroma and flavor. Once the vegetable and meat is tender it is allowed to cook with the mashed dal. Today I prepared Dalcha with bottle gourd for my lunch along with Qimah Methi and Matar Chawal. Traditionally Dalcha is served along with Baghara Chawal and Phalli Gosht, or even along with Biryani on the side.

Kaddu, peeled and cut into Diamonds

Peel and cut bottle gourd kaddu diagonally into large diamond shapes. The kaddu that I have used today was very green and callow, so it didnt have any tough and aged seeds. If there is any fibrous central pith with mature hard seeds, I suggest you slice the central pith and discard it and use only the clean white flesh. But it not mandatory.

Kaddu Ka Dalcha

Kaddu Ka Dalcha – Bottle Gourd in Legume Soup

Ingredients:

Chana dal/Bengal gram (or) Yellow lentils/Tuvar ki dal – 1 1/2 cups
Salt
Canola oil/Ghee – 2 tbsp
Cumin seeds – 2 tsp
Garlic pods – 2-3, peeled and crushed
Dried red chillies – 2, each broken into two and stalks removed
Curry leaves – 10 fresh leaves
Tomato – 2, large, ripe and red, finely chopped
Chopped Cilantro – 1 tbsp
Red chilli powder – 2 tsp
Salt – to taste
Turmeric powder – 1/4 tsp
Bottle gourd/Opo Squash/Kaddu – 1, medium sized, around 750 gms
Raw tamarind juice/Kacchi Imli ka juice – 4 tbsp or to taste

Method:

1. Peel the bottle gourd. Slice off and discard the top and bottom of the gourd. Cut the bottle gourd into two halves lengthwise. If the central pith of the bottle gourd contains mature seeds, discard the central pith, or if the bottle gourd is young and tender, there is no need to discard the central pith. Now cut each half into 1 inch thick strips lengthwise. Cut each strip diagonally into 2-3 inch pieces.
2. Wash the dal in two or three water changes. Drain and keep aside. In a pressure cooker, add the drained dal and 4 cups water. Add 2 tsp salt and pressure cook the dal until it is soft and well cooked. You can puree the dal in a blender and pour it back back into the saucepan and keep aside. I just mash it using a dal ghotni or use an immersion blender sometimes.
3. In a large frying pan at medium heat, pour canola oil, and as soon as it warms up, add the cumin seeds and the crushed garlic pods. After 30 seconds, add the dried red chillies and curry leaves. Immediately add the chopped tomatoes, chopped cilantro, red chilli powder, salt, turmeric and mix well. Cover the lid for about a minute. Add the chopped bottle gourd and mix well. Pour in water to cover the bottle guard pieces and cover the lid. Let cook for about 10 minutes or until the bottle gourd is tender. To check, pierce a piece of bottle gourd with the tip of a sharp knife.
4. Once the bottle gourd is tender, add this to the saucepan with the pureed dal and pour in water to dilute and achieve a thin soupy consistency. Add the tamarind juice and mix well. Taste for seasonings. Let it boil once, then simmer and let it cook for 5 minutes. Serve warm.

This delicious dal is my entry to the event ‘Delicious Dals from India’ being hosted by Suma at her blog Veggie Platter.

Luv,
Mona

AddThis Social Bookmark Button