Masala Vada

April 14th, 2010 Mona Posted in Canola Oil, Chane ki Dal, Curry leaves (dried), Curry leaves (fresh), Dill/Suvabhaji (fresh), Ginger/Adrak, Green Chillies, Red Chilli powder, Salt/Namak, Yellow Onion/Pyaaz 6 Comments »

An Andhra special street food and snack, most often seen being sold at Indian Railway Platforms, these crunchy on outside but soft inside vada’s are my favorite tea time snack along with chutney and some warm chai. They are made out of lentils, herbs, spices and chopped onions. Sometimes I also dunk these vada’s into warm sambar and enjoy the vadas as a mini meal.

Masala Vada

This time I added a few dill leaves that were lying in the refrigerator. You can add fresh chopped cilantro or mint or amaranth leaves or even spring onions (if using spring onions, skip chopped onions in the recipe and add both the chopped greens as well as the whites) instead.

Masala Vada – Lentil Fritters

Ingredients:

Chana dal – 1 cup
Green chillies – 4-6, finely chopped
Ginger – 1 tsp, minced
Red chilli powder – 1/2 tsp
Curry leaves (fresh/dried) – 1 sprig, finely chopped
Salt – to taste
Onion – 1, small, finely chopped
Dill leaves – 1/4 cup, finely chopped
Canola oil – to deep fry

Method:

1. Soak the chana dal in a bowl with surplus fresh cool water for 2 hours. Later, drain and reserve about a fistful of the soaked chana dal aside in a bowl. Add the rest of it into a food processor. Process until coarse, do not puree the mixture, and do not add any water while grinding. Remove the coarse chana dal into a mixing bowl. Add the reserved soaked chana dal and add the rest of the ingredients except oil. Mix well, and shape into patties.
2. Heat oil to deep fry in a kadai or a deep saucepan. Once the oil is hot, fry the patties one by one on both sides until golden. Remove into a wire mesh strainer or a paper towel lined platter for excess oil to drain away and serve warm along with coconut chutney or coriander and mint chutney or sambar.

Luv,
Mona

AddThis Social Bookmark Button

Chatpata Chaat

April 5th, 2010 Mona Posted in Black pepper powder, Canola Oil, Cilantro/Kothmir (fresh), Coriander seeds, Cumin seeds/Zeera, Ginger-Garlic paste, Green Chillies, Hyderabadi special, Red Chilli powder, Salt/Namak, Tomato/Tamatar (fresh), Turmeric/Haldi, White Potato/Aloo, Yellow Onion/Pyaaz, Yogurt/Dahi 12 Comments »

The mere mention of chaats reminds me of those visits to Gokul chaat bhangaar. It is a popular eatery for fast food snacks in Hyderabad city. Inspite of going through many controversies, this tiny eatery has been able to attract crowds of foodies who come flocking to this place from even across the city and cram on the roadside at King Koti blocking the busy traffic, just to fill up their stomachs with the delicious chaat items that they sell at reasonable prices.

For those of you not familiar with the term, chaat in India refers to all kinds of snack or fast food items that a popular street food with a mingling taste of spicy, sweet, sour, soft, salty and crunchy. For chaat preparation a variety of pre-prepared ready to use ingredients are mixed together just prior to consumption. There exist many regional variations of chaats in India. Pani Puri (also known as Golgappe), Chana Cutlet, Ragda Cutlet, Ragda Samosa, Dahi Puri, Fruit Chaat, Bhel Puri etc are just a few mentions. Today I am writing about Chana Cutlet, Ragda Cutlet and Ragda Samosa.

Ragda Cutlet
Other names: Ragda Patties, Ragda Pattice, Ragda Tikki, Ragda Pattie

Ragda Cutlets used to be one of the hot sellers at the Gokul Chaat Bhandaar. Every once in a while, while on the way to Pura Shahar/Old City (Hyderabad, India), we used to make a stop there and enjoy the yummy chaats. To make this wholesome snack, a spicy peas mixture is made and is served along with aloo cutlets, tangy chutneys, some sweetened yogurt and chopped onions.

dried green peas and dried yellow/white peas~ available at Indian grocery stores
Note: Split yellow peas that are available in the market are neither Tuvar ki dal or Chane ki dal

Ingredients:

For Ragda:
Dried Yellow/White Peas – 1/2 cup
Dried Green peas – 1/2 cup
Canola oil – 2 tbsp
Onion – 2, medium sized, finely sliced
Ginger-garlic paste – 1 tbsp
Green chillies – 3, finely chopped
Roasted Coriander seed power – 1 tsp
Roasted Cumin seed powder – 1 tsp
Turmeric powder – 1/4 tsp
Tomatoes – 3, medium sized, finely chopped
Red chilli powder – 1 tbsp
Salt – to taste
Cilantro – 2 tbsp, finely chopped
For Cutlets:
Potatoes – 6, mediu sized, peeled and quartered
Water
Black pepper powder
Salt
For Garnish:
Kothmir Pudina Chutney
Tamarind chutney
Chopped Onion
Sev (store bought ready made, or home made)
Sweetened Yogurt

Ragda Cutlet

Method:

For Radga
1. Soak the dried peas in fresh cool water overnight. The next day, drain the peas and wash them. Add them to the pressure cook add pour in water to cover the peas by 2 inches. Add 1 tsp salt and pressure cook until they are soft but not mushy.
2. Meanwhile, in a skillet at medium high heat add oil and as soon as it is warm, add the onions and stir fry for a few minutes until they are soft. Add ginger-garlic paste, turmeric powder, green chillies, coriander and cumin seed powder and stir continuously and let cook for a minute or two. Add tomatoes and mix well. Cover and cook while stirring in between until the tomatoes are soft and mushy. Add red chilli powder, salt and chopped cilantro and stir to mix.
3. Once the peas are done, add the contents of the skillet to the peas in the pressure cooker and mix well. Add more water if needed. Mash up the mixture just a little bit leaving some peas whole in the mixture. Let the mixture cook for some time until you get a gravy consistency. Remove from heat and keep aside.
For Cutlets:
4. In a microwave safe bowl, add the quartered potatoes and about 1/2 cup water. Mix and microwave on high for a few minutes (5-8 minutes or more, keep a watch) until the potatoes are soft. Once soft, mash them using a fork. Add black pepper powder and salt to taste and mix. Shape into cutlets and shallow fry all the potato cutlets on both sides. Keep aside.
To Assemble:
5. Arrange two warm potato cutlets on a plate. Pour two (or more if you wish) ladlefuls of warm ragda on them. Pour a few tablespoons of kothmir pudina chutney, tamarind chutney and sweetened yogurt. Sprinkle chopped onion and sev over it. Serve immediately.

***

Below are a few variations of chaats you can prepare using the method above with a few substitutions here and there.

Chana Cutlet:
For chana cutlet, prepare cholay, and while assembling instead of adding ragda, add cholay and follow the rest of the procedure.

Ragda Samosa:
For ragda samosa, prepare aloo samosa and while assembling instead of adding cutlets, break two samosas for each person and follow the rest of the procedure.

Luv,
Mona

AddThis Social Bookmark Button

Mint~Pudinah

March 29th, 2010 Mona Posted in Mint/Pudina, Mint/Pudina (fresh) 15 Comments »

Regular readers of my blog might be familiar with my love for gardening. Ever since I landed here, I have always maintained a little garden come spring/summer until fall, consisting of a few basic veggies and herbs. This has been my annual spring-summer ritual that gives me immense joy. Among them all, one herb that I always plant is Mint. I love the aroma and flavor of mint, also called as pudinah in Urdu.

store bought bunch of mint leaves from an Indian store,
this is Indian variety of Mint

Alluring aroma, bright green and crinkly opposite leaves with brownish square stems are some of the characteristic features of mint plant. There exist dozens of varieties of this hardy perennial. Out of all, I usually buy and use the kind available in the Indian grocery stores for my cooking. And at times I make do with spearmint which according to me is the closest of the Indian mint in flavor.

plucked Indian variety mint leaves

To grow Mint:

Growing mint from other healthy stems is very easy. There are two ways to grow your own mint.

1. One way is to grow them through store brought saplings.
2. The other way is to grow them from stem cuttings.

1. Buy your favorite variety of mint saplings from the garden centers or nurseries or from some friendly gardeners, and transfer them to wide and deep pots. I usually buy Spearmint or Peppermint or Indian mint. Place outdoors during spring/summer and water daily. Mint loves moist soil and grows vigorously once established. Keep snipping off the tips from time to time and use them in your cooking to promote a bushy growth and avoid flowering.

2. To grow mint from stem cuttings:
I always choose mint sprigs to be used as cuttings from Indian stores, as I find their tatse to be strong and synonymous to Indian culinary preparations. You can choose any variety you like. Just cleanly snip off two sets of opposite leaves from the bottom and leave the remaining at the growing tip. Make a clean diagonal cut just below the bottommost node, and plant the cutting in soil in a small container, or you can also place the cutting in a bowl/container with fresh cool water, such that the bottommost node is covered with soil or with water, in a bright area at room temperature that receives plenty of indirect sunlight.

stem cuttings of fresh & healthy Indian variety mint
placed in a glass with some fresh cool water so that they root

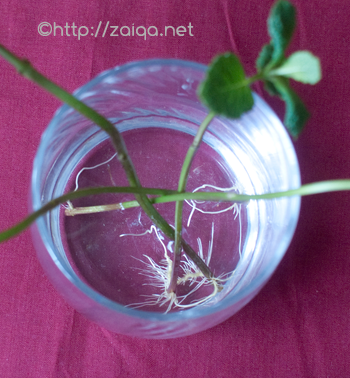
stem cutting beginning to root

In a week or two you will notice that the stem cuttings will start to root and develop new leaves. These roots are very fragile. Transfer these stems to a large and deep containers and place in a partly sunny area outdoors. Keep watering regularly whenever the soil looks dry. Soon you will have enough mint to share with your neighbors. Pinch back mint tips which make beautiful garnishes, or as required. This helps to keep the plant bushy and delay flowering.

Good to Know:

I advise growing mint only in large sized pots, tubs or containers and never in ground, as it invasive and quickly spreads out like a weed taking over your entire lawn or garden. Growing mint from seed is difficult, therefore I only recommend buying small seedlings from nursery or garden centers during early spring or use a stem cutting from the store brought mint you use for cooking. If during winters it gets very cold and snows in your area, then mint will die, but do not fret, it revives once winter ends. Bring the mint pots indoors during winters and place in front of windows that receives some bright daylight. Do not crowd several varieties a single pot/container. Mint prefers partly sunny areas and a moist soil, water it frequently whenever the soil looks dry.

Indian Mint growing luxuriously outdoors in a pot on the deck

To Store Mint:

Fresh is best when it comes to mint or any herbs. Buy one can always store it by either freezing the leaves or by drying them. I do not like to dry them.

1. To store fresh leaves, make a fresh cut below each stem and place the stems in a glass. Pour a little amount of fresh cool water into the glass that acts like a vase, taking care the water does not touch any leaves. Place it on the kitchen countertop in an area away from harsh sunlight. Change the water daily. This way, the stems will root which you can also use to plant the mint, and the leaves will stay fresh for a about 2-3 weeks.

2. An another way to store fresh mint is to pluck all leaves and store them covered in a zip-lock bag or container lined with paper towel in the refrigerator until needed.
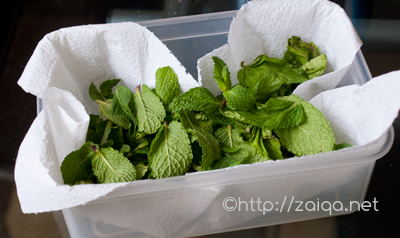
plucked mint leaves

This way the mint will stay fresh for about a week or two maximum.

3. I also freeze chopped mint, just like I do with fresh cilantro. This way you can store fresh mint indefinitely and you can add it to curries whenever you need it.

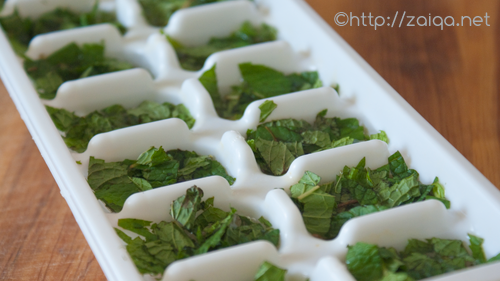
chopped mint in ice-cube tray ready to be freezed

Wash the mint leaves in fresh cool water. Spread on a kitchen towel and let dry for 30 minutes. Now chop all the mint leaves roughly. In an ice-cube tray, tightly pack roughly chopped mint into each of the molds of the tray. Cover with water and freeze overnight. The next day, working quickly, unmold the frozen mint cubes from the ice-cube tray and transfer them to a zip-lock bag. Squeeze out air from the bag and freeze immediately. To use, add the frozen cubes to the curries during the last stages of cooking.

Luv,
Mona

AddThis Social Bookmark Button

Aloo kay Samosay

March 23rd, 2010 Mona Posted in All-Purpose Flour/Maida, Canola Oil, Carom seeds/Ajwain, Carrot/Gajar, Cilantro/Kothmir (fresh), Cumin seeds/Zeera, Eid/Ramadhan/Iftaar, Garam masala powder, Ghee, Ginger/Adrak, Hyderabadi special, Kasuri methi, Lemon/Nimbu, Mustard seeds/Rai, Nigella seeds/Kalonji, Peas/Matar, Red Chilli powder, Red Potatoes, Roasted Coriander powder, Roasted Cumin powders, Salt/Namak, Turmeric/Haldi, White Potato/Aloo, Whole Wheat Flour/Durum Atta 17 Comments »

Chai shops, bakeries, mithaiwala shops, cart vendors, chat bhandars along the length and breadth of the Indian subcontinent, all sell these magical pastries. Originated and traveled to India possibly from the Middleeast, Samosas are triangular pastries, a popular street food, usually stuffed with minced meat, or a potato mixture. They are the usual appetizers that make their presence at the Nizami Hyderabadi meals, and also enjoyed throughout India and also all over the world by everyone. Samosas are also very famous in Toronto and loved by people here.

Samosas – ready to be eaten

This classic Indian snack food appears in different avatars and types within the Hyderabad city, and also all over India with minor regional variations, some differing in the fillings used, others varying in shapes. For example Luqmi, a rectangular qimah-minced meat stuffed appetizer commonly eaten in Hyderabad, is a royal cousin of samosa. Other regional variants of samosas include the sambusak, samusak or shingara etc.

Today I had prepared some aloo samosas~potato stuffed pastries that are just as good as the Qimah Samosas – minced meat stuffed samosas. You can even bake them if you wish, bit I like to deep fry and prepare them the way they were supposed to be made. The crisp outer texture of samosa is what I love the most.

Aloo kay Samosay – Potato Stuffed Triangular Pastries

Ingredients:

Canola Oil to deep fry
For Filling:
Canola oil – 2 tbsp
Cumin seeds – 1 tsp
Black mustard seeds – 1 tsp
Fresh Ginger – 1 tbsp, finely grated
Potatoes – 4, peeled and chopped
Carrot – peeled and chopped, 1 cup
Red chilli powder – 1 tsp
Dry roasted Coriander powder – 3/4 tsp
Dry roasted Cumin seed powder – 1/4 tsp
Kasuri methi – 3 tbsp
Salt – 1 tsp
Frozen green peas – 1/2 cup (or) Dried green peas – 1/2 cup, soak them in surplus water overnight and pressure cook until soft the next day, drain and keep aside to use
Lemon juice – 4 tbsp
Garam masala – 1/2 tsp
Cilantro – 2 tbsb, finely chopped
For Covering:
All-purpose flour/Maida – 1 cup
Whole wheat flour/Durum flour – 1 cup
Carom seeds/Ajwain – 1 tsp
Nigella seeds/Kalonji – 1/2 tsp
Canola Oil or Ghee – 2 tbsp
Water
Salt to taste

Method:

1. In a saucepan, heat oil and as soon as it warms up add the cumin seeds, mustard seeds and ginger and let them splutter. In a few seconds add the chopped potatoes and carrots. Add water to cover the vegetables and add red chilli powder, salt, cumin seed powder, kasuri methi and cover with a lid. As soon as the potatoes are done, uncover and add the frozen peas or cooked dried peas, garam masala, chopped cilantro and lemon juice. Cook while stirring until the mixture is dry. Keep aside.

2. Now prepare the dough. Add maida, ajwain, kalonji and salt in a mixing bowl and mix. Add canola oil or ghee and mix well using fingers. Gradually add water and knead to form a smooth and pliable dough. Turn the dough onto a floured work surface and knead until elastic. Cover with a towel and keep aside for 30 minutes for the dough to rest. Later shape the dough into 8 balls and cover them with a towel.
3. One by one roll the balls into thin ovals. Using a pizza cutter or a knife cut each oval in the center into two halves, thus a total of 16 half-ovals will be produced. Cover the rest with a towel while filling others. Take a half-oval and brush half of each straight edge using your fingertip with water. Fold the second half of the straight edge over the fist half to form into a cone. Pinch close the seam. Hold the cone with the open end up and fill the cone with some of the filling. Cut off any excess dough and use it later. Brush one side of the open end with water. Pinch to seal the top edges enclosing the filling. Prepare all the samosas the same way and keep them covered under a towel.
4. Once all are ready, heat oil in a deep saucepan or kadai. To test if the oil is ready to be used, drop a pinch of dough into the hot oil, the dough should come up within a few seconds. Deep fry the samosas a few at a time until golden. Using a slotted spoon remove them into a strainer. Serve warm along with tamarind chutney or ketchup. Once cool, they can even be stored in the refrigerator for 2-3 days and reheated in the oven.

To Bake the Samosa:
After step 4, place the samosas in a greased or non-stick baking tray. Bake in a pre-heated 220° C oven for 20 minutes or until light brown in color. Serve immediately

Note:
1.If you are finding it difficult to enlcose the filling in the dough this way, please head over to Qimah Samosa-Minced meat stuffed samosa where I have explained an easier way to assemble samosas.
2. If there is any left over dough and the filling has been used up, you can make namakpaare out them.
3. If there is any left over filling and the dough has been used up, use the filling to make vegetable curry puffs.

This month Sailaja is on a chaat spree and she is dishing out varieties of chaat items on her blog. Head over her blog to go though them all.

Luv,
Mona

AddThis Social Bookmark Button

Masala Upma

March 12th, 2010 Mona Posted in Black Gram/Urad Dal, Canola Oil, Curry leaves (fresh), Green Chillies, Groundnut/Moomphalli, Hyderabadi special, MDH Sambar powder, Quick fix meals, Semolina/Sooji/Suji, Tomato/Tamatar (fresh) 13 Comments »

This quick and simple preparation and a comforting one-dish meal is wholesome and perfect for a satisfying breakfast, brunch or a yummy snack and easy to take delight in. So when I returned home today tired and exhausted after a trip to the grocery mart and the Jumah salah, I thought of whipped up this instant masala upma and it was pure bliss.

Semolina/Sooji/Upma rawa (fine variety)

Idli, Wada, Sambar, Upma, Dosa are all famous South-Indian dishes, that are my absolute favorites too. And there exist many variations of each of them. This particular variation of Upma is one of my favorites. I enjoy my upma along with shallow fried peanuts, the way my Ammi used to serve upma to us all. Those peanuts really add a lot of flavor and crunch to the delicious upma.

Usually the coarser variety of semolina is preferred for upma, but I managed with the fine variety, which is used in the preparation of sweets, and it turned out fine enough.

Masala Upma – Savory Breakfast Semolina
Serves: 2

Ingredients:

Semolina/Sooji/Upma rawa- 1/2 cup
Canola oil
Curry leaves – 2 sprigs, fresh
Mustard seeds – 3/4 tsp
Urad dal – 1/2 tsp
Chopped Onion – 3 tbsp
Small green chillies – 3, finely chopped
Tomato – 1, finely chopped
Red chilli powder – 1/2 tsp
Salt – 1 tsp
Turmeric powder – 1/4 tsp
MDH Sambar powder – 1/2 tsp
Water – 1 1/2 cup
Groundnuts, with skin – 1/2 cup
Cilantro – 2 tbsp, finely chopped

Masala Upma, served along with shallow fried groundnuts

1. Heat a skillet at medium heat and as soon as it is warm add the upma rawa and dry roast it stirring constantly and attentively until you see and slight variation in color to a light brown and you get a wonderful aroma. Immediately remove from heat and transfer the roasted rawa to a platter and keep aside.
2. In the same skillet, pour 1 tbsp oil and add the mustard seeds. As they start spluttering, add the onions, green chillies, curry leaves and urad dal. Stir fry for a minute. Now add the tomatoes, red chilli powder, turmeric powder, sambar powder qnd salt. Mix well. Pour in about 1 1/2 cup of water, reduce heat, cover and let cook for a few minutes until the tomatoes are mushy.
3. Meanwhile, in a frying pan at medium high heat add about 2 tbsp oil and as soon as it warms up, add the groundnuts and stir fry until lightly browned. They burn easily, so be careful and attentive. Once done, using slotted spoon transfer the shallow fried groundnuts to a platter.
4. Now add the roasted rawa to the cooking tomato mix ture in the skillet while stirring constantly so as to avoid forming lumps and mix well. Cover and let it cook on low heat for 2-5 minutes until the rawa has absorbed all the moisture and it is mostly dry. Add chopped cilantro, mix well. Cover and let rest for 1-2 minute. Serve immediately along with shallow fried groundnuts and a mango or lemon pickle, or any chutney that you fancy.

Luv,
Mona

AddThis Social Bookmark Button