Sun-Dried Food Products Series ~ III: Dal ki Badiyan

July 30th, 2010 Mona Posted in Ginger-Garlic paste, Green Gram/Moong ki Dal, Green Onion/Hari Pyaz, Hyderabadi special, Red Chilli powder, Salt/Namak, Turmeric/Haldi 12 Comments »

Among all those amazing dried products that one can make during hot Indian summer days making use of the strong sunshine, dal ki badiyan are the ones I really love.

Badiyan are tiny sun dried lentil nuggets, which are nutritious and an excellent substitute for meat in curries. Many varieties of badiyan are available ready made in stores. But nothing compares to these homemade variation that I am addicted to since childhood.

Dal ki Badiyan ~ Sun Dried Lentil Nuggets

Split and skinned green gram/Moong ki Dal – 500 gms
Hari Pyaz/Spring greens, finely chopped – 3 cups (only the greens, not the white)
Ginger-garlic paste – 1 tbsp
Turmeric powder – 1/4 tsp
Salt and Red chilli powder – to taste

Method:

1. Soak the dal for 2 hours in fresh cool water. Later, drain and wash the dal in several changes of water. Once washed and drained, puree the dal in blender adding just enough water to aid in the process. (Note: Do not add too much water, or else the badiyan will not form properly)
2. In a mixing bowl, add the pureed dal, chopped spring greens, ginger garlic paste, turmeric powder, red chilli powder and salt. Mix thoroughly.
3. Drop blobs of the prepared mixture on a clean and dry tray or a rimmed baking sheet using your hands or a spoon. Leave the tray in the sun during daytime and bring the tray indoors when dark. On the first night, gently scrape the partially dried badiyan and invert them so that the next day the bottoms also get nicely dried up in the sun. It usually takes 3-5 days under hot sun for the badiyan to completely get dried.
4. When completely dried, transfer the badiyan to an air tight container and store at room temperature or in the refrigerator. Be careful and keep away from moisture.
5. Always shallow fry a few needed badiyan in some oil until the color changes to golden brown just before consumption. Do not burn them or else their taste will worsen. Consume the crunchy shallow fried badiyan on the side to your meals, or add the shallow fried badiyan to any of your favorite curries or soups and cook for just a few minutes.

Dal Ki Badiyan Pictorial

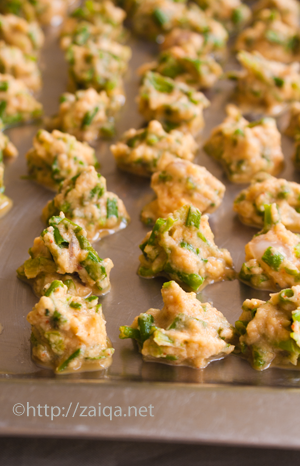
Blobs of the mixture on tray, ready to be sun dried

Badiyan – Sun drying

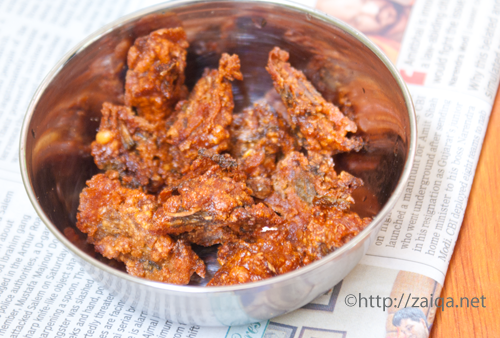
Shallow fried Badiyan, ready for consumption

Preparing Dal ki Badiyan in Oven:

If you live in areas where sunlight is scarce and plays hide and seek with you, you can even prepare badiyan in the oven. Just lightly spray or brush the tray with a little bit of cooking oil, then drop the batter on the tray as shown above and place the tray in the oven pre-heated at the lowest setting. Let it bake for around 2-3 hours. Shake the tray after every hour. Keep a close eye and as you observe they are completely dried up, remove and let them cool on a rack. Once completely cool, transfer to air tight containers and store until needed. Shallow fry a few needed the badiyan in a little oil and enjoy when fancied.

Other Amazing sun dried Indian food products from this series are:
1. Sukhi Dahi Mirch – Sun dried Yogurt Chillies
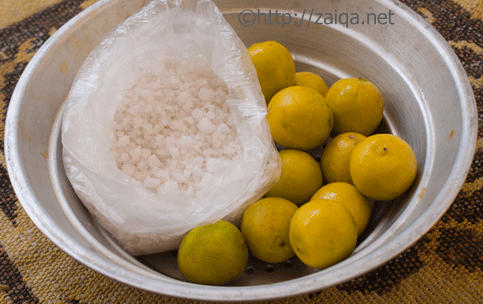
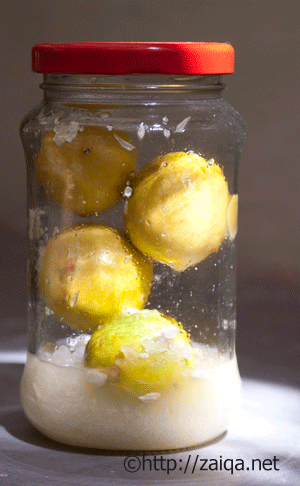
2. Dhoop Nimbu ~ Sun Preserved Lemons

AddThis Social Bookmark Button

To Market

July 1st, 2010 Mona Posted in Hyderabadi special 16 Comments »

I had been to the wholesale Gudimalkapur ka market in Hyderabad a few days ago early on a rainy morning where fresh produce is sold everyday in heaps at very cheap prices. Although I was not able to click a lot of pictures, here are a few. Enjoy the virtual tour.

The Vegetable Market:

The Fish Market:

Luv,
Mona

AddThis Social Bookmark Button

Sun-Dried Food Products Series ~ II: Dhoop Nimbu

June 21st, 2010 Mona Posted in Coarse salt/Mota Namak, Hyderabadi special, Lemon/Nimbu 14 Comments »

The last month in Hyderabad was very hot, with temperatures almost touching 45°C in the daytime. Though these temperatures made me uneasy and frustrated, my Nani(grandmother) made good use of those days by preparing something I had missed a lot. She made a little quantity of Dhoop Nimbu upon my request and here I am sharing her recipe with you all. She recalled that her husband, my late Nana(grandfather) was an ardent fancier of this acidic sun preserved wonder. He used to prepare it regularly and relished it always along with some Mash ki Dal and Warqi Roti at breakfasts when he was alive. The process of preparation is simple, but requires some special conditions. Strong sunshine for almost a week, thoroughly clean and dry utensils are essential for the process.

Dhoop Nimbu ~ Sun Preserved Lemons

Ingredients:

Mota Namak/Coarse Salt – 4 tbsp
Lemons – 6

Choose 6 blemish free ripe and yellow thin skinned lemons and wash them thoroughly. Wipe them completely dry with a clean cloth. Using the tip of a sharp knife, poke 4 of the 6 lemons making superficial slits on all over them and keep aside in a dry bowl. Juice the remaining two lemons and keep aside in a bowl. Now add 1 tablespoon of mota namak in a clean and dry glass jar with a tight lid. Add a gashed lemon to the jar and add an another tablespoon of mota namak to it. Likewise keep adding the mota namak and the gashed lemons until both the ingredients are used up. Lastly pour in the reserved juice of the two lemons. Close the lid of the jar and shake the bottle thoroughly. Place this jar in an area that receives almost 6 hours of strong sunshine. Keep rotating the bottle hourly or after every 3 hours everyday when you keep it in the sun. Bring the jar indoors when it is dark and place it back in the sun the next day. Keep repeating it for until 5-6 days. By then you will notice that the lemons will start changing color into light brown and will begin to get softer. Also they will release juices and shrink in size. At the end of the 5th or 6th day,  transfer the jar of sun preserved lemons in the refrigerator to store and use when required. The prepared Dhoop Nimbu is ready for consumption.

To use: Using a dry slotted spoon, take a preserved lemon from the jar. Cut it into required number of pieces and serve them on the side along with meals. These preserved lemons are very acidic and quite delicious. The juices that are released along with the mota namak is not suitable are consumptions as it is very briny in taste. However when all the sun preserved lemons have been used up, the remaining briny juices can be used up to make a new batch of dhoop nimbu.
You can also cut all sun preserved lemons and make a pickle out of them following the same process for lemon pickle given here.

Dhoop Nimbu Pictorial

Characters in Play: (Indian) Thin-Skinned Lemons and Mota Namak

Day 1 in Sun

Day 2 in Sun

Day 3 in Sun

Day 4 in Sun

Day 5 in Sun

Enjoy!

Other Amazing sun dried Indian food products from this series are:
1. Sukhi Dahi Mirch – Sun dried Yogurt Chillies
2. Dal ki Badiyan – Sun Dried Lentil Nuggets

Luv,
Mona

AddThis Social Bookmark Button

Mosambi juice

June 15th, 2010 Mona Posted in Hyderabadi special, Mosambi 16 Comments »

It was unbearably hot and sultry, but by gods grace, the weather has now turned cool with the arrival of monsoons in Hyderabad city. So, on the weekend, I made a quick trip to the Mozamjahi market to buy some Mosambi, also called as sweet lime. Ah, I had missed this fruit very dearly.

Vendors selling and people buying Mosambi at the Mozamjahi Market in Hyderabad, India

Mosambi ~ Sweet Lime

A glass of fresh home made Mosambi juice to refresh and quench the thirst

To make Mosambi juice: Simply peel the fruit and discard all the seeds. Transfer the pulp into a blender and add some sugar to taste. Blend until frothy for a few minutes. Strain into a jug and serve it chilled.

Luv,
Mona

AddThis Social Bookmark Button

Kulfa ki Katli

May 20th, 2010 Mona Posted in Bok Choy, Canola Oil, Cumin seeds/Zeera, Curry leaves (fresh), Dried Red Chillies, Garlic/Lahsun, Hyderabadi special, Purslane leaves/Kulfa ki bhaji, Red Chilli powder, Salt/Namak, Tamarind/Imli, Tomato/Tamatar (fresh), Turmeric/Haldi, Yellow Lentil/Tuvar ki Dal/Toor dal 42 Comments »

Its a wonderful day today in Hyderabad. The weather is the coolest it has ever been since I landed here, and my jet lag seems to be fading away gradually. So, I thought this morning as the perfect opportunity to visit the wholesale market in Hyderabad at Gudimalkapur, and indeed the visit was totally worth it. The market was a frenzy, but a treat my sore eyes. There were huge piles of fresh greens, seafood, vegetables and fruits, flowers and I bought all that I could at very reasonable prices.

Kulfa ki bhaji ~Purslane

To start with I chose Kulfa ki bhaji (in Urdu language), (Purslane in English) that I bought to cook and satisfy my long patience. It had been more than 3 long years since I had tasted Kulfa ki bhaji and many other such basic fresh vegetables and fruits available here in Hyderabad. Purslane is a succulent with thick leaves and reddish stems and a crisp citrusy taste.

Today my Ammi prepared Kulfa ki Katli, a dal preparation cooked along with Kulfa ki bhaji, tomatoes, tamarind and other aromatic spices. Aloo Methi and Khushka were accompaniments to this humble dal concoction and I thoroughly enjoyed my meal.

Kulfa ki Katli – Purslane simmered in Aromatic and Tangy Dhal

Ingredients:

Thick Tamarind concentrate – 1/4 cup
Kulfa ki bhaji/Purslane – washed and drained, tender leaves and stems chopped fine, roots discarded ~ around 3 cups, loosely packed
Tuvar ki dal – 1 cup, washed in several changes of water and drained
Red chilli powder – 1 1/2 tsp
Salt – to taste
Turmeric powder – 1/4 tsp
Curry leaves – 1 sprig
Tomato – 1, medium sized, roughly chopped
For Baghaar:
Canola oil – 4 tbsp
Cumin seeds – 2 tsp
Dried red chillies – 2, each split into two
Garlic pods – 2, finely chopped
Curry leaves – 2 sprigs

Method:

In a pressure cooker, add the washed dal, red chilli powder, turmeric powder, tomatoes, salt and curry leaves. Add about 4 cups water and pressure cook until the dal is mushy. Once done, mash the dal with a dal ghotni, or blend it until smooth. Add the chopped purslane and gently mash just a little bit. Add tamarind and pour in more water to adjust the consistency. Let it cook on medium high flame. Meanwhile prepare baghaar, add oil to a small frying pan at medium high heat. As soon as it is hot, add the baghaar ingredients and let them splutter for just a few seconds. Immediately pour this baghaar hissing into the cooking dal. Let the dal cook for a further 5-10 minutes. Serve warm along with rice and a curry of your choice.

I have never been able to find this green leafy vegetable/herb in Toronto. If anyone of you living in Toronto has been able to spot Purslane at grocery stores, please let me know. Also, if anyone is willing to trade seeds with me, I am more than happy. Please contact me if interested.

Note: If Purslane is unavailable you can try this recipe with any of your favorite greens. I have tried this dal using baby bok choy and spinach.

Luv,
Mona

AddThis Social Bookmark Button