Khorma is one dish which we can have with Pulao, or Plain Rice, or Parathas or Naan. Today I savored this curry along with Rajma Pulao. I love the meal the day I get to enjoy combination. It is even great for gatherings, when you can prepare this combination with some snacks and a dessert to finish off and impress your loved ones.
This dish comes from the cookbook India’s Vegetarian Cooking by Monisha Bharadwaj. I have tried many recipes from this cookbook and loved most of them. I have not yet bought this book, but it sure now is among the top in the list of my Cookbook Wishlist.

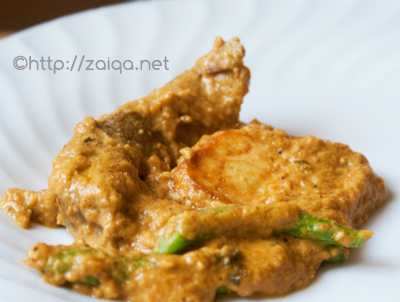
Navratan Korma – Nine Jewelled Curry
It was yummy, and I am glad I tried this recipe. You can dump in all the left over vegetables, like cabbage, carrots, cauliflower, potatoes, peas, corn, capsicum, carrots, beans, from the refrigerator you have in you house. I have used only a few, I didnt have all those in the house.
Navratan Korma – Nine Jewelled Curry
Serves:4; Preperation Time:15 mins; Cooking time:25 minutes
Ingredients:
- Frozen Mixed Vegetables – 300 gms
- Canola Oil – 1 tbsp
- Onion – 1, small, finely sliced
- Ginger Garlic Paste/Adrak-Lahsun Masala – 1 tbsp
- Tomato Paste – 3 tbsp
- Green Chillies – 3 fresh, slit in middle
- Turmeric powder/Haldi – 1 tsp
- Garam Masala powder – 1 tsp
- Cashew Nuts – 2 tbsp
- Salt – to taste
- Tinned Pineapple Chunks – 2 tbsp, chopped
- Light Cream – 100 ml
- Cherries – to garnish
- Cilantro – to garnish
- Grated Cheddar Cheese – to garnish
Method:
- Heat oil in a saucepan and fry the onion for a minute or so. Keep stirring to prevent it from sticking and stir in the ginger garlic paste.
- Add the tomato puree and chillies and cook until oil seperates, ading a couple of tablespoons of water to hasten the process.
- Add the frozen vegetables, turmeric powder, garam masala and salt. Mix gently and cook for a couple of minutes before folding in the cashewnuts, pineapple and cream. Heat through without allowing to boil.
- Serve hot garnished with the cherries, coriander leaves and cheese.
Suggested Accompaniments: You can have it along with Pulaos, Naan, Parathas, Basmati Chawal or Roti
Luv,
Mona