Buttermilk Biscuits

June 6th, 2014 Mona Posted in All-Purpose Flour/Maida, Baking powder, Butter/Makhan, Buttermilk, Salt/Namak, Sugar/Shakkar 2 Comments »

I first had buttermilk biscuits at Popeyes along with fried chicken. And it was love at first bite.

Since then I have been in search for a recipe to recreate them in my home myself. I tried a lot of recipes online and finally I can say that I might have found one that I am really happy with. Today I am going to share it with you all.

Buttermilk Biscuitsmakes: 8 biscuits
adapted from here

Ingredients:

All purpose (not self-rising) – 2 cups
Baking powder – 1 tbsp
Salt – 1 tsp
Sugar – 1 tsp
Unsalted cold butter – 6 tbsp
Buttermilk – 1 cup

Method:

Preheat oven to 450°F. In a mixing bowl, add the flour, baking powder, salt and sugar. Mix. Now add cold butter cut into tiny pieces and buttermilk. Using a fork, gently mix, avoid overmixing. Dust flour on your kitchen countertop and invert the buttermilk+flour mixture. Knead dough gently 3 to 4 times until it holds together. Dust your palms with flour as well and pat the mixture down into a large patty, approx 1 inch in thickness.

Line a rimmed baking tray with parchment paper and dust it lightly with flour. Working quickly, use a biscuit cutter to cut biscuits and keep placing the biscuits on the tray, make sure they are all placed close to each other. Place the baking tray in the refrigerator for approx 15-30 minutes. Now transfer the tray to the preheated oven and let them bake for 15 minutes. As soon as you see a get a light brown hue, remove from oven and serve warm along with a salad or coleslaw and baked/grilled chicken.

Luv,
Mona

AddThis Social Bookmark Button

Eggy Bread – Mom Style – Indian Version French Bread

April 3rd, 2014 Mona Posted in Black pepper powder, Egg/Anda, Milk and Milk Products, Salt/Namak, Sandwich Bread, Sugar/Shakkar 5 Comments »

Breakfast in my home is usually cereal, pb&j or nutella. But on the weekends I try to plan and make something special that is a favorite of everyone. Back home, mom makes parathas for my father along with a dal or vegetable curry for breakfast ‘every’ single day, weekend breakfasts are even more elaborate, with special preparations like Puri-Cholay, Aloo kay Parathay, Khichdi-Khagina etc.

One breakfast that both me and my hubby love is this eggy bread. My toddler eats just a bite or two, like she eats everything else, she is fussy eater, just like I was as my mom keeps tells me.

You can call it a version of french bread, an indian take on it. The recipe is very simple and it gets done quickly.

Eggy Bread – Mom Style – Indian Version French Bread

Ingredients:

Bread slices – 4
Milk – 3/4 cup
Eggs – 3
Black pepper powder – 1/2 tsp
Salt – a pinch
Sugar – 1 tsp

Method:

Whisk eggs in a bowl and add milk, black pepper powder, salt and sugar. Heat a frying pan on medium high heat.  Meanwhile slice each sandwich bread into two triangles. Stack them all in a bowl. Add half tablespoon of oil in the pan as soon as it gets hot and swirl around the pan to evenly coat it. Dip each triangle of bread in the egg+milk mixture and let it soak up for 10-20 seconds. Lift up the bread and carefully place on the frying pan. Cook for 2-3 minutes each side until golden brown and cooked through. Transfer to a serving plate. Repeat with all the bread slices. Serve warm.

Luv,
Mona

AddThis Social Bookmark Button

Rasgulla – Rasmalai

January 9th, 2014 Mona Posted in Cardamom/Elaichi, Eid/Ramadhan/Iftaar, Lemon/Nimbu, Milk and Milk Products, Saffron/Zafraan, Sugar/Shakkar 4 Comments »

One of my favorite desserts since my childhood is this Bengali delicacy Rasgulla. The white spongy balls in the sugar syrup please me to no extent. Its cousin is Rasmalai. The first time I tasted Rasmalai I remember very nicely was in one Ramadan during my childhood when we were staying at my Mama’s house for holidays. It was love at first bite.

In order to prepare Rasmalai you have to have Rasgullas. When you have guests and you need a quick dessert to make, you can use tinned store-brought rasgullas to make rasmalai, or making them from scratch is also as easy, but it needs a little time.

Rasgulla and Rasmalai 

For Rasgulla – Cheese Balls in Fragrant Sugar Syrup:
Milk – 4 cups
Lemon juice – juice of half a lemon
Water – 2 1/2 cups
Sugar – 1 cup
1 green cardamom powdered

In a heavy bottomed saucepan at medium high heat, pour in milk and let it come to a boil. Once boiling, remove from heat and let cool for 10 minutes. Add the lemon juice, stir and keep aside for 20 minutes. The milk will curdle. Line a sieve with a muslin cloth and drain the curdled milk. Bring the ends of the cloth together into a bundle and squeeze it to drain water. Hang for a further 30 minutes until all the water is properly drained out. Transfer the milk solids to a bowl and knead into a soft ball. Make smooth equal sized 10-12 balls. In a pressure cooker, boil sugar in water and add green cardamom powder and the prepared balls. Pressure cook until you get a whistle. The balls will now swell up in size. Let cool, chill and serve. Or use them to make Rasmalai, recipe below.

For RasMalai – Cheese Cakes in Fragrant Thickened Milk Sauce:
10-12 Rasgullas
Milk – 3 cups
Rasgulla Sugar syrup – 3/4 cup
Saffron – a pinch

Grease the bottom of a heavy bottomed saucepan with few drops of ghee, this will prevent burning of milk at the bottom. Pour in milk and bring to a boil. Once boiling, reduce heat and let simmer for a hour. Meanwhile, take the rasgullas and gently squeeze them between your fingers to flatten them, but not break them, so that most of the sugar syrup is removed. Keep them aside in a bowl. Do not discard the sugar syrup. By now the milk will be reduced to about half its quantity. Drop the squeezed flattened rasgullas in the milk. Add the sugar syrup, saffron, dried nuts and let simmer for 15- 30 minutes. In a couple of minutes, they will soak up the milk and puff up. Remove from heat, let cool to room temperature. Serve chilled.

Note:
You can store the sugar syrup and use it to flavor tea, coffee etc. It will last a few weeks in the refrigerator.

Luv,
Mona

AddThis Social Bookmark Button

Halal Tandoori Turkey – Roasted Turkey Desi Style with Pasta

October 6th, 2013 Mona Posted in Black pepper powder, Bok Choy, Broccoli, Carrot/Gajar, Cilantro/Kothmir (fresh), Coriander seeds, Cumin seeds/Zeera, Garam masala powder, Lemon/Nimbu, Mint/Pudina (fresh), Olive Oil, Radish, Red Chilli powder, Red Potatoes, Salt/Namak, Turkey, Turmeric/Haldi, Yogurt/Dahi 15 Comments »

Every Eid I try to cook something special and make the day memorable by preparing a delicious meal. I had never tried turkey before. So I was ecstatic to learn that Mina Halal is now offering zabihah by hand, Grade A, whole halal turkey through large grocery retailers throughout Ontario.
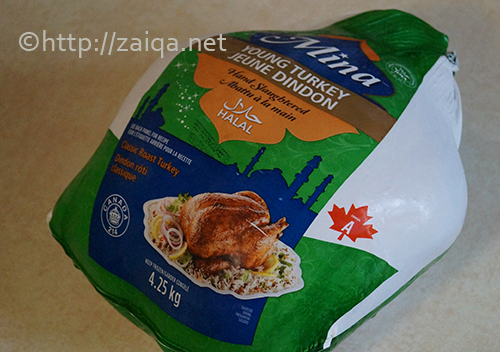
Mina Halal Turkey

Turkey is a magnificent bird. It has ultra lean, high in flavor meat and is it large enough to easily feed a gathering of 8-12. Turkey is high in protein, low in calories and one of the leanest meats around. It’s also an excellent source of B12. Dark meat from the drumstick is also an excellent source of zinc and selenium. This Eid why dont you all try my recipe in your home and impress your loved ones. They will be happy to eat something new and feel special inshallah. And when there are leftovers, you can use the meat in a multitude of ways, from soup and sandwiches, to pizza and pasta, to burgers and beyond.

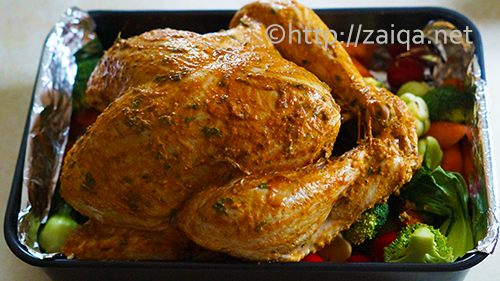
I wanted to make an desi version of roasted turkey. And what better roasting technique than making a tandoori roasted bird. I served the tandoori turkey along with pasta and vegetables which I made using the broth after roasting the bird. The result was a spicy lip-smacking turkey that we all thoroughly enjoyed.

Halal Tandoori Turkey – Roasted Turkey Desi Style with Pasta

Ingredients:

Halal Turkey – fresh or frozen (if frozen thaw according to instructions)
Vegetables:
Baby Bokchoy
Carrots – chopped horizpntally into 1/2 inch pieces
Broccoli florets
Baby radish
Baby potatoes with skin (red and white)
To Marinate:
Olive oil – 3 tbsp
Hung Yogurt – 1 cup
Red chilli powder – 4 tsp
Salt – 4 tsp
Juice of one large lemon
Turmeric powder – 1/2 tsp
Roasted Cumin Seed powder – 1 tsp
Roasted Coriander seed powder – 1 1/4 tsp
Garam masala powder – 1 tsp
Black pepper powder – 1/2 tsp
Cilantro and Mint leaves – finely chopped, 1/2 cup, tightly packed

Method:

1. In a bowl, add all the ingredients for the marinade and mix well to form a paste.
2. Preheat oven to 440° F. Rinse inside and outside of turkey; pat dry with paper towels. Rub the marinate mixture all over the turkey, inside and out. Transfer to a large mixing bowl, cover with cling wrap and let marinate in the refrigerator overnight.

marinated Turkey on a bed of fresh vegetables

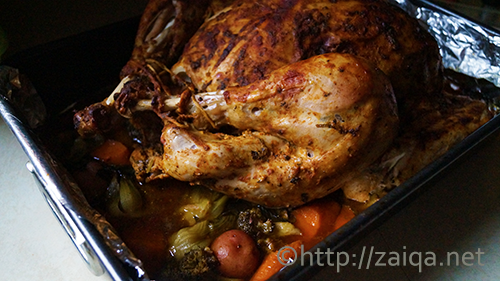
3. The next day, atleast 5-6 hours before serving, begin the preparation of roasted turkey. Take the turkey out of the refrigerator. In a large roasting pan, place aluminium foil to cover it. Place the vegetables in the roasting pan so that they cover the entire base of the pan. Season them with salt and pepper. Tuck wings under turkey, tie the legs together with kitchen twine, and place it in the roasting pan over the vegetables.

roasted turkey

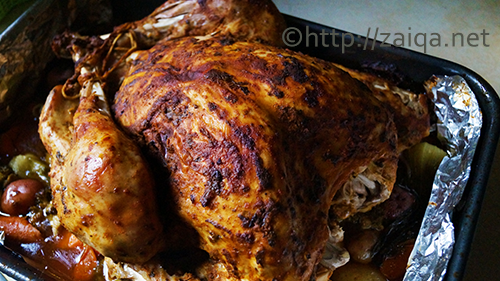
4. Roast turkey, uncovered for 15-20 minutes until you get a nice browned color on the turkey. Then lower the heat to 325° F, and cover the turkey with aluminium foil. Roast for a furthur 3 1/2 to 4 hours, until thermometer inserted into the thickest part of the thigh registers 165 degrees. The turkey will be cooked to perfection and so soft that the meat will literally fall off the bone.

vegetables nicely done in the delicious broth

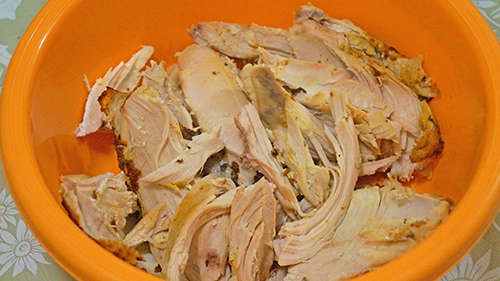
5. Transfer the turkey to a platter. Let cool for 30 minutes until you make the pasta.
6. Place a strainer over a bowl. Transfer the vegetables along with the pan juices into the strainer.

turkey meat

the base for the pasta made with broth and pasta sauce

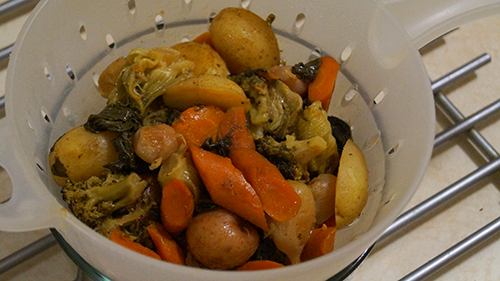
vegetables in the strainer over a bowl

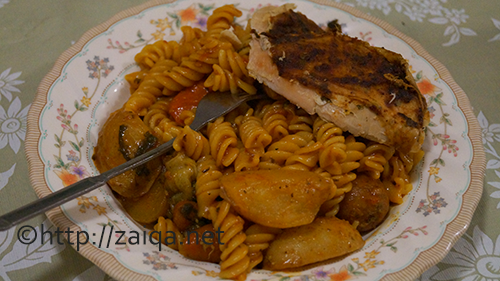
pasta served along with vegetables and roasted turkey meat

For Pasta: (Serves: 4)
7. Add 350 ml pasta sauce (I choose Garden Select) and the collected pan juices to a saucepan and let it come to a boil. Taste and add salt pepper to suit your taste. Mix and add 500 gms fusilli pasta to the saucepan and enough warm water to cover the pasta. Cover the pan and cook on medium heat. Keep stirring every few minutes. After about 10-15 minutes, lower the heat to simmer and cook covered while stirring occasionally until the pasta is done. Add more water if needed to cook the pasta. While you are cooking the pasta, debone the turkey and transfer the meat into a serving platter. Once the pasta is done, add the vegetables from the strainer to the pasta and gently mix. Serve the pasta along with turkey meat. Enjoy!

I still have a ton of leftover turkey meat mashallah. I will be posting something delicious with the leftover turkey meat in a few days inshallah.

Tip: you can store cooked leftover turkey meat once it has cooled down to room temperature in freezer bags in the freezer indefinitely. To use thaw in the refrigerator.

Luv,
Mona

AddThis Social Bookmark Button

Easy Homemade Mango Ice-Cream without a Machine

August 12th, 2013 Mona Posted in Condensed Milk, Mango/Aam 7 Comments »

I cant believe summer is almost gone. The chill in the air is slowly and steadily returning. So before I bid farewell to summer, I was in the mood of ice-creams. I enjoy store bought ice-creams, and love to try out different flavours and brands. But homemade is far superior to the store-bought kind – without added preservatives or stabilizers, or air whipped in to add volume.

I do not have an ice-cream maker, I would love to, but I am not really sure which one is the best in the market, any suggestions from you readers?

But what if I do not have an ice-cream machine at home, I can still make yummy ice-cream using this very simple and easy method. One of my most favorite flavors for ice-cream is Mango! then comes nutella, chai, pictachio, strawberry, vanilla and the list goes on. This simple technique will give you a delicious homemade ice-cream, which everyone in your house will enjoy. Condensed milk is a magic ingredient when making no-churn ice cream – the end result will be creamy, smooth and not at all icy.

Easy Homemade Mango Ice-Cream without a Machine

Ingredients:

Mango Pulp – fresh/canned – 2 cup, smoothly pureed
Condensed Milk/Evaporated Milk – 1 cup (with or without fat – your choice), chilled overnight in refrigerator

Method:
Pour the condensed milk or evaporated and pureed mango pulp into a large bowl. Beat with an electric whisk until thick and quite stiff for 8-10 minutes. Pour into a freezer container or a large loaf tin, cover with cling film and freeze until solid, about 6 hours or overnight. Enjoy!

Luv,
Mona

AddThis Social Bookmark Button