Chicken 65

January 15th, 2010 Mona Posted in Black pepper powder, Canola Oil, Cashewnuts/Kaaju, Cilantro/Kothmir (fresh), Cornflour, Cumin seeds/Zeera, Curry leaves (fresh), Egg/Anda, Eid/Ramadhan/Iftaar, Garam masala powder, Ginger-Garlic paste, Green Chillies, Hyderabadi special, Mustard seeds/Rai, Poultry/Murgh, Red Chilli powder, Salt/Namak, Tomato Ketchup, Turmeric/Haldi, Yogurt/Dahi 34 Comments »

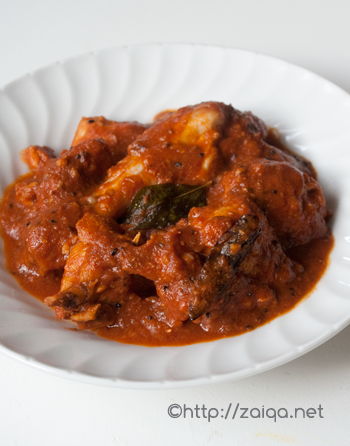
A quick, yummy and irresistible chicken stir fry~Chicken 65 is a famous Hyderabadi appetizer served at parties and easily available at most of the restaurants and food stalls in Hyderabad city. Please do not ask me why is it called Chicken 65, I have no idea about it.

There exist many versions of this dish, and today I am posting my version. I also make a dry version with no sauce, and just the baghaar/tempering. Inshallah I will post it in the future sometime. For now, you can prepare this simple dish and impress your loved ones.

Chicken 65

Serve Chicken 65 along with Rumali rotis. If you cannot buy or prepare Rumali roti, just heat a thin tortilla on a flat griddle until nicely toasted on both sides and enjoy.

Note: Normally, the chicken 65 that is served back home in Hyderabad is fiery red in color, that is because red color is added to it. I do not add color to food and hence the different color.

Chicken 65

Boneless Chicken – 500 gms, cut into bite size cubes, washed and drained (you can also use chicken with bone if you want)
For Batter:
Ginger-garlic paste – 1 1/2 tbsp
Salt – 1 tsp
Turmeric powder – 1/4 tsp
Garam masala powder – 1/2 tsp
Black pepper powder – 1/4 tsp
Egg white – 1, large
Cornflour – 1 tbsp
Canola oil – to deep fry
For Baghaar:
Canola oil – 2 tbsp
Cumin seeds – 1 tsp
Black Mustard seeds – 1/2 tbsp
Green chillies – 10, small, each slit into two
Curry leaves – 20-25 fresh
Yogurt – 1/3 cup, lightly stirred until smooth
Tomato Ketchup – 3 tbsp
Soya sauce – 2 tbsp
Red chilli powder – 1 tsp
For Garnish:
Fried cashew nuts – roughly chopped
Cilantro – roughly chopped
Onion rings
Baby carrots
Sliced cucumbers
Shredded lettuce leaves
Lemon wedges

Method:

1. In a medium sized mixing bowl, add all the ingredients for the batter except egg and cornflour and and mix well. Add the chicken cubes and gently combine. Cover and let the chicken marinate for 1 or 2 hours. Later, bring the chicken back to room temperature and add cornflour and egg. Mix well. Deep fry the chicken pieces in hot oil for not more than 3 minutes in batches. Drain the fried chicken in a wire mesh strainer for the extra oil to drain off  and keep aside until all are done.
2. In a mixing bowl, add yogurt, tomato ketchup, soya sauce and red chilli powder and mix well. Keep aside.
3. For baghaar/tempering, in a frying pan at medium high heat, add oil and as soon as it is warm add the cumin seeds and the mustard seeds. As the seeds begin to pop, remove the pan from heat and add the green chillies and curry leaves. Stir fry and let the pan cool down. Once the pan is slightly cool, add the stirred yogurt mixture and mix well. (if you add curd in hot pan the curd will curdle). Transfer the pan to the stove and keep stirring continuously at medium heat. Once boiling, add the fried chicken and mix well. Cover with a lid and let cook for 5-10 minutes. Keep stirring ever once in a while. Serve Chicken 65 on a platter garnished with fresh cilantro, fried cashew nuts, lemon wedges, lettuce leaves, cucumber slices, baby carrots and onion rings.

Luv,
Mona

AddThis Social Bookmark Button

Tamatar Murgh

November 20th, 2009 Mona Posted in Canned crushed tomatoes, Canola Oil, Cumin seeds/Zeera, Curry leaves (fresh), Fenugreek/Methi seeds, Garam masala powder, Hyderabadi special, Mustard seeds/Rai, Nigella seeds/Kalonji, Quick fix meals, Red Chilli powder, Salt/Namak 12 Comments »

Tamatar Murgh

Today was one such day when I was out of ideas to prepare a chicken curry. Thats when suddenly I recollected the video that I had posted on my blog a while back where Rani Kulsum Begum was dishing out a delicious Tamatar Murgh curry. I tried her recipe today with a few changes of my own here and there and it was one ambrosial yet a simple curry to prepare.

Tamatar Murgh – Chicken simmered in crushed tomato sauce

Ingredients:

تيل/Canola oil – 3 tbsp
ثابت کلونجی/Nigella sativa seeds – 1 tsp
ثابت زیرہ/Cumin seeds – 1 tsp
میتھی دانہ/Fenugreek seeds – 1/2 tsp
رائی/Mustard seeds – 1 tsp
ادرَک لہسن مسالہ/Ginger-garlic paste – 3 tbsp
کری پتہ/Curry leaves – 2 sprigs, fresh
زیرہ پاوٴڈر/Dry roasted Cumin seed powder – 1 1/2 tsp
دھنیا پاوٴڈر/Dry roasted Coriander seed powder – 2 tsp
سرخ مرچ پاوٴڈر/Red Chilli powder – 2 1/2 tsp
پساہوا ٹماٹر ٹين والا/Canned Crushed tomatoes – 400 ml
نمک/Salt – 2 tsp
مُرغ/Whole Chicken with bone – skinned and cut into pieces (around 1.5 kg)
گرم مسلہ پوڈر/Garam masala powder – 1/2 tsp

Method:

In a large non-stick saucepan or a saute pan at medium high heat, pour in oil and as soon as it warms up, add the nigella seeds, cumin seeds, fenugreek seeds and mustard seeds. As they begin popping and spluttering, add the ginger-garlic paste and fry for a minute. Add the curry leaves and fry them along for a few seconds. Add the dry roasted cumin and coriander seed powders as well as the red chilli powder and mix well. Pour in the crushed tomatoes and mix well, let cook uncovered for 2 minutes. Add salt and chicken and mix well. Spread the chicken so that it is in a single layer. Cook uncovered at medium heat for 5 minutes. Then, cover with a lid and let cook for 25-30 minutes or until the chicken is tender and well cooked, stirring it gently occasionally. Uncover the lid and cook until the oil is floating on top and the tomato masala is dry and clinging to the chicken, around 8-10 minutes. Add garam masala powder and mix well. Serve warm.

Note: If you like to have a saucy masala instead of a dry clinging masala, do not cook uncovered furthur in the last stages.

Luv,
Mona

AddThis Social Bookmark Button

Nimbu ka Achaar

September 24th, 2009 Mona Posted in Canola Oil, Coriander seeds, Cumin seeds/Zeera, Dried Red Chillies, Garlic/Lahsun, Green Chillies, Kabuli Chana, Lemon/Nimbu, Mustard seeds/Rai, Nigella seeds/Kalonji, Red Chilli powder, Salt/Namak, Turmeric/Haldi 21 Comments »

Pickles are Indian specialities, enjoyed at breakfasts, at meals, or as an accompaniment to a snack . Each household has their own twist on the pickles that they prepare yearly using freshly available seasonal fruits and vegetables. Among those pickles, mango pickle and lemon or green lime pickle are the two classic indian pickles prepared most commonly in every household, and also easily available at the stores in various varieties.

Fresh Lemons

In todays express lifestyle, the art of making pickles at home is slowly sinking into the mists of time. It only takes a little time, effort and love to prepare these indulgences at home, with your own control on the amount of spices as well as the quality of the product. The following is my mothers recipe for Lemon or Lime pickle.

Note: Pickling is a bacteriostatic method of food preservation, in which the micro-organisms are unable to grow in food. Salt is the main ingredient used as the preservative. Throughout the preperation, take precautions and use only dry spoons for mixing and transfering purpose. Make sure the utensils you are using for making the pickle are absolutely moisture free. Otherwise the pickle will spoil and there are chances of fungus/mould formation. Pickles should never be sored in glazed jars.

Enjoy about a teaspoon of this pickle along with your meals, as an accompaniment to your breakfast or a snack.

Nimbu ka Achaar – Lemon/Lime Pickle
Makes: about 2.5 lb

The procedure includes the following steps which are later described in detail below:

1. Wash and wipe lemons or limes. Chop the 10 lemons or limes, add juice of 2 lemons or limes, mix salt and turmeric and keep aside for 3 days covered in a glass jar with tight lid at room temperature. Shake the bottle gently twice everday so that all the pieces are soaked in the juices.
2. After 3 days, add the powdered pickle spices and the tempering/baghaar to the pickle. Mix well.  Transfer to air tight pickle jars and store in the refrigerator for 1 or 2 weeks for the lemon or lime pieces to ferment. The pickle is ready to be used once the skin of the lemons or limes is soft.

Detailed Procedure:

Lemon or Lime – 10, blemish free, ripe and juicy
Juice of fresh lemons or limes
Iodine free Salt – 2 tbsp
Turmeric powder – 1/3 tsp

Cut lemons mixed with turmeric powder, lemon juice and salt in a large glass dish

Choose blemish free, good quality, preferably organic lemons or limes. I am never able to find thin-skinned lemons where I live, so I prepare pickle using thick skinned lemons or green limes, and have kind of got used to them. Infact the thick pickled lemon skin tastes delicious! Wash them and pat them completely dry using a dry cloth. You can also spread them out on a tray and place it under the sun to complately air dry for 1 or 2 hours. If the skin of the lemons you are using is thick (like mine, see the pictures), discard the thick top stalk part and bottom of the lemons and chop up 10 lemons into small quarters and put into a sterilized glass jar with a tight non-metallic lid. This need not be done for limes as they have a thinner skin. Cutting off the top and bottom is also not required if the skin of the lemons you are using is thin. The skin of Indian lemons is usually thin, whereas the lemons that are available elsewhere are quite thick. Discard the seeds. Add salt, turmeric powder and lemon/lime juice to the jar so that all the pieces are covered in the juice and mix well. Keep the jar in a dark place at room temperature for 3 days. Gently shake the jar twice every day.

Red chilli powder – 2 tbsp
Dry Roasted Cumin seed powder – 2 tbsp
Dry Roasted Coriander seed powder -1 tbsp
Dry Roasted Black Mustard seed powder – 1 tsp
Dried Chickpeas/Kabuli Chana – washed and pat dried completely (optional)
Garlic pods – 3
Small green chillies – 4, washed, and completely pat dried, roughly chopped

After 3 days, the lemon/lime pieces will have released a lot of juices. Add and mix all the above ingredients into the chopped lemon/lime quarters with its juices in the glass jar using a dry spoon and keep aside. Now prepare the baghaar or the tempering. (the dried chickpeas and garlic pods turn soft, suitable for eating, upon fermentation and acquire a tangy taste in the pickle).

Freshly prepared Lemon pickle ready to be set aside in the refrigerator to mature

Baghaar or the Tempering:

Canola oil – 1/2 cup
Nigella seeds/Kalonji – 1 tsp
Black mustard seeds – 1 tsp
Cumin seeds – 1 tsp
Dried red chilli – 2

In a pan, heat oil at medium high heat and as soon as it warms up add the remaining ingredients and mix well. In a few seconds they start to splutter. Remove from heat and keep aside. Take care not to burn the spices. Let it cool down and come to room temperature. This is the baghaar or tempering. Once the baghaar is cooled, carefully pour it into the lemon/lime pickle jar.

Lemon pickle ready to be eaten with its skin all nicely softened after 2 months

Store this freshly prepared lemon/lime pickle in the refrigerator to slowly ferment for about a week or two. Fermentation process renders fruits soft and and the fruits take on an additional aroma and flavor of spices. Mould growth is prevented by the use of a tight lid, by which air is prevented from coming in contact. Make sure that you use a completely dry spoon to use the pickle when you feel like eating it, and cover it and store in the refrigerator as soon as possible for a long life. Keep rotating and turning the jar frequently in the refrigerator. Check if the skin of the lemon/lime is soft enough. If you have used thick lemons, you might have to wait a little longer. I kept the pickle jar unopened for 3 months in the refrigerator, before I used it.

Luv,
Mona

AddThis Social Bookmark Button

Aloo Bonda

September 10th, 2008 Mona Posted in Black Gram/Urad Dal, Canola Oil, Cashewnuts/Kaaju, Cilantro/Kothmir (fresh), Curry leaves (dried), Eid/Ramadhan/Iftaar, Ginger/Adrak, Gram Flour/Besan, Green Chillies, Hyderabadi special, Lemon/Nimbu, Mint/Pudina (fresh), Mustard seeds/Rai, Red Chilli powder, Salt/Namak, Turmeric/Haldi, White Potato/Aloo 13 Comments »

After a good afternoon siesta during the humid and sultry Indian Summer days, a few Aloo Bondas along with a cup of warm tea while going through the days newspaper would be perfect. It is also savored during the rainy days in India. Oh, it brings back many cherished memories..

Aloo Bondas – Potato Croquettes

Aloo Bondas are balls of mashed lightly spiced potatoes dipped in chickpea flour and deep fried till golden brown. They are the most loved snacks in India, sold in most of the ready made food stalls, and also as a street food by the bandiwalas in small carts by the road side.

I often prepare Aloo Bondas for Iftaar in Ramadhan. These are our favorite snacks.

Aloo Bondas – Potato Croquettes

Makes -About 20

Ingredients:

For the Tempering/Baghaar:

  • Canola Oil – 1 tbsp
  • Split Black Gram/Urad Dal – 1 tbsp
  • Black Mustard seeds/Rai – 1 tsp
  • Dried Curry leaves – 6, crushed (optional)
  • Ginger – 1 tbsp, finely chopped

For the Potato filling/Aloo:

  • Potatoes – 4, medium sized, boiled, peeled and diced into 1/4 inch pieces
  • Red chilli powder – 1/2 tsp
  • Salt – 1 tsp
  • Turmeric – 1/4 tsp
  • Lemon juice – 2 tbsp
  • Finely chopped Cilanto, Mint leaves and Small Green chillies/Hara Masala – 1/2 cup, loosely packed
  • Roasted Cashewnuts – 1/4 cup (optional)
  • Frozen peas (thawed) – 1/2 cup (optional)

For the Chickpea flour batter/Besan:

  • Chickepea flour/Besan – 1 cup
  • Water – 150 ml
  • Canola Oil – to deep fry

Method:

Prepare Popato Filling/Aloo:

  • Pour oil into a small frying pan at medium heat, and add the black mustard seeds, split dal and chopped ginger. Cover with a splatter screen. Saute for 30 seconds or until the seeds stop popping. Add the dried crushed curry leaves. Remove from heat. This is the ‘Baghaar’.
  • Add red chilli powder, salt, turmeric and the prepared baghaar to the chopped potatoes. Also add the cashewnuts and peas, if using, and mix well. Take a little bit of the potato mixture at a time in your hands and shape them into walnut sized balls pressing them between your palms. Keep doing this until the whole potato mixture is completed. Keep them aside.

Prepare the Batter/Besan:

  • In a bowl, add the chickpea flour, water, red chilli powder, salt and turmeric to it and whisk it till there are no lumps and it is a smooth, pancake or buttermilk like batter of pouring consistency.

Deep frying the Croquettes/Bondas:

  • In a kadai or a wok at medium heat, pour oil and let the oil heat up. After a little while, drop about 1/4 tsp of the chickpea flour batter into the hot oil. If it floats on surface the oil is ready for deep frying.
  • One at a time dip the potato balls into the chickpea flour batter. With the help of a tablespoon, bath them well so they are covered all over with the batter. (Note: The potato balls should be completely covered with the batter or else they will disintegrate during deep frying)
  • Carefully drop them, one at a time, into the hot oil. Deep fry about 4-6 balls depending upon the size of the Kadai or wok. They need to be turned for even frying. Once they are golden brown in colour, remove them on a tray lined with paper towel. Continue doing this until all the potato balls are done. Discard excess chickpea flour batter. Serve warm.

Suggested Accompaniments: Enjoy them along with Tomato ketchup, Kothmir-Pudina ki Chutney or any of your favorite Chutney as a dipping sauce along with a cup of warm tea.

This goes to ‘Joy from feasting to Fasting’. Takecare everyone and enjoy your weekend!

Luv,
Mona

AddThis Social Bookmark Button

Upma

June 24th, 2008 Mona Posted in Beef Stock, Black Gram/Urad Dal, Blog Events/Entries/Polls, Canola Oil, Cashewnuts/Kaaju, Chicken Stock, Cilantro/Kothmir (fresh), Curry leaves (dried), Curry leaves (fresh), Dals (Pulses & Legumes), Dried Red Chillies, Fats and Oils/Tel, Fruits/Phal (fresh), Ginger/Adrak, Green Chillies, Green Gram/Moong ki Dal, Lamb/Beef/Mutton/Veal/Sheep, Lemon/Nimbu, Mustard seeds/Rai, Non-Vegetarian/Gosht, Onion/Pyaaz, Salt/Namak, Semolina/Sooji/Suji, Simple Kitchen Tips, Spices & Seasonings/Masaale, Turmeric/Haldi, Vegetables/Tarkariyaan, Yellow Onion/Pyaaz 14 Comments »

Upma is an another Indian dish which can be had as a snack or can even be had as a filling breakfast.  

Tip: Indian cuisine is versatile. Simple techniques and and a marriage of various kinds of spices and flavors makes the Indian cuisine flexible and sapid. Indian women know very well to use the left overs and whip up delicious meals using them. One such dish where I usually use the leftover curries is Upma. If the left over curry is a dry dish, I often mix it in the preperation of the Upma which makes it even more delicious and healthier. And if the left over curry is thin (soupy) in consistency, then I use it to serve along with Upma.  

Upma – Semolina cake, served along with leftover Colocasia/Arvi in a tangy sauce

Upma is comfort food for me. It is a filling healthy breakfast to start a new day, quite easy to prepare and gets prepared swiftly. Upma Rawa or Semolina or Sooji is available at many Indian stores very easily.

Serves – 4

Upma – Semolina cake

Ingredients:

  • Semolina/Sooji/Upma Rawa – 1 1/2 cups
  • Canola oil – 3 tbsp
  • Black Mustard seeds – 2 tsp
  • Whole dried red chilli – 1 
  • Small Green chillies – 4, finely chopped
  • Fresh grated ginger – 1 tbsp
  • Fresh or dried Curry leaves – 10
  • Urad Dal – 1 tsp
  • Moong Dal – 1 tsp
  • Turmeric – 1/2 tsp
  • Yellow Onion – 2, large, finely chopped
  • Salt – 2 tsp or to taste
  • Water/Chicken or Lamb Stock – 3 1/2 cups
  • Lemon juice – 3 tbsp
  • Cilantro – 1/2 cup, finely chopped
  • Fried Cashewnuts – 1/2 cup, chopped

Method:

  • In a non-stick saucepan at medium heat, pour oil and as soon as it gets warm, throw in the mustard seeds. Cover the saucepan with a splatter screen and as soon as the seeds begin to pop, add in the green and red chillies, dals, ginger, turmeric and curry leaves. Saute them for 3 minutes and later add the chopped onion and salt to it. Let the onions sweat out a little. Fry them all for about 5 minutes stirring it continually. Add the Upma Rawa and fry the whole mixture for 5-8 minutes more again stirring frequently (if you have any dry curry left-overs, you can add it too at this stage, read the notes above)
  • Now pour the water/stock and mix throughly to that no lumps form. Reduce the heat to low and cover the saucepan. Let it cook for 3 minutes more. 
  • Remove from heat and add lemon juice, cashewnuts and cilantro. Fluff and mix it all using a fork and spoon the mixture into whatever molds you like, press the mixture well. Invert them onto warm serving plates and serve them for a yummy breakfast. 

Suggested Accompaniments: I and my family enjoy it along with Lemon/Lime or Mango pickle prepared Indian style, or with any thin (soupy) leftover Curry/Saalan. I also love to savor it along with Khatti Dal. My Mother used to serve it us when I was a kid along with a handful of shallow fried groundnuts. 

This goes as an entry to the event, Click Yellow for Bri, being held this time as a Cancer Fundraiser by Jai and Bee for Briana Brownlow.

This also goes all the way to Raaga of The Singing Chef for the WBB#23 Express Breakfast Event she is holding this month.

Luv,
Mona

AddThis Social Bookmark Button