Cheddar Cauliflower Bisque

November 18th, 2009 Mona Posted in Cheddar Cheese, Coriander seeds, Cumin seeds/Zeera, Dry Bay Leaf/Tej Patta, Garlic/Lahsun, Milk and Milk Products, Orange Cauliflower, Red Chilli powder, Salt/Namak, Yellow Onion/Pyaaz 11 Comments »

Cheddar Cauliflower (a variety of the Orange Cauliflower) is a very flavorful Canadian Cauliflower, with a sweet and mild taste, a bright yellowish orange color, and rich in beta-carotenes (about 25 times more than white cauliflower).

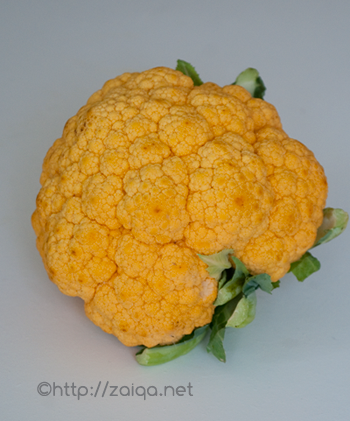
Gorgeous Cheddar Cauliflower

I had seen this eye-catching variety of cauliflower for the first time the last year. And since then been enjoying them in various ways. This week, I again bought a few and prepared a delicious bisque which I thoroughly relished as my breakfast along with a crusty bread.

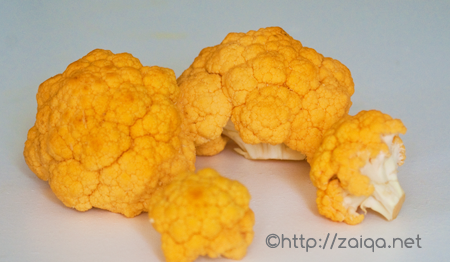
Cheddar Cauliflower florets

Cheddar Cauliflower Bisque

Ingredients:

Organic Cheddar Cauliflower – 1 large head, approx 650 gms, cut into florets, keep the tender cauliflower greens aside in a bowl
Yellow Onion – 1, medium sized, sliced into thick rings
Garlic cloves – 4
Dry roasted Cumin seed powder – 1/2 tsp
Dry roasted Coriander seed powder – 1/2 tsp
Dried Bay leaf/Tej patta – 1, large, dried
Salt – 1/2 tsp
Red chilli powder – 1/4 tsp
Kraft Light Singles, Cheddar cheese – 1 slice (halal)
2% Milk – 1 cup

Bright and nourishing ~ Cheddar Cauliflower Bisque

Method:

1. Preheat oven to 400°C.
2. Line a rimmed baking sheet with aluminium foil and place the cauliflower florets, onion rings, and garlic cloves on it. Drizzle with 2 tsp canola oil and bake/roast in the oven for 20-25 minutes. Shake the baking sheet once in between during the time.

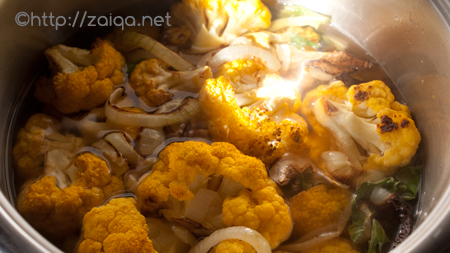
roasted florets and onion + greens + chicken stock

3. Transfer the baking sheet onto racks and let cool until warmish. Add the contents of the baking sheet into a saucepan and add 700 ml of chicken stock. Throw in the cumin powder, coriander powder, salt, red chilli powder, bayleaf and cover the lid. Let cook on medium heat until the cauliflower is tender.
4. Remove and discard the bayleaf from the saucepan. Transfer the contents to a blender container and puree until smooth. You can also a liquidizer. (At this stage, you can strain it if you prefer a smooth consistency, I didn’t because I did not want to waste anything). Pour it back into the saucepan.
5. Add cheddar cheese and the milk and cook on medium heat for 3-5 minutes. Remove from heat and serve warm with a crusty bread.

Did you know there exists a beautiful Purple Cauliflower too?

This warming bisque goes to Health Nut Challenge 3, which Yasmeen of Healthnut is hosting on her wonderful blog. Do mail her your entries before January 2010.

***

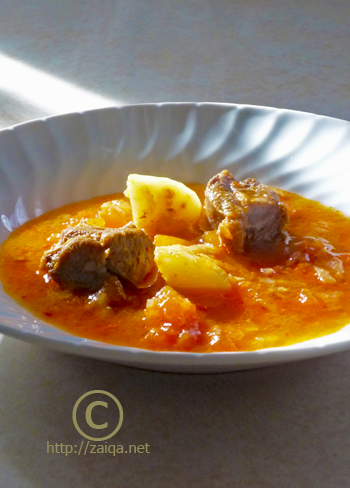
Note: Earlier this year, I had made a humble contribution of my recipe for ‘Qimah Dum‘ for ‘The BloggerAid – Changing the Face of Famine Cookbook‘.

Dum ka Qimah

This cookbook includes recipes by over 140 bloggers over 60 countries from worldwide. 100% of the proceeds for the cookbook target children and education through the World Food Programme called School Meals. Do get your copy soon to go through the recipes and support the great cause

Luv,
Mona

AddThis Social Bookmark Button

Nimbu ka Achaar

September 24th, 2009 Mona Posted in Canola Oil, Coriander seeds, Cumin seeds/Zeera, Dried Red Chillies, Garlic/Lahsun, Green Chillies, Kabuli Chana, Lemon/Nimbu, Mustard seeds/Rai, Nigella seeds/Kalonji, Red Chilli powder, Salt/Namak, Turmeric/Haldi 21 Comments »

Pickles are Indian specialities, enjoyed at breakfasts, at meals, or as an accompaniment to a snack . Each household has their own twist on the pickles that they prepare yearly using freshly available seasonal fruits and vegetables. Among those pickles, mango pickle and lemon or green lime pickle are the two classic indian pickles prepared most commonly in every household, and also easily available at the stores in various varieties.

Fresh Lemons

In todays express lifestyle, the art of making pickles at home is slowly sinking into the mists of time. It only takes a little time, effort and love to prepare these indulgences at home, with your own control on the amount of spices as well as the quality of the product. The following is my mothers recipe for Lemon or Lime pickle.

Note: Pickling is a bacteriostatic method of food preservation, in which the micro-organisms are unable to grow in food. Salt is the main ingredient used as the preservative. Throughout the preperation, take precautions and use only dry spoons for mixing and transfering purpose. Make sure the utensils you are using for making the pickle are absolutely moisture free. Otherwise the pickle will spoil and there are chances of fungus/mould formation. Pickles should never be sored in glazed jars.

Enjoy about a teaspoon of this pickle along with your meals, as an accompaniment to your breakfast or a snack.

Nimbu ka Achaar – Lemon/Lime Pickle
Makes: about 2.5 lb

The procedure includes the following steps which are later described in detail below:

1. Wash and wipe lemons or limes. Chop the 10 lemons or limes, add juice of 2 lemons or limes, mix salt and turmeric and keep aside for 3 days covered in a glass jar with tight lid at room temperature. Shake the bottle gently twice everday so that all the pieces are soaked in the juices.
2. After 3 days, add the powdered pickle spices and the tempering/baghaar to the pickle. Mix well.  Transfer to air tight pickle jars and store in the refrigerator for 1 or 2 weeks for the lemon or lime pieces to ferment. The pickle is ready to be used once the skin of the lemons or limes is soft.

Detailed Procedure:

Lemon or Lime – 10, blemish free, ripe and juicy
Juice of fresh lemons or limes
Iodine free Salt – 2 tbsp
Turmeric powder – 1/3 tsp

Cut lemons mixed with turmeric powder, lemon juice and salt in a large glass dish

Choose blemish free, good quality, preferably organic lemons or limes. I am never able to find thin-skinned lemons where I live, so I prepare pickle using thick skinned lemons or green limes, and have kind of got used to them. Infact the thick pickled lemon skin tastes delicious! Wash them and pat them completely dry using a dry cloth. You can also spread them out on a tray and place it under the sun to complately air dry for 1 or 2 hours. If the skin of the lemons you are using is thick (like mine, see the pictures), discard the thick top stalk part and bottom of the lemons and chop up 10 lemons into small quarters and put into a sterilized glass jar with a tight non-metallic lid. This need not be done for limes as they have a thinner skin. Cutting off the top and bottom is also not required if the skin of the lemons you are using is thin. The skin of Indian lemons is usually thin, whereas the lemons that are available elsewhere are quite thick. Discard the seeds. Add salt, turmeric powder and lemon/lime juice to the jar so that all the pieces are covered in the juice and mix well. Keep the jar in a dark place at room temperature for 3 days. Gently shake the jar twice every day.

Red chilli powder – 2 tbsp
Dry Roasted Cumin seed powder – 2 tbsp
Dry Roasted Coriander seed powder -1 tbsp
Dry Roasted Black Mustard seed powder – 1 tsp
Dried Chickpeas/Kabuli Chana – washed and pat dried completely (optional)
Garlic pods – 3
Small green chillies – 4, washed, and completely pat dried, roughly chopped

After 3 days, the lemon/lime pieces will have released a lot of juices. Add and mix all the above ingredients into the chopped lemon/lime quarters with its juices in the glass jar using a dry spoon and keep aside. Now prepare the baghaar or the tempering. (the dried chickpeas and garlic pods turn soft, suitable for eating, upon fermentation and acquire a tangy taste in the pickle).

Freshly prepared Lemon pickle ready to be set aside in the refrigerator to mature

Baghaar or the Tempering:

Canola oil – 1/2 cup
Nigella seeds/Kalonji – 1 tsp
Black mustard seeds – 1 tsp
Cumin seeds – 1 tsp
Dried red chilli – 2

In a pan, heat oil at medium high heat and as soon as it warms up add the remaining ingredients and mix well. In a few seconds they start to splutter. Remove from heat and keep aside. Take care not to burn the spices. Let it cool down and come to room temperature. This is the baghaar or tempering. Once the baghaar is cooled, carefully pour it into the lemon/lime pickle jar.

Lemon pickle ready to be eaten with its skin all nicely softened after 2 months

Store this freshly prepared lemon/lime pickle in the refrigerator to slowly ferment for about a week or two. Fermentation process renders fruits soft and and the fruits take on an additional aroma and flavor of spices. Mould growth is prevented by the use of a tight lid, by which air is prevented from coming in contact. Make sure that you use a completely dry spoon to use the pickle when you feel like eating it, and cover it and store in the refrigerator as soon as possible for a long life. Keep rotating and turning the jar frequently in the refrigerator. Check if the skin of the lemon/lime is soft enough. If you have used thick lemons, you might have to wait a little longer. I kept the pickle jar unopened for 3 months in the refrigerator, before I used it.

Luv,
Mona

AddThis Social Bookmark Button

Tamatar ki Dal

August 18th, 2009 Mona Posted in Cilantro/Kothmir (fresh), Cumin seeds/Zeera, Curry leaves (fresh), Dried Red Chillies, Garlic/Lahsun, Ghee, Green Chillies, Red Chilli powder, Salt/Namak, Tomato/Tamatar (fresh), Turmeric/Haldi, Yellow Lentil/Tuvar ki Dal/Toor dal 10 Comments »

Simple dals like the old-time Tamatar Dal always reminds of home, my childhood and comforts a vexed being. Thin soup like consistency of pureed flavored dals with a delicious tempering of spices is a staple in my house, used to wet rice and enjoyed along with a vegetarian or a non-vegetarian dry dish on the side.

Indian tomatoes are naturally sour unlike the tomatoes available here, that are slightly sweetish in taste. The sourness of the tomatoes imparts a delicious flavor to the dal.

A baghaar of aromatic healing spices in a little amount of ghee adds a delightful flavor to the dal. You could also use vegetable or canola oil instead.

Tamatar Dal – Tomato Lentil Soup

Ingredients:

Tuvar Dal/Yellow lentils – 1 cup
Water
Large Red Tomato – 4, roughly chopped
Small Green chillies – 4, finely chopped
Red Chilli powder – 2 tsp
Salt
Turmeric – 1/4 tsp
Ghee – 2 tsp
Curry leaves – 10 fresh leaves
Cilantro/Kothmir – 3 tbsp, finely chopped
Mint – 1 tbsp
Cumin seeds/Zeera – 1 tbsp
Dried Red chillies- 3
Garlic pods/Lahsun – 2, each sliced into two if the pods are very large

Tamatar ki Dal

Method:

1. Wash and drain the dal. Add the drained dal in a saucepan and pour in about three cups of water. Add 1 tsp salt, green chillies, chopped tomatoes and bring it a boil. Lower the heat to medium, half cover the lid and let cook until the dal is soft and mushy. Add more water if needed.
2. At this stage, you can pour the dal contents into a blender and blend until pureed. This is entirely optional, only if you prefer a smooth consistency. Or you can just mash up the cooked dal using a ‘Dal Ghotni’. Pour it back into the same saucepan, and add red chilli powder, 2 tsp salt and turmeric. Mix well and add 2 glasses of water. Let cook on medium heat uncovered for 10-15 minutes, until you achieve a just slightly thick soup like consistency. Remove from heat. Add chopped cilantro and mint leaves.
3. Pour ghee into a pan at medium high heat. As soon as it gets warm, add the garlic pods, stir fry until the garlic pods are lightly reddish brown in color. Quickly mix in cumin seeds, dried red chillies and curry leaves. Remove the pan from heat. This is the baghaar or the tempering. Add the contents of the pan into the dal and mix well. Serve.

Suggested Accompaniments: Khushka and any vegetarian or non-vegetarian dish.

This delicious dal is my entry to the event ‘Delicious Dals from India’ being hosted by Suma at her blog Veggie Platter.

Luv,
Mona

AddThis Social Bookmark Button

Palak ki Pakodi, Til ki Chutney

July 29th, 2009 Mona Posted in Canola Oil, Cilantro/Kothmir (fresh), Garlic/Lahsun, Ginger-Garlic paste, Gram Flour/Besan, Green Chillies, Mint/Pudina (fresh), Red Chilli powder, Salt/Namak, Sesame seeds/Til, Spinach/Palak ki bhaji, Tamarind/Imli, Turmeric/Haldi 12 Comments »

It has been raining since a few days here, and I was craving for some snacks. Palak Pakodi with Til ki Chutney is what I prepared today and we enjoyed it الحمد لله along with chai.

Palak ki Pakodi – Spinack Fritters

Ingredients:

Spinach – 100 gms

Palak – Spinach

For the batter:-

Gram flour/Besan – 1 cup
Cool fresh water – 1 cup
Red Chilli powder – 1 tsp
Salt – 1 tsp
Turmeric – 1/4 tsp
Ginger garlic paste – 1 tsp

Palak ki Pakodi – Spinack Fritters

Method:

1. Heat oil in a kadai to deep fry the fritters.
2. In a bowl, prepare the batter. Mix all the ingredients under the heading for the batter until the batter is smooth. Keep aside.

Spinach strips in batter

3. Wash and pat dry the spinach thoroughly. Discard stems and pile the spinach one above the other. Cut into strips and add it to the batter. Using a fork mix well and gently lift a small amount in the fork and drop it into the hot oil in the kadai. Deep fry on both sides until golden brown in color, around 3-5 minutes.
4. Remove the fritters into a large wire mesh strainer for the excess oil to drip off.

Til ki Chutney – Sesame seed Chutney

Ingredients:

Sesame seeds/Til – 1/2 cup
Small green chillies – 5, stems discarded, roughly chopped
Tamarind concentrate – 2 tbsp
Fresh Chopped Cilantro/Kothmir – 1 tbsp
Fresh Mint leaves/Pudina – 6 leaves
Garlic cloves – 2
Salt – to taste
Fresh cool water – 3/4 cup

Til ki Chutney – Sesame seed Chutney

Method:

1. In a pan at medium high heat, dry roast the sesame seeds until lightly golden brown in color. Remove the pan from heat and keep aside to cool.

Dry roasted Sesame seeds

2. Once the sesame seeds are completely cooled, add the rest of the ingredients and grind in a blender until smooth. Add more water if you need. Adjust salt to taste.
3. Prepare baghaar/tempering in a pan- pour 1 tbsp oil in a frying pan at medium hight heat. Add 1 tsp cumin seeds, 2 dry red chillies, and a few curry leaves. As they crackle, remove from heat and mix into the chutney. Serve.

Dip the Spinach fritters into the chutney and enjoy as a snack.

I also prepare this snack along with the chutney quite usually in Ramadan at Iftaar. This is my entry to the ‘Hyderabadi Ramadan Food Festival ’09’ that I am hosting on my blog.
Do send me your entries as soon as possible before Ramadan starts. The deadline is 20th August ‘09.

Luv,
Mona

AddThis Social Bookmark Button

Aloo aur Gosht ka Khatta Salan

February 9th, 2009 Mona Posted in Canola Oil, Cilantro/Kothmir (fresh), Coriander seeds, Cumin seeds/Zeera, Curry leaves (fresh), Garlic/Lahsun, Ginger-Garlic paste, Ginger/Adrak, Hyderabadi special, Lamb/Beef/Mutton/Veal/Sheep, Lemon/Nimbu, Red Chilli powder, Red Potatoes, Salt/Namak, Tamarind/Imli, Tomato/Tamatar (fresh), Turmeric/Haldi, Turnip/Shalgam, White Potato/Aloo, Yellow Onion/Pyaaz 12 Comments »

Finally the snow seems to be melting away and I can hear water running down on the streets into the drains through everywhere. It wont be long when the piles and piles of snow will slowly flow away and evaporate, and I am so looking forward to it all inshallah.

Frozen Moment #5 – Spring’s not very far from now

The weather was in single digits yesterday, after a long long time. I was very delighted to take a walk, and feel the cool but bearable winds. During the days, sunlight streaming in through windows when the sky is clear and not cloudy gives me utmost pleasure and awaken my dull and boring days.

Today I prepared Khatta shorba, one of the easiest, light and delicious Hyderabadi curry that I enjoy along with Khadi dal and Chawal for a filling dinner or lunch.

Aloo-Gosht ka Ka Khatta Shorba – Aromatic Soured Meat Stew

Khatta Salan means ‘tangy curry’. Sometimes the curry is also referred to as Khatta shorba means ‘tangy stew’. The sourness from the tomatoes and tamarind, a slight heat from red chilli powder and the subtle sweetness from onions along with the roasted spices impart an aromatic and delectable flavor to this tomato stew. This same tomato base or shorba is used in many other versions of the khatta shorba, which are Karele ka Khatta ShorbaBhendi Ka khatta shorba, Arvi-Gosht ka khatta shorba etc.

Aloo-Gosht ka Khatta Salan – Meat & Potato in Aromatic tangy Tomato Stew

Ingredients:

Lamb shouldermeat with bones – 600 gms, washed and cut into bite size pieces
Yellow Onion – 3, large, finely sliced
Red chilli powder – 1 tbsp
Salt – 2 1/2 tsp
Curry leaves – 2 sprigs, fresh
Ginger garlic paste – 1 tsp
Turmeric – 1/4 tsp
Roasted Cumin seed powder – 1/2 tsp
Roasted Coriander seed powder – 1/2 tsp
Tomatoes – 5, large red and ripe, finely chopped
Potatoes – 3, medium sized, quartered
Tamarind juice/Lemon or Lime juice – 3 tbsp
Canola oil – 5 tbsp

Method:

  • In a large pressure cooker at medium high heat, add oil, and as soon as it warms up add the sliced onions and fry until golden brown. Add ginger-garlic paste, curry leaves, salt, red chilli powder, turmeric, cumin powder and meat bones. Let cook until the meat is no longer pink. Add tomatoes and cook along until it starts leaving oil. Pour in water to cover and pressure cook until the meat is cooked.
  • Add the quartered potatoes and tamarind/lemon/lime juice and around 2-4 cups of water to the meat stew and let it cook  half covered for a further 5-10 minutes or until the potatoes are fork tender. Remove from heat and serve.

Suggested Accompaniments: Chawal and Khadi dal.

Note: You can replace potatoes with peeled and quartered turnips to make it ‘Shalgam aur Gosht Ka Khatta Salan’ – Turnip and Lamb meat in a Tangy Sauce.

Luv,
Mona

AddThis Social Bookmark Button