Gosht ka Achaar

August 14th, 2010 Mona Posted in Canola Oil, Cumin seeds/Zeera, Curry leaves (fresh), Dried Red Chillies, Eid/Ramadhan/Iftaar, Fenugreek/Methi seeds, Ginger-Garlic paste, Hyderabadi special, Lamb/Beef/Mutton/Veal/Sheep, Lemon/Nimbu, Mustard seeds/Rai, Red Chilli powder, Salt/Namak 18 Comments »

Ramadan Mubarak everyone!

I was very little when I had first tasted this pickle at one my aunts place, but I still remember the burst of flavors that made me fall in love with this pickle~ tangy, spicy and simply ambrosial. Since then I have tried to replicate this recipe handed to me by one of my dear grandmother in the family. She had only given me andaaza (rough estimate) amounts of the ingredients being used, a mutti (handful) of that, a mutti of this.

This is one of my most treasured recipes, simple and straightforward procedure, very close to my heart, and that which I have been enjoying since times past. Enjoy this spicy, lemony meat pickle that is sure to entice your taste buds. I hope you all like it as much I do.

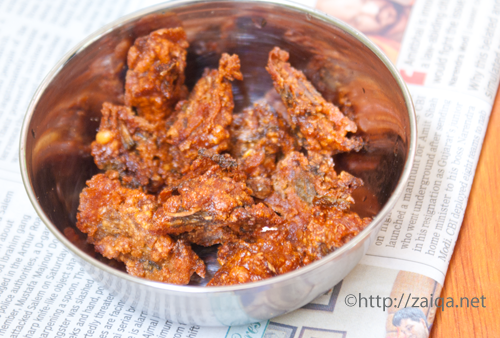
Gosht ka Achaar – Veal Meat Pickle

Ingredients:

Boneless Beef/Veal meat – 800 gms, washed, drained, pat dried and cut into small bite-size pieces
Lemon juice – 2 cups, fresh
Garlic cloves – 150 gms, pureed into a smooth paste (with addition of as less water as possible to puree)
Canola oil – 1/2 cup
Curry leaves – 20-25, fresh, chopped
Cumin seeds – 1 tbsp
Dried red chillies – 4
Dry roasted Cumin seed powder – 3 tbsp
Dry roasted Mustard seed powder – 2 tbsp
Dry roasted Fenugreek seed powder – 3 tbsp
Red chilli powder – 2 1/2 tbsp
Salt – 2 tbsp

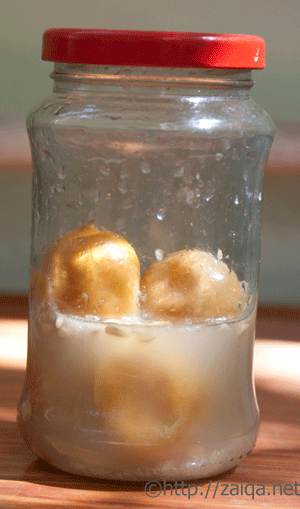
Gosht ka achar – Veal Meat Pickle

Method:

1. In a deep glass mixing bowl, add the meat pieces and pour in lemon juice. See that all the meat pieces are nicely covered in the lemon juice. Add more if needed. Cover and let marinate in the refrigerator overnight.
2. The next day,add garlic paste to the marinating meat.
3. In a large non-stick heavy saucepan pour in oil, and as soon as it warms up add the curry leaves, cumin seeds and dried red chillies. Within a few seconds add the cumin seed powder, mustard seed powder, fenugreek seed powder, red chilli powder, salt and mix. Immediately add the marinating meat+garlic with all its juices from the mixing bowl and mix well. Let cook partially covered stirring occasionally until the meat is tender. This will take about 35-45 minutes depending on various factors. You can even pressure cook the meat if you want it cooked quick. Keep an eye and remove from heat as soon as the meat is cooked and gravy is thick and clinging to the meat.
4. Let it cool down completely. Transfer to a sterilized glass canning jar and store it in the refrigerator. Use a dry spoon whenever fancied.

Note: Use only Beef/Veal meat for this recipe. I do not suggest using lamb meat or even chicken meat instead.

Enjoy the pickle along with your meals on the side.

This is my first entry to the The Hyderabadi Ramadan Food Festival that I am hosting on my blog.

Luv,
Mona

AddThis Social Bookmark Button

Tuna Avocado Salad

August 9th, 2010 Mona Posted in Avocado, Black pepper powder, Cilantro/Kothmir (fresh), Dill/Suvabhaji (fresh), Green Chillies, Lemon/Nimbu, Salt/Namak, Tuna 6 Comments »

Avocado, with more than 500 varieties and chock full of healthy nutrients, is one of my favorite power fruits. The first time I had tasted it in Toronto, I was a little apprehensive if I would fancy its taste or not. But as it is so good for health, I kept getting one every time I visited the market and began having chunks of this fruit every once in a while at breakfast instead of mayo in my sandwich. And oh boy, I eventually fell in love with it.

If unripe when bought, keep them wrapped in a newspaper at room temperature for a few days until they are ripe and yield slightly to pressure. Once ripe, cut around the pit using a sharp knife, twist the halves to open the fruit. Carefully whack a knife on the pit, twist to remove and discard the pit. Cup the avocado halve, score and scoop out flesh. Cut avocado reacts with air and browns just like an apple, so it is better to use it immediately.

I was eyeing this recipe from one of my most favorite and inspiring chefs from Food network~Micheal Smith, since long. I tried it and whipped up this yummy quick salad/sandwich filling for a yummy evening snack along with chai and a banana on the side.

Tuna Avocado Salad
(Inspired from Chef Micheal Smith’s recipe)

Ingredients:

Canned tuna, packed in water – 1 can
Avocado – 1, pitted and peeled, chopped
Lemon juice – 2 tbsp
Dill leaves – 1/4 cup, finely chopped
Cilantro – 1/4 cup finely chopped
Green chillies – 2, finely chopped
Salt and Black pepper powder – to taste

Method:

Combine all in a mixing bowl, toss together to mix. Serve as a sandwich or in a wrap.

Luv,
Mona

AddThis Social Bookmark Button

Sun-Dried Food Products Series ~ III: Dal ki Badiyan

July 30th, 2010 Mona Posted in Ginger-Garlic paste, Green Gram/Moong ki Dal, Green Onion/Hari Pyaz, Hyderabadi special, Red Chilli powder, Salt/Namak, Turmeric/Haldi 12 Comments »

Among all those amazing dried products that one can make during hot Indian summer days making use of the strong sunshine, dal ki badiyan are the ones I really love.

Badiyan are tiny sun dried lentil nuggets, which are nutritious and an excellent substitute for meat in curries. Many varieties of badiyan are available ready made in stores. But nothing compares to these homemade variation that I am addicted to since childhood.

Dal ki Badiyan ~ Sun Dried Lentil Nuggets

Split and skinned green gram/Moong ki Dal – 500 gms
Hari Pyaz/Spring greens, finely chopped – 3 cups (only the greens, not the white)
Ginger-garlic paste – 1 tbsp
Turmeric powder – 1/4 tsp
Salt and Red chilli powder – to taste

Method:

1. Soak the dal for 2 hours in fresh cool water. Later, drain and wash the dal in several changes of water. Once washed and drained, puree the dal in blender adding just enough water to aid in the process. (Note: Do not add too much water, or else the badiyan will not form properly)
2. In a mixing bowl, add the pureed dal, chopped spring greens, ginger garlic paste, turmeric powder, red chilli powder and salt. Mix thoroughly.
3. Drop blobs of the prepared mixture on a clean and dry tray or a rimmed baking sheet using your hands or a spoon. Leave the tray in the sun during daytime and bring the tray indoors when dark. On the first night, gently scrape the partially dried badiyan and invert them so that the next day the bottoms also get nicely dried up in the sun. It usually takes 3-5 days under hot sun for the badiyan to completely get dried.
4. When completely dried, transfer the badiyan to an air tight container and store at room temperature or in the refrigerator. Be careful and keep away from moisture.
5. Always shallow fry a few needed badiyan in some oil until the color changes to golden brown just before consumption. Do not burn them or else their taste will worsen. Consume the crunchy shallow fried badiyan on the side to your meals, or add the shallow fried badiyan to any of your favorite curries or soups and cook for just a few minutes.

Dal Ki Badiyan Pictorial

Blobs of the mixture on tray, ready to be sun dried

Badiyan – Sun drying

Shallow fried Badiyan, ready for consumption

Preparing Dal ki Badiyan in Oven:

If you live in areas where sunlight is scarce and plays hide and seek with you, you can even prepare badiyan in the oven. Just lightly spray or brush the tray with a little bit of cooking oil, then drop the batter on the tray as shown above and place the tray in the oven pre-heated at the lowest setting. Let it bake for around 2-3 hours. Shake the tray after every hour. Keep a close eye and as you observe they are completely dried up, remove and let them cool on a rack. Once completely cool, transfer to air tight containers and store until needed. Shallow fry a few needed the badiyan in a little oil and enjoy when fancied.

Other Amazing sun dried Indian food products from this series are:
1. Sukhi Dahi Mirch – Sun dried Yogurt Chillies
2. Dhoop Nimbu ~ Sun Preserved Lemons

AddThis Social Bookmark Button

Suhali

July 21st, 2010 Mona Posted in All-Purpose Flour/Maida, Canola Oil, Salt/Namak 8 Comments »

Deep fried, crisp and sweet. This is how I how I describe my childhood favorite tea time snack~Suhali (plural – suhaliyaan). They are just like poori, but rolled a little thinner than poori for a crisp end result and sprinkled generously with powdered sugar after being deep fried.

Suhali – Deep fried Sweet Discs

Ingredients:

All Purpose flour/Maida – 3 cups
Salt – to taste
Canola oil – 3 tbsp
Water

Oil to deep fry
Powdered sugar as topping

Method:

Mix flour, oil and salt in a bowl. Add water little by little to make a soft dough. Knead for a couple of minutes. Cover the bowl with a kitchen towel and keep aside for 15-20 minutes. Knead again for 5 minutes. Pinch off walnut-size balls of dough and roll them between the palms of your hands to smooth round balls. Cover the balls with a kitchen towel. One by one roll the balls into thin discs using as little flour as possible.

Deep fry the discs in hot oil in a deep kadai/wok on both sides until golden and crisp. Remove them using a slotted spoon from hot oil and place on a platter. Immediately sprinkle the fried suhali with powdered sugar. Continue until all are done. Serve when cool. Store at room temperature. Finish within a week.

Note:
1. It is necessary that you roll the discs for suhali preparation thinner than you roll for poori.
2. You can add ghee and cold milk to the flour instead of oil and water respectively to make the dough if you wish. My aunt even adds a spoon or two of semolina to the dough.
3. Use as little flour as possible while rolling the suhali.

Luv,
Mona

AddThis Social Bookmark Button

Sun-Dried Food Products Series ~ II: Dhoop Nimbu

June 21st, 2010 Mona Posted in Coarse salt/Mota Namak, Hyderabadi special, Lemon/Nimbu 14 Comments »

The last month in Hyderabad was very hot, with temperatures almost touching 45°C in the daytime. Though these temperatures made me uneasy and frustrated, my Nani(grandmother) made good use of those days by preparing something I had missed a lot. She made a little quantity of Dhoop Nimbu upon my request and here I am sharing her recipe with you all. She recalled that her husband, my late Nana(grandfather) was an ardent fancier of this acidic sun preserved wonder. He used to prepare it regularly and relished it always along with some Mash ki Dal and Warqi Roti at breakfasts when he was alive. The process of preparation is simple, but requires some special conditions. Strong sunshine for almost a week, thoroughly clean and dry utensils are essential for the process.

Dhoop Nimbu ~ Sun Preserved Lemons

Ingredients:

Mota Namak/Coarse Salt – 4 tbsp
Lemons – 6

Choose 6 blemish free ripe and yellow thin skinned lemons and wash them thoroughly. Wipe them completely dry with a clean cloth. Using the tip of a sharp knife, poke 4 of the 6 lemons making superficial slits on all over them and keep aside in a dry bowl. Juice the remaining two lemons and keep aside in a bowl. Now add 1 tablespoon of mota namak in a clean and dry glass jar with a tight lid. Add a gashed lemon to the jar and add an another tablespoon of mota namak to it. Likewise keep adding the mota namak and the gashed lemons until both the ingredients are used up. Lastly pour in the reserved juice of the two lemons. Close the lid of the jar and shake the bottle thoroughly. Place this jar in an area that receives almost 6 hours of strong sunshine. Keep rotating the bottle hourly or after every 3 hours everyday when you keep it in the sun. Bring the jar indoors when it is dark and place it back in the sun the next day. Keep repeating it for until 5-6 days. By then you will notice that the lemons will start changing color into light brown and will begin to get softer. Also they will release juices and shrink in size. At the end of the 5th or 6th day,  transfer the jar of sun preserved lemons in the refrigerator to store and use when required. The prepared Dhoop Nimbu is ready for consumption.

To use: Using a dry slotted spoon, take a preserved lemon from the jar. Cut it into required number of pieces and serve them on the side along with meals. These preserved lemons are very acidic and quite delicious. The juices that are released along with the mota namak is not suitable are consumptions as it is very briny in taste. However when all the sun preserved lemons have been used up, the remaining briny juices can be used up to make a new batch of dhoop nimbu.
You can also cut all sun preserved lemons and make a pickle out of them following the same process for lemon pickle given here.

Dhoop Nimbu Pictorial

Characters in Play: (Indian) Thin-Skinned Lemons and Mota Namak

Day 1 in Sun

Day 2 in Sun

Day 3 in Sun

Day 4 in Sun

Day 5 in Sun

Enjoy!

Other Amazing sun dried Indian food products from this series are:
1. Sukhi Dahi Mirch – Sun dried Yogurt Chillies
2. Dal ki Badiyan – Sun Dried Lentil Nuggets

Luv,
Mona

AddThis Social Bookmark Button