Dum ke Rote ~ I

November 9th, 2009 Mona Posted in All-Purpose Flour/Maida, Almonds/Badaam, Baking powder, Cardamom/Elaichi, Ghee, Hyderabadi special, Khoa, Milk and Milk Products, Pistachios/Pista, Saffron/Zafraan, Semolina/Sooji/Suji, Sugar/Shakkar 29 Comments »

Rote (also referred to as roat), are baked~cooked on dum, sweet and crunchy semolina flat cookie sort of delicacies made especially in Hyderabad city, which are deliciously crunchy from the outside, but soft in the center. This confection has the all goodness in them, including exotic saffron, nuts, khoa and glorious ghee.

Semolina -Sooji rawa (fine variety)

The following is one of my friend Saba’s recipe, which I have changed just a little bit here and there. My hubby loved these rote a lot الحمد لله and I plan to make them again soon inshallah.

My mother-in-law’s version is simpler. Inshallah I will post my Mother-in-laws version for this confectionery sometime in the future.

Dum ke Rote – Baked Sweet Semolina flat breads
Makes: 13 large rote as shown in the picture below

Ingredients:

Almonds – 3/4 cup
Pistachios – 1/2 cup
Saffron threads – 2 pinch
Semolina/Sooji (fine variety) – 3 cups
All-Purpose flour – 3 1/4 cup
Granulated Sugar – 3 cups
Baking powder – 1 1/2 tbsp
Cardamom powder – 1 tsp
Homemade Khoya – 3/4 cup
Ghee – 1 cup, warmed
Warmed Milk – 1 cup

Dum ke Rote

Method:

1. Soak the almonds and pistachios together in cool water overnight. The next day, peel them and keep aside. In a blender container pour in 1/2 cup warmed milk and the peeled nuts and grind to a smooth paste. Keep aside in a bowl.
2. Add the khoya and the remaining warmed milk in a blender container and blend to a smooth paste.
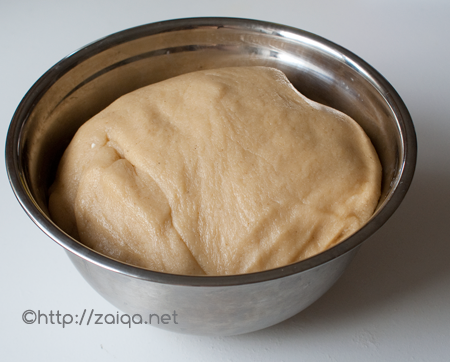
3. In a mixing bowl, add semolina, all-purpose flour, sugar, baking powder and cardamom powder. Using a whisk, mix well. Add the nuts+milk paste, and the khoya+milk paste and ghee and mix well. Knead to form a dough. Cover and keep aside for 1 hour for it to rest. Later, knead again until dough is pliable and cover again and let rest for 1 more hour.

4. Preheat oven to 350°F and knead the dough a final time. Pinch out fist size balls from the dough and shape into smooth balls. Using your fingers flatten them into discs (approx 6 inches in diameter) and arrange on greased foil lined baking sheets leaving 2 inch space all around each of the discs. Gently press few sliced almonds on top of each disc. Place the baking sheets in the oven and bake for 10-15 minutes or until the sides and base are nicely browned (but not burnt). Keep a close eye. Immediately switch to broil on low setting for 2-5 minutes until the tops are browned (but not burnt) and the nuts are toasted. Keep a close eye.
5. Remove the baking sheets from the oven. Leave to cool on tray for 5 minutes. Using a flat spatula transfer them to wire racks until they are cooled completely. Store in an air tight container at room temperature. Finish within 3-4 weeks.

If you prepare this delicacy at home too, feel free to send me your recipe for Dum ke Rote. I will be happy to try it out.

Luv,
Mona

AddThis Social Bookmark Button

Murghi ka Salan

November 7th, 2009 Mona Posted in Canola Oil, Cilantro/Kothmir (fresh), Coriander seeds, Ginger-Garlic paste, Hyderabadi special, Lemon/Nimbu, Poultry/Murgh, Quick fix meals, Red Chilli powder, Salt/Namak, Tomato/Tamatar (fresh), Turmeric/Haldi, Yellow Onion/Pyaaz, Yogurt/Dahi 16 Comments »

Out of all the curries that I prepare using chicken, this is perhaps the one I prepare most usually at home for meals. Home made ginger-garlic paste and yogurt, fresh lemon juice helps tenderize the chicken, and both the yogurt and tomatoes render a subtle sour flavor which balances out the sweetness of the shallow fried onions in the curry. Fresh roasted coriander seed powder and fresh cilantro add a wonderful aroma.

Murghi ka Salan – Chicken Curry

Murghi ka Salan – Chicken Curry

Ingredients:

Chicken, with bone – 800 gm, skinned and cut into 10-12 pieces
Home made Yogurt – 1/2 cup
Home made Ginger garlic paste – 2 tbsp
Fresh Lemon juice – 3 tbsp
Red chilli powder – 1 1/2 tsp
Salt – 1 1/2 tsp
Turmeric powder – 1/4 tsp
Canola oil – 3 tbsp
Yellow Onion – 2, large, peeled and finely chopped
Green cardamom – 4
Black peppercorns – 8
Cloves – 3
Cinnamon stick – one 2″ stick
Dry-roasted Coriander seed powder – 2 tsp
Tomatoes – 4, large, ripe and red, finely chopped
Cilantro/Kothmir – finely chopped, 1/2 cup, loosely packed

Method:

1. In a large mixing bowl, add yogurt, ginger garlic paste, lemon juice, red chilli powder, salt and turmeric. Using a spoon or a whisk, mix well. Add the chicken pieces and mix well to coat all the pieces with the marinade. Marinate for 1 hour, covered, in the refrigerator
2. Later, before you start cooking, remove the chicken from the refrigerator and leave on the countertop to bring it back to room temperature. Continue cooking.
3. In a large heavy bottomed non-stick casserole dish at medium high heat, pour in oil, and as soon as it warms up add the chopped onion and stir fry until it is nice and evenly golden brown in color. Add the cloves, cinnamon stick, cardamom, black peppercorns, coriander seed powder and mix well. A wonderful aroma emanates. Fry them for a minute along with onions, later add the chopped tomatoes and mix well. Cover with a lid and let cook for 4-5 minutes. Add a few splashes of water and let cook until tomatoes are all mushy, add the marinated chicken with all the juices and mix well. Let cook uncovered for 5-10 minutes. Later, lower the heat to medium, pour in 2 to 3 cups warm water and mix gently. Cover with the lid and let cook for 30-40 minutes or until the chicken is tender and well-cooked. Remove from heat and add the chopped cilantro and gently mix well. Serve.

Suggested Accompaniments: Serve the curry along with Khushka and Tamatar dal, or along with Parathas, and a vegetarian side-dish of your choice for a delicious meal.

Luv,
Mona

AddThis Social Bookmark Button

Taleh Baingan

November 5th, 2009 Mona Posted in Eggplant/Baingan, Red Chilli powder, Salt/Namak 9 Comments »

During my childhood, this spongy vegetable ranked among the toppers in my list of disliked vegetables . The only way I would eat them was when these eggplant discs were deep fried till crisp on the edges with a soft flesh in the center, and lightly seasoned with red chilli powder and salt while still warm. But today, eggplants seem to have become one of my favorite vegetables over time and I somehow end up getting a few eggplants home most usually. There are so many delicious preparations that can be made out of this  simple vegetable, for ideas I recommend going through this cookbook – Eggplant – More than 75 delicious recipes, it will make you fall in love with eggplants.

Indian eggplants ~ cut into chips

I am sure even you all will enjoy these eggplant chips, my childhood favorite, as an accompaniment to your meals.

Taleh Baingan – Deep fried Eggplant discs

Ingredients:

Baingan/Aubergine/Eggplants – 4 (I used baby eggplants as shown in the picture, you can even use Japanese eggplants)
Red chili powder – 3/4 tsp or to taste
Salt – to taste

Taleh Baingan – Deep fried Eggplant discs

Method:

1. Cut the eggplant into half inch thick slices and soak them in surplus salted water in a mixing bowl.
2. Heat oil to deep fry in a kadai or wok at medium heat and as soon as it is warm enough. Drain the eggplant discs and gently slide them in the hot oil, and deep fry in batches on both sides until the color is changed to a golden brown color and the outer edges are wrinkled.
3. Remove using a slotted spoon into a wire mesh strainer for the excess oil to drain away. Immediately sprinkle the fried discs while warm with the red chilli powder and salt on both sides. Serve immediately and enjoy while still warm.

Luv,
Mona

AddThis Social Bookmark Button

Buttermilk Pancakes

November 3rd, 2009 Mona Posted in All-Purpose Flour/Maida, Baking powder, Baking soda, Butter/Makhan, Buttermilk, Egg/Anda, Salt/Namak, Sugar/Shakkar, Vanilla powder, Whole Wheat Flour/Durum Atta 9 Comments »

Light and fluffy, tender and slightly tart buttermilk pancakes, what better way to start a lazy weekend morning.  This classic American breakfast/brunch will surely delight you and your family.

Buttermilk Pancakes
Recipe Source: Chatelaine
Makes – 12

Ingredients:

Unsalted Butter – 1/2 cup,melted and cooled + extra for cooking
Buttermilk – 2 cups (or mix 2 cup milk + 2 tbsp lemon juice and let stand 5 minutes until it thickens)
All Purpose flour – 1 cup
Whole wheat flour – 1 cup
Granulated Sugar – 1/4 cup
Baking powder – 2 tsp
Baking soda – 1 tsp
Salt – 1 tsp
Eggs – 2, large, at room temperature
Vanilla powder – 1 1/2 tsp

Method:

1. In a bowl, add eggs, buttermilk (or the milk+lemon juice mixture), butter and vanilla.
2. In a bowl, using a fork mix flour, sugar, baking soda, baking powder and salt. Make a well in the center and add the above wet mixture. Mix until just blended. The flour should be lumpy in texture for fluffy pancakes. Mix as little as possible.
3. Pour little butter in a non-stick frying pan at medium high heat. As soon as it warms up, pour 1/3 cup batter into the pan. Make 1 or 2 pancakes at a time depending on the size of the pan. Cook until bubbles form on top of pancake and edges begin to brown, 2-4 minutes. Using a flat rubber spatula, flip and cook the other side until the other side is golden-brown, 2-3 minutes. Do not press or they will not be fluffy.
4. Serve right away. To keep warm, keep them stacked in a warm oven until all are cooked. Drizzle with maple syrup and serve.

Tips: Pour batter into the pan, gently push in a few seasonal fruit slices (sliced banana, peaches, or berries), pinch of spices (like cinnamon powder, cardamom or nutmeg etc) or you can also add a few chopped toasted nuts (pistachios, hazelnuts, almonds or even shredded coconut) or chocolate chips into the pancake batter before you flip it.
Freeze leftover pancakes in a freezer bag and reheat it when fancied in a toaster or toaster oven.

Luv,
Mona

AddThis Social Bookmark Button

Aloo Qimah Matar ke Cutlets

October 30th, 2009 Mona Posted in Black pepper powder, Canola Oil, Ginger-Garlic paste, Lamb/Beef/Mutton/Veal/Sheep, Peas/Matar, Red Chilli powder, Salt/Namak, White Potato/Aloo 16 Comments »

Aloo ke Cutlets/Potato croquettes is a popular snack food in India, usually enjoyed as chaat. Whenever I have time on hand, what I do is, prepare these in bulk and freeze or refrigerate them to store for future use. Everyone at home enjoys them as a side-snack to meals, and I have a quick snack on hand.

Aloo Qimah Matar ke Cutlets – Potato croquettes
Makes: 14-15 cutlets

Ingredients:

White Potatoes – 6 or 7
Black pepper powder – 1 tsp
Salt – 1 tsp
Cooked peas (fresh or frozen)(thawed if frozen) – 3/4 cup

For Qimah:

Canola oil – 2 tsp
Minced Veal meat – 250 gms
Red chilli powder – 1/2 tsp
Salt – 1/2 tsp
Ginger garlic paste – 1 tsp

Aloo Qimah Matar ke Cutlets – Potato croquettes

Method:

1. Wash and drain the qimah. In a large sauté pan at medium high heat, pour in oil and as soon as it warms up, add the drained qimah and all the remaining ingredients for qimah and mix well. Let it cook stirring frequently until the qimah is completely cooked and well browned and all the moisture has been dried up. Remove from heat and keep aside to cool.
2. Wash and drain the potatoes. In a pressure cooker, add the potatoes and pressure cook for a few minutes until the potatoes are soft. make sure that you do not pressure cook for long such that the potatoes burst open. Open the cooker and drain the potatoes in a colander. Once they are warmish to touch, hold the warm potatoes using a kitchen towel in one hand, and peel them using the other hand. Place the peeled potatoes in a mixing bowl. Mash them well. Add the prepared cooled qimah, the cooked peas, black pepper powder and salt. Mix well.

potato+peas+qimah cutlets

cutlets stacked in a food storage box to be refrigerated

3. Shape the prepare potato mixture into patties as shown in the picture. Grease your hand with a little oil to aid in the process. Once the potato mixture is complete and the patties are ready, stack them as shown in the picture in a food storage box, in layers and sheets of aluminium foil separating them (store them this way if you plan to finish them all within one week). To eat, shallow fry a few of the patties in just a few drops of oil in a frying pan on both sides until light brown. Serve warm.

Tip: You can also prepare larger patty shaped potato cutlet and enjoy these shallow fried cutlets sandwiched between burger buns for a quick breakfast.

Tip: If you plan on storing these cutlets for a longer time, arrange the shallow-fried cooked cutlets and freeze them individually for 3 hours. Later, stack them all up in a food storage box and store the frozen cutlets for future use. To use, microwave them for a few minutes before you serve.

Luv,
Mona

AddThis Social Bookmark Button