Sun-Dried Food Products Series ~ I: Sukhi Dahi Mirch

June 4th, 2009 Mona Posted in Green Chillies, Salt/Namak, Yogurt/Dahi 9 Comments »

Hot Indian summers are taken full advantage of by preparing many kinds of sun-dried products by women which last whole year long. Sukhi Dahi Mirch is one such preperation where the green chillies are allowed to ferment in yogurt and salt mixture for a while and then sun-dried until they have absorbed all the yogurt and dried with a changed light yellowish skin color. This sun-dried chilli is then enjoyed as a condiment along with food.

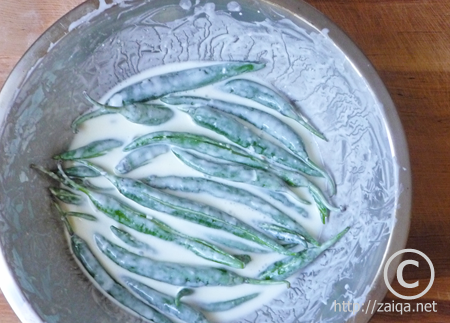
Long Green chillies soaking in Yogurt+Salt mixture

With summer here in Toronto in full swing officially, I decided to prepare a few of these when I spotted some beautiful long green chillies at a store here. Unfortulately sunshine for continous week, even in summers, with no cloudy/rainy day is a little unimaginable here. Nevertheless I was lucky enough with some strong Toronto summer sunshine for my mirchi’s to sun dry and satisfy our cravings.

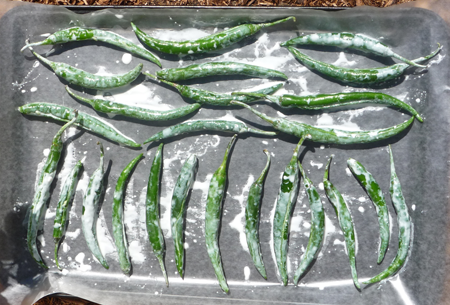
Soaked chillies sun drying

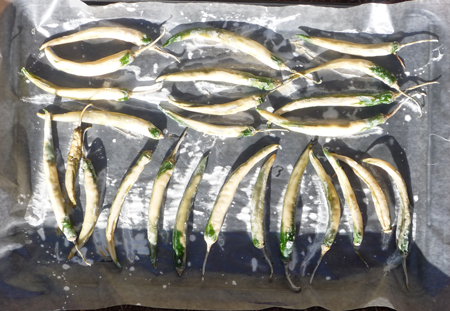
Chillies with changed color on day-3

The below recipe prepares a small batch, if you would like to prepare a large stock to last a whole year, just double/triple the amounts of ingredients and continue accordingly.

Sukhi Dahi Mirch – Sun dried Yogurt Chillies

Ingredients:

Long fresh Green chillies – 30 no.s
Sour Yogurt – 1 1/2 cup
Salt – 1 tsp

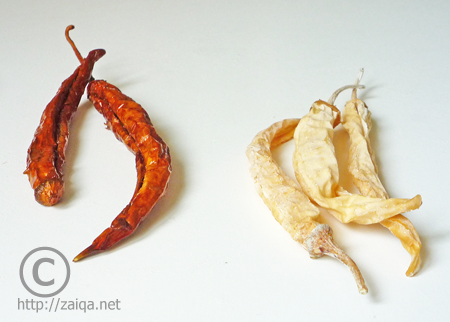
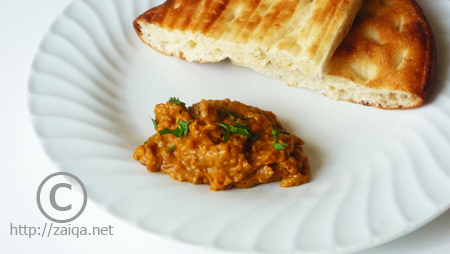
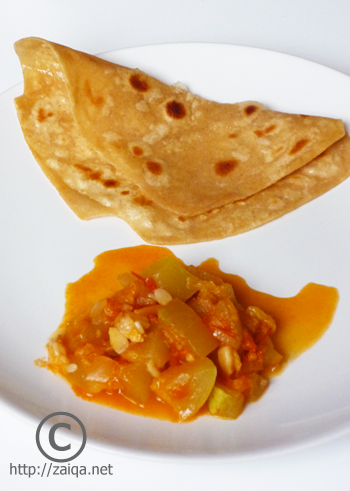
Deep fried Dahi Mirch   ~  Sun-dried Dahi Mirch

Method:

1. In a stainless steel bowl, lightly whip yogurt with salt and keep aside.
2. Wash and pat dry the chillies thoroughly. Slit the green chillies carefully, keeping the stalk intact, and remove and discard the seeds. Wash your hands immediately with warm soapy water immediately, or else there are chances that your hands will burn later on.
3. Using a spoon add all the slit green chillies into yogurt+salt mixture and let them sit at room temperature uncovered for 3 to 4 hours.
4. Line a baking sheet with wax paper/aluminium foil, or a few layers of newspaper and lay the soaked green chillies one by one on the wax paper, leaving a small space between each of them. Discard the left over yogurt.
5. Place the baking sheet with the chillies in an area where you get maximum sun light from morning till evening for 4 to 5 days. Keep bringing the baking sheet back from outdoors to indoors every evening and place it back in sun the next day in the morning. Turn the chillies once in a while so that the other sides are also exposed to the sun. The color of the chillies change from green to light beige or yellowish in color and their skin dries up.
6. Once they are dry and their color has changed after 5 days of sun drying, store them in an air tight container. To consume them, deep fry the sun-dried chillies once the oil is completely hot for a few seconds and enjoy them as a condiment along with food. Be careful when you fry them, the right temperature of the oil is essential, as they might burn quickly when deep frying.

Other Amazing sun dried Indian food products from this series are:
1. Dal ki Badiyan – Sun Dried Lentil Nuggets
2. Dhoop Nimbu ~ Sun Preserved Lemons

Luv,
Mona

AddThis Social Bookmark Button

Baghari Turai aur Chane ki Dal ka Saalan

June 1st, 2009 Mona Posted in Canola Oil, Chane ki Dal, Cilantro/Kothmir (fresh), Green Chillies, Red Chilli powder, Ridged Gourd/Turai, Salt/Namak, Tomato/Tamatar (fresh), Turmeric/Haldi, Yellow Onion/Pyaaz 7 Comments »

Todays meal consists of a simple comforting Turai ka saalan along with warm Phulka’s

Main Ingredients ~ Turai, Tomatoeas, Yellow Onions, Split Chana Dal

The split bengal gram/chane ki dal in this curry is cooked until it is just tender, but still holds its shape, and later allowed to cook furthur in the tomato-onion sauce of ridged gourd.

Ridged gourd, mainly an Indian vegetable, also called as Turai in Urdu, is mainly composed of water. When it is cooked in a tomato-onion sauce, it develops a delicious mellow flavor. Peel and discard the tough outer skin of Turai.

In some places, ridged gourd is also referred to as ‘Ribbed Gourd’.

Chopped and Peeled Turai

Baghari Turai aur Chane ki Dal ka Saalan – Split Bengal gram and Ridged Gourd Curry
Serves: 8 to 10

Ingredients:

Split Bengal gram/Chane ki dal – 1 cup
Canola oil – 2 tsp
Yellow Onion – 2, large, finely sliced
Tomatoes – 2, large, finely chopped
Salt – 1 tbsp
Red Chilli powder – 1 tbsp
Turmeric – 1/4 tsp
Cilantro – 2 tbsp, finely chopped
Green chillies – 3, small sized, each slit into two
Ridged Gourd/Turai – 6, medium sized, as shown in the picture

Baghari Turai aur Chane ki Dal ka Saalan

Method:

1. Soak the Chana dal overnight at room temperature, covered in surplus cool water in a bowl. The next day, drain and rinse the dal. Add the drained dal along with 2 cups fresh cool water and 1 tsp salt to a saucepan. Boil until the dal is just soft, but not at all mushy. Once done, remove the saucepan from heat and keep aside.
2. Meanwhile, wash the ridged gourd under fresh cool tap water. Pat dry with towels. Peel and discard the skin. Chop and discard the two ends and cut into quarters as shown in the picture. Keep aside.
3. In a pressure cooker at medium high heat, pour oil and as soon as it warms up, add the sliced onion and stir fry for 5 minutes. Once the onion is soft, add the chopped tomatoes, red chilli powder, salt, turmeric, cilantro, green chillies and stir well to mix. Cover with lid and let cook for 3 minutes. Add the chopped turai, and half cup water and pressure cook for around 5 minutes.
4. Add the chana dal with its water to the pressure cooker and cover it ajar with a lid, and let cook at medium heat for 10 more minutes or until the turai is tender. Serve immediately.

Suggested Accompaniments: Enjoy this simple vegetable+dal salaan with warm rice or roti for a delicious meal.

Luv,
Mona

AddThis Social Bookmark Button

Besan Ka Salan

May 23rd, 2009 Mona Posted in Canola Oil, Cilantro/Kothmir (fresh), Gram Flour/Besan, Green Chillies, Red Chilli powder, Yellow Onion/Pyaaz 13 Comments »

My father is not a very good cook, but he prepares a few dishes perfectly well, like Pyaz ka Anda, Ande ka Meetha, Khichdi, Nimrish Anda, etc. Among these dishes, Besan ka Salan is his favorite, which he very lovingly used to prepare while my Ammi fixed a few Parathas to go along with it for us all as the Sunday breakfasts during my childhood. 

Besan Ka Salan – Gram Flour Curry

Today I present you all with one of my beloved father’s favorite curry, which I enjoyed along with store brought Afghani Roti as my weekend breakfast today. Hope you enjoy it as well. 

Besan Ka Salan – Gram Flour Curry

Ingredients:

Chickpea flour/Besan – 1 cup
Canola oil – 2 tsp
Sliced Onions – 1/2 cup
Red chilli powder – 1 tsp
Salt – to taste
Small green chillies – 4, finely chopped
Warm Water – 2 cups
Chopped Cilantro – for garnish

Method:
-In a non-stick frying pan at medium heat, pour in canola oil and as soon as it warms up add the onions and fry them until they are golden brown in color. Add the besan and mix throughly. Roast the flour along with the onions for a minute or two, stirring it continuously until you achieve a rich orange-yellow color, similar to the color of turmeric, and a beautiful aroma. Be careful so that you do not burn it into brown and also that the flour does not form into lumps.
-Pour in warm water, add red chilli powder, salt and chopped green chillies and stir it all well and breaking any lumps of flour if present into a smooth paste with the back of a wooden spoon. Let it cook for 2-5 minutes until you achieve the desired pasty consistency. Taste for salt and chilli, add more if you wish. Garnish with chopped cilantro. Serve warm immediately.

Note:
1. Serve Besan Ka Salan immediately as soon as it is prepared, or else it will absorb the liquid and form a cake. If due to any reasons it has dried up, simply pour in a little more water so that it forms a paste and reheat it stirring it well. Serve right away.
2. Enjoy this curry along with Roti/Paratha/Phulka. Rice is a not good accompaniment to it.

Suggested Accompaniments: Serve Besan Ka Salan warm along with warm Roti or Parathas for a delicious breakfast.

Luv,
Mona

AddThis Social Bookmark Button

Kaddu Ka Salan with Varqi Roti

May 16th, 2009 Mona Posted in Bottle Gourd/Kaddu, Canola Oil, Red Chilli powder, Salt/Namak, Tomato/Tamatar (fresh), Turmeric/Haldi, Whole Wheat Flour/Durum Atta, Yellow Onion/Pyaaz 16 Comments »

Todays post features a simple yet delicious subzi-roti combination which I enjoy as a breakfast or lunch or a dinner meal.

Bottle Gourd curry/Kaddu ka Salan with Layered Flat Bread/Varqi Roti

Today I prepared Varqi Roti and simple Bottle gourd curry for our lunch. The procedure for Varqi Roti is simple and I have explained it using the pictorial tutorial below:

This is the procedure how my Grandmother/Nani used to prepare Varqi Roti for her husband, my beloved late Grandfather/Nana, who was a Tehsildaar, from the state of Lucknow, a great foodie and food enthusiast.

Varqi Roti – Flaky Flat Bread

Makes : 7 Rotis

Ingredients:

Durum Wheat flour – 2 1/2 cups
Water – 2/3 cup
Salt – 1 1/2 tsp
Canola oil – for cooking the Roti

Method:

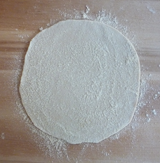
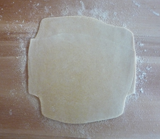
The materials used to prepare any flat bread/roti are a Girda and a Belan. Girda is a flat wooden board on which the flat bread/roti are rolled using the belan, which is the rolling pin.  If you did not happen to buy a girda from your trip to India, use any flat wooden board available or a any clean flat surface like your kitchen countertop or a wooden cutting board. Keep a kitchen towel below the board to keep it steady while rolling the roti with the rolling pin.

Girda & Belan (Image Source – Internet)

1. In a bowl, add the flour and salt and mix well. Gently pour in water, a little at a time, to form soft dough.
2. Make golf sized balls out of the dough and roll it using flour into circles using a rolling pin on the flat wooden board.

3. Sprinkle flour on the rolled out roti and fold it as shown in the picture. Keep sprinkling flour after every fold. Follow these steps until it is folded into a rectangle.

4. Once it is folded into a rectangle, roll it out into a roti again.
5. Heat a cast iron flat griddle/tawa on medium high heat. Once it is hot, put the rolled over prepared roti on the heated griddle. Let it cook for a few seconds. You will notice small bubbles on the roti. Flip it with a rubber spatula or a flat spoon which you have and cook it on the other side again for a few seconds.
6. Now quickly brush the roti with oil with a silicone basting brush or usian a teaspoon all over, and flip it over. Again, working quickly, spead the oil over the other side too and flip it to cook that side. Line a platter with a papertowel and remove the roti onto the lined platter. Cover the roti with a kitchen towel until all are done to keep warm. Alternately you can also use a ‘Milton casserole/hot-pot‘ to keep the rotis warm.

Milton Products – An Indian brand for household items that is my personal favorite

Opo Squash, Tomatoes, Onion

Bottle gourd is an another favorite subzi which we all enjoy a lot along with Roti for meals. The plants of bottle gourd produce vigorous climbing vines and tendrils with fragrant white flowers. Ammi had a large bottle gourd plant during my childhood. Bottle gourd are a good source of choline and various minerals. It is a commonly used vegetable in India. They have a spongy white flash with white seeds in a fibrous center pith. This easily digestable vegetable has a kind of bland but delicious taste, so it is used to prepare both sweet and savory preparations.

Kaddu Ka Salan – Bottle Gourd in Tomato-Onion gravy

Ingredients:

Bottle Gourd/Opo Squash/Kaddu – 1, small sized (it came to around 770 gms of chopped bottle gourd after peeling)
Canola Oil – 2 tsp
Yellow Onion – 1, large, finely sliced
Tomato – 2, medium sized, finely chopped
Salt – 1 1/2 tsp
Turmeric – 1/4 tsp
Red Chilli powder – 2 tsp

Method:

1. Wash, peel and chop the bottle gourd into small pieces. (You can either discard the peels or store them to prepare this delicious curry) (Discard if the seeds are hard, but if the seeds are tender, use them in the curry)
2. Pour oil into a pressure cooker at medium heat and as soon as it warms up, add the sliced onion. Let it cook till it is light brown in colour. Keep stirring occasionally. Once the onion is soft and browned, add the chopped tomatoes and cover the lid ajar for 2 minutes.
3. Add the bottle gourd, red chilli powder, turmeric, salt and 1/2 cup water. Mix well and cover the lid and pressure cook for about 8-10 minutes or until the bottle gourd is completely cooked. Serve the curry warm.

***********

Voting for the Lok Sabha Elections in India ends and Congress wins with Dr.Manmohan Singh returning to power as the Prime Minister of India for the second consecutive time.
Congratulations India!

Luv,
Mona

AddThis Social Bookmark Button

Tandoori Rainbow Trout

May 11th, 2009 Mona Posted in Canola Oil, Carom seeds/Ajwain, Coriander seeds, Cumin seeds/Zeera, Garam masala powder, Lemon/Nimbu, Rainbow Trout, Red Chilli powder, Salt/Namak, Yogurt/Dahi 8 Comments »

Rainbow trout is a large, beautiful moderately fatty fish. It is very rich in Omega 3 fatty acids, just like Salmon, Mackerel, Sardines, Albacore Tuna, and Herring, so very good for your heart health. These fish are also considered low in methyl mercury levels.

Fresh Cleaned Rainbow Trout

In this recipe the beautiful fresh fish is marinated in a Tandoori masala of yogurt and aromatic spices for atleast 2 hours, and later grilled to perfection. It is crisp outside and spicy and succulent inside. Tandoori Machli is a delicacy.

Tandoori Rainbow Trout

Ingredients:

Fish alternatives: Char, Swordfish, Pink Salmon

Rainbow trout – 1 large fish, about 2.2 pounds, cleaned with head and tail intact (you can remove the head and tail if you like)
Thick Yogurt – 1/2 cup
Red chilli powder – 1 tsp
Salt – 1 tsp
Lemon juice – 1 tbsp
Ajwain – 1 tsp
Garam masala – 1 tsp
Roasted Coriander/Dhaniya powder – 1 tsp
Roasted Cumin/Zeera powder – 1/2 tsp

Tandoori Rainbow Trout, 
served on a bed of fresh Napa cabbage leaves and Chopped Carrot Fingers

Method:

1. In a small bowl, add all the ingredients except the fish and mix well. This is the aromatic Tandoori masala. Slather it on the fish, inside and outside. Transfer the fish into a large resealable plastic bag along with all the marinade and let it rest for not more than 2 hours in the refrigerator.
2. Bring the fish back to room temperature before you grill. Oil a fish grilling basket and place the marinated fish in the fish basket and clip it closed.
You can either grill the fish using your charcoal grill, gas grill or even bake it in your oven indoors.
For Charcoal grilling:
Light the charcoal briquettes and build a fire on direct medium grilling and let burn until the coals are almost completely covered in white ash. Oil the grill grate. Place the fish basket on the grill grate and cover the grill. Let it cook for 15 minutes until the fish meat is opaque. Turn the fish in the basket and cover the grill. Let cook for an another 10-15 minutes. Remove the fish from the basket and serve.
For Gas Grilling:
Preheat the grill on high for 10 minutes with the lid covered. Once the grill is hot, turn to medium or medium low. Oil the grill grate. Place the basket on the grill grate and cover the grill. Let it cook for 15 minutes until the fish meat is opaque. Turn the fish in the basket and cover the grill. Let cook for an another 10-15 minutes. Remove the fish from the basket and serve on a platter.
For Baking:
Preheat the oven to 350°F. Line a rimmed baking sheet with aluminum foil. Place the fish basket on the baking sheet. Transfer the baking sheet into the oven and let cook for 15-20 minutes per side. Remove the fish from the basket and serve on a platter.
3. Extract as much meat as possible from the head and tail and discard them. Remove the backbone, and cut the fish into pieces and serve.

Note: The exact time for grilling varies depending on the size and thickness of the fish.

I enjoyed the Tandoori Rainbow Trout along with some broad noodles served with the store brought ‘Thick and Chunky Catelli Garden Select Six Vegetable Recipe-Diced Tomatoes & Basil Pasta Sauce’.

Luv,
Mona

AddThis Social Bookmark Button