The weather has not been good at all. Been playing games with us since the temperatures actually started to be in the two digits. Its has suddenly become so very hot, this being just the Spring in Canada and not Summer yet. Weather has been too topsy-turvy for the past two to three weeks, resulting in me catching Flu. It was terrible. Now I feel alright and thank my God for the good health again. It sure is a precious bounty-Good health.
I have not even been cooking since the past few days, but yesterday as I began to feel alright, I prepared Qimah Matar Aloo and had it with some warm Phulkas. It was so good. Good home cooked food is always very comforting and gives solace.
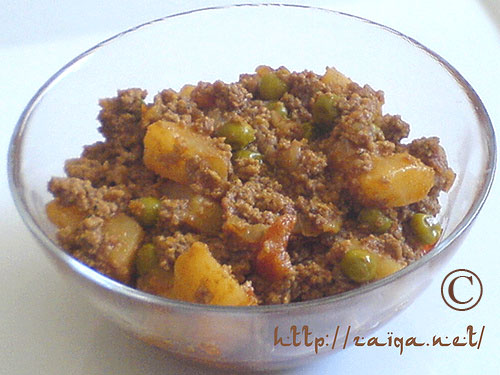
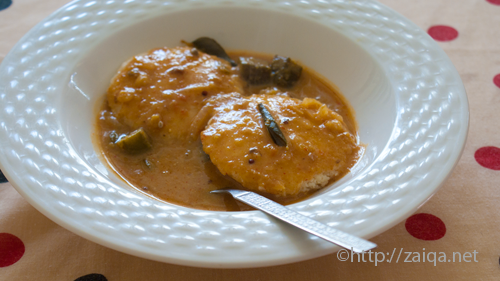
Qimah Aloo Matar – Ground meat with Peas and Potatoes Curry
For this recipe, you can use the ground meat of Veal, Lamb or Goat, whatever is available. It turns out equally delicious and I have tried this recipe with all the above mentioned meats.
Qimah Aloo Matar – Ground meat with Peas and Potatoes Curry
Ingredients:
For Gravy:
Canola/Sunflower Oil – 2 tbsp
Yellow Onion/Pyaz – 3 medium, finely chopped
Tomato – 1, large, chopped
Red Chilli Powder/Lalmirch Powder – 1 tbsp
Salt – 2 tsp
Potato – 2, medium, peeled and quartered
Tomato Ketchup – 2-3 tbsp (I use Heinz) OR Tomato Chilli Sauce – 2-3 tbsp
To Cook Qimah/Ground Meat:
Canola Oil/Sunflower Oil – 2 tbsp
Qimah/Ground Lamb/Veal/Goat meat – 700 gms, washed and drained in a very fine wire mesh strainer
Turmeric Powder/Haldi – 1 tsp
Garam Masala – 2 tsp
Soya Sauce – 1 tbsp
Lemon Juice – 4 tbsp
Matar/Frozen green peas – 1/2 to 1/4 cup (if you are using dried green peas, soak them in surplus water a day before, drain and cook until just tender in fresh water)
Shredded Cheddar Cheese – 4 tbsp (optional)
Method:
1. Pour 2 tbsp oil into a non-stick heavy bottomed sauce pan at medium high heat and throw in the finely chopped onions as soon as the oil warms up. Keep stirring them until they are lightly browned.
2. Add the chopped tomato, tomato ketchup, red chilli powder and salt and mix well. Let it cook until it is mushy. Add the quarted potatoes and a little water and close lid for 3-5 minutes. Remove from heat and keep aside.
3. In an another saucepan, pour the rest of the oil, and add the washed and drained ground meat and let stand for a minute. Stir to break lumps and add turmeric powder, garam masala, soya sauce, lemon juice amd keep stirring until the water starts evaporating and the raw smell of the meat wards off.
4. Pour in the reserved gravy of tomato+onion+potato and mix the whole thing together. Let cook on low heat and when the water has almost evaporated, add frozen peas and give it a stir.
5. Garnish with shredded cheddar cheese, and serve hot.
Suggested Accompaniments:Serve it hot with Basmati Chawal / Naan/ Afghani Roti, along with a dollop of butter.
Tip: Leftovers? Use up this left over curry as the filling for Samosa for some very delicious Snacks.
Luv,
Mona