Idli anyone?

April 17th, 2008 Mona Posted in Baking powder, Basmati Rice/Chawal, Black Gram/Urad Dal, Canola Oil, Dals (Pulses & Legumes), Eid/Ramadhan/Iftaar, Food Additives, Hyderabadi special, Idli rawa, Salt/Namak, Simple Kitchen Tips, Spices & Seasonings/Masaale, Vegetables/Tarkariyaan 14 Comments »

Idli, also spelled as Idly or Iddly is a food native to Southern India. It is the most favorite South Indian breakfast next to Dosa, Wada and Samabar. Idlis have been compared to the moon and jasmine flowers in literature. They are steamed cakes of dehulled black gram dal and cream of rice or wheat. These soft and fluffy cakes are easy to digest and rich in proteins and carbohydrates. They are prepared in many hotels, homes and restaurants almost every day for the morning breakfasts especially in South India and elsewhere too. It is a healthy and nutritious probiotic pure South Indian breakfast.

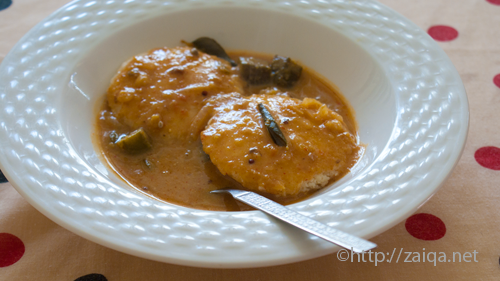
Idlis served along with Sambar generously poured over them

The ‘Idli Rawa‘, which is the cream of rice or wheat is available in any Indian stores. The Idli mould is also easily available in most of the Indian stores, and are sold in almost every stainless steel utensils shop in India. The Idli plates in a Idli mould have depressions  to pour the batter in those. These depressions vary in sizes in different stores. I have a medium size Idli mould which is perfect for my family.

To prepare Idli, I start its preperation from a day ahead. Like for example if I plan to prepare it on Sunday for breakfast or brunch, I start its preparation from Saturday morning. On the Saturday morning, I wash and soak the urad dal in plenty of water, and before I go to sleep in the night I drain away the water and grind the dal well, then mix it with the washed idli rawa in a bowl and keep the bowl in a warm and dark place to ferment night long. Then on Sunday morning the fermented batter is ready to prepare yummy Idlis. I use equal amounts of idli Rawa and dal for Idli preparation.

Idli – Steamed Rice-Lentil Cakes
Makes : approx 40 Idlis

Ingredients:

Urad Dal (or) Mask ki dal/Split husked Black gram – 1 1/2 cups
Cream of Rice (Idli Rawa) – 1 1/2 cups
Baking powder – 1/2 tsp
Salt –  1 tablespoon
Canola Oil – to grease the Idli Plates

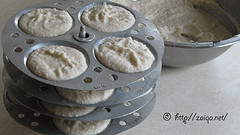
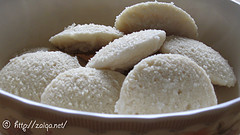
Idli batter in the Idli Mould & Cooked Served Idlis

Method:
(Note: Read the entire post before you proceed to prepare the Idli)

1. Wash the Urad dal in several changes of water and soak it in surplus water for about 6-8 hours. Later, drain the dal. In a wet grinder, or a food processor, blend the Urad dal adding just a little of water to aid in the blending to a very smooth and fluffy paste. Do not add to much water, it should be added just so that the mixer/grinder motor runs smoothly. The fluffier the batter, the better it is, so grind well for 10-15 minutes. Transfer the batter to a very large stainless steel mixing bowl (as the batter will ferment and rise and overflow if the container is small).
2. While the urad dal is grinding, wash the idli rava with water about 2-3 times and drain it completely. There is no need to soak the idli rava in water. Make sure no excess water remains after draining the water. Add this to the urad dal batter. Also add baking powder and mix it all completely using a spoon without any lumps. The batter should be as thick as possible. Cover and leave the batter undisturbed overnight so that it ferments and doubles in size. If you are not living in India or live in cold temperature places, you could use the oven to ferment the batter: Set the oven on to minimum (lowest setting/warm) for about 5-10 minutes, then turn it off. Cover and keep the mixing bowl with the batter in the warmed oven so that it ferments for about 8-15 hours or overnight.
3. The next morning the batter should have fermented well and the volume almost doubled. Once the batter has risen it can be used immediately to prepare idlis. If you are not going to make idlis immediately, store the batter in the refrigerator or else the idlis will be very sour. Add salt to the batter and mix it well. The consistency of the batter should be like condensed milk, not too thick nor too thin. You can add more water if needed to achieve that consistency.
4. Grease all the Idli plates with a few drops of oil and pour about 2-3 tablespoon of batter in each depression in the Idli plates.
5. Before filling the idli plates, add some water in a large pressure cooker and switch on the stove. So by the time you are done with the batter the water will start boiling and you can place the idli stand in the cooker and close the lid. Make sure the water does not touch the lowest idli plate in the stand. The water level in the pressure cooker should be well below it. Close the lid of the cooker and do not put the weight on it. In about 10 minutes you will see steam escaping from the vent of the cooker. Using an oven mitt remove the idli stand from the cooker and place it on the countertop. Scoop the Idlies out of the plates using a spoon in a big serving bowl. Cover the serving bowl with lid to keep the idlis warm. Repeat this process with the next batch adding water to the cooker as necessary until the batter is all used up.

Suggested Accompaniments: Serve them hot along with Sambar, Coconut chutney, Hara Dhaniya aur Pudina Ki Chutney at breakfast or as a brunch or a snack.

Tips:

  1. If you live in warmer places, you need not add baking soda to the batter.
  2. If you live in a cold place,  it happens that the batter has not fermented at all. If the batter has not fermented and doubled in size by next day, do not use it for Idli. Instead make Dosa out of it.
  3. If you do not find Cream of Rice, you can even use Cream of Wheat as the Idli Rawa.
  4. This is the basic recipe for the prepartion of Idli. You can alter it by adding a few chopped french beans, carrots, cilantro to the batter.
  5. Adding a dollop of butter to the steamed idlis while having them hot along with sambar makes it even more delectable.
  6. These Idli moulds are the traditional methods to prepare Idli at home. If you are somehow not able to find the Idli Mould, you can use little metal bowls which can be kept in a steamer or an egg poacher or tiny aluminium molds for cakes and muffins. I have however never used these. I only use the Idli Mould each time I prepare Idli.
  7. You don’t need a pressure cooker for steaming idlis. Simply use any vessel with a vent on the lid which is big enough to fit the idli plates stand you are using. Add some water to the vessel and heat it while you fill the batter. Place the stand inside the vessel and close it with a lid. If the lid does not have vent for the steam to escape, leave a small portion of the vessel open. Steam it for 10-15 minutes. Insert a toothpick or a knife in the center of the idli and if it comes out clean the idlis are ready. Switch off the stove and serve it after a couple of minutes.
  8. You can even freeze the leftover idlis to be used some other day. Simply place cooled idlis on a tray seperately and let them freeze for 3 hours. Once frozen, transfer them all to a zip lock freezer bag and store until needed. When you want to have them, simply place the frozen idlis in a plate and microwave for 2 minutes approx.

Luv,
Mona

AddThis Social Bookmark Button

Gobi Gosht

April 8th, 2008 Mona Posted in Cabbage/Patta Gobi, Canola Oil, Eid/Ramadhan/Iftaar, Fats and Oils/Tel, Hyderabadi special, Lamb/Beef/Mutton/Veal/Sheep, Non-Vegetarian/Gosht, Onion/Pyaaz, Quick fix meals, Red Chilli powder, Salt/Namak, Simple Kitchen Tips, Spices & Seasonings/Masaale, Turmeric/Haldi, Vegetables/Tarkariyaan, Yellow Onion/Pyaaz 16 Comments »

Gobi Gosht is one of those very regular dishes that are prepared and had at many Hyderabadi households. It is simple to prepare, and is healthy enough. There are many other ways to prepare this very simple vegetable that is mostly disliked by so many people because of the strong aversion to cabbage some people keep.

Green Cabbage, halved

In this recipe, you can use, either Vegetable Stock, or Lamb Meat stock instead of water while cooking for more flavor.

Gobi Gosht – Cabbage with Lamb Meat

Ingredients:

Cabbage/Band Gobi – 1, medium-sized, finely shredded (I prefer green cabbage than white cabbage)
Lamb meat, with bone – 600 gms, washed and cubed into bite size pieces
Red Chilli Powder – 1 tbsp
Salt – 1 tbsp
Turmeric – 1/4 tsp
Canola Oil – 1 tbsp
Yellow Onion – 2, small, finely sliced
Chopped Cilantro – 2 tbsp
Chopped green chillies – 2 tbsp

Gobi Gosht – Cabbage with Lamb Meat

Method:

1. In a pressure cooker, pour oil, and as it gets warm, add the cubed meat, sliced onion, ginger-garlic paste, red chilli powder, salt and turmeric powder. Add water to cover the meat and pressure cook until the meat is tender.
2. Add the shredded cabbage, chopped cilantro and green chillies and half cover the lid. Let it cook on medium heat for about 20 minutes approx, until the cabbage is done. Keep a check, and add a few drops of water if needed while cooking the cabbage.

Luv,
Mona

AddThis Social Bookmark Button

Rishte Ka Achaar

April 1st, 2008 Mona Posted in Canola Oil, Chutneys and Pickles, Curry leaves (fresh), Dried Red Chillies, Fats and Oils/Tel, Fruits/Phal (fresh), Green Chillies, Hyderabadi special, Mango/Aam, Mustard seeds/Rai, Red Chilli powder, Salt/Namak, Simple Kitchen Tips, Spices & Seasonings/Masaale, Turmeric/Haldi, Vegetables/Tarkariyaan 26 Comments »

Home-Made Mango Pickles are my favorite. And among all the kinds, I realy love this pickle a lot. It is so simple to prepare, hot as a pickle should be and absolutely delicious.

The first time I had this pickle was at my Aunt’s-Khala’s house I fell in love with it the moment I had tasted it at her place. And used to have it like a curry along with Chawal or Parathas.

Unripe green mangoes ~ Kairi

I love blog hopping, and a few days back, on Priya’s blog, I had seen this pickle, which reminded me so much of Rishte Ka Achaar that my mouth was watering, and I was so much craving for it, just like a pregnant lady would! Somedays ago, I had been to an Indian store where I saw some very young and large sized Raw Sour and Green Pickle Mangoes, and I quickly bought three of them, came home and prepared this pickle. I was so happy.

Rishte Ka Achaar – Mango Pickle

I do not have any idea why this pickle is named as ‘Rishte Ka Achaar’. I have no clue. But it is called so by everyone in my contacts, and even they do not have any idea about this. If anyone of you know why it is called so, please let me know. I will be very happy to come to know about it from my dearest Readers.

Try and get some very sour raw green mangoes for this pickle. And do not use the green mangoes for this pickle if they are not very sour.

Rishte Ka Achaar – Mango Pickle

Ingredients:

Unripe and Sour Green Pickle Mangoes – 3, large
Dry Roasted Black Cumin Seed Powder – 1 1/2 tbsp
Red Chilli Powder – 1 tbsp
Salt – 1 1/2 tbsp
Mustard Seeds – 2 tsp
Dry Red Chillies – 4
Turmeric – 1/3 tsp
Curry leaves (fresh) – 6
Green Chillies – as per your taste, chopped or slit (optional)
Canola oil – 3 tbsp

Rishte ka achar

Method:

1. With a damp towel, wipe the raw green mangoes clean and dry them with a paper towel throughly. Throughly dry your hands and knife. Carefully, peel the skin, deseed them and cut into very small pieces.
2. In a flat glass container with a tight lid, put the cut raw mango pieces and add salt and turmeric and mix well. Cover the lid tightly and put the container aside for 24 hours in a cool dark place.
3. The next day, you will see that the mango pieces have released a lot of juice. In a pan on medium high heat, pour oil and add the mustard seeds, curry leaves and dry red chillies. As soon as they begin to pop, remove from heat. Let it cool completely. This is the tempering/baghaar.
4. After the baghaar has cooled off completely, pour it into the container with mango pieces, and also add red chilli powder, black cumin seeds powder and green chillies, if using, and mix well. Adjust the salt and red chilli powder according to your tastes. The Achaar is ready. You can now relish upon it.

Store it in a glass jar with an air tight lid. It keeps very weel if kept away from water. Always use a dry spoon when you have it and keep it covered and refrigerated.

Tip: After you have cut the mango into small pieces and deseeded it, do not throw away the seed, use it in Khatti Dal instead of using the tamaring or lemon as the souring agent. It makes your Dal khatti/sour and gives a very good flavor to it.

Luv,
Mona

AddThis Social Bookmark Button

Sheekh Kewab Series~I

October 26th, 2007 Mona Posted in Canola Oil, Coriander seeds, Cumin seeds/Zeera, Egg/Anda, Garam masala powder, Ginger-Garlic paste, Green Chillies, Groundnut/Moomphalli, Lamb/Beef/Mutton/Veal/Sheep, Nigella seeds/Kalonji, Parsley (fresh), Poppy seeds/Khus-Khus, Poultry/Murgh, Red Chilli powder, Salt/Namak, Sesame seeds/Til, Simple Kitchen Tips, Turmeric/Haldi, Yellow Onion/Pyaaz 29 Comments »

Kawabs are one of the most delicious non-vegetarian tandoori item next to Tandoori Chicken. I heard and read at a site that the first kawabs were invented during the war times, when the animal was slaughtered, cut into pieces, and pierced by the only things they had along, sword (!) and they roasted it over fire. We in the modern world continue to do so, but in a more decent way, we have replaced swords with skewers. ‘Sheekh’ means a ‘skewer’, and ‘Sheekh Kawabs’ are the ‘Kawabs grilled/roasted on Skewers’.

Sheekh Kababs – Minced meat Kebabs

Kawabs are vegetables, or meat pieces or ground meat marinated with spices and wrapped around the skewers and grilled or roasted over fire, charcoal, or in oven. They are very easy to prepare too. Marinate them with the required ingredients, and later you just have to grill them. There is no long process to it. Kababs can be Vegetarian, Non-Vegetarian or both. They are a delicacy.

In this recipe I am using both minced chicken as well as minced lamb. The taste comes out very well. My Mother-In-Law usually prepares this type of kawabs. I learnt this procedure from her but modified it my way. An another version of Sheekh Kabab is posted here.

It is very important that after you wash the minced meat, the water from it has all been drained out completely, or else the shape doesnt come out very well. And while mixing the minced meat with the other ingredients, its important that you use your hands, and pulverise the mixture with your palm. You can marinate it for 2-6 hours in the refrigerator. Bring the whole marinated mixture to room temperature before you start grilling it.

Sheekh Kawabs – Minced meat Kebabs (I)

Ingredients:

Minced Chicken – 350 gms
Minced Lamb – 200 gms
Onions – 3, large, finely sliced
Dry Roasted Black Cumin powder – 3/4 tsp
Dry Roasted Sesame seeds powder – 3/4 tsp
Dry roasted Khus Khus powder – 3/4 tsp
Nigells seed/Kalaunji powder – 3/4 tsp
Dry Roasted Coriander seeds powder – 1 tsp
Dry Roasted Groundnut powder – 1 1/2 tbsp
Green chilli – 6, cut and grinded to paste
Garam Masala – 1 tsp
Raw papaya paste – 2 tbsp
Salt – 2 tsp
Red chilli powder – 1 tsp
Turmeric – 1/2 tsp
Eggs – 2, lightly beaten
Ginger Garlic Paste – 2 tsp
Cilantro/Kothmir – 1 tbsp, finely chopped
Plain Parsley leaves – 1 tbsp, finely chopped
Canola Oil – to baste the kababs, and to deep fry the onions.

Method:

1. Wash the meat and drain it well till all the water has been removed completely and the meat is dry. This is important or else the shape does not come out very well.
2. Fry the onions in oil oil they are crisp and brown in colour. Remove them once they are done from the oil onto a paper towel.
3. In a bowl, mix all the ingredients, with your hands till they nicely mixed. Knead the mixture till pulverized with your palms. Later wash your hands very well with an antiseptic soap. Let the mixture marinate for 2 to 6 hours.
4. Bring it to room temperature, and divide the mixture into 8 balls. Shape each one into a long cylinder.
5. Dip your skewer into oil and insert it into the cylinders just to make a big hole in each one. Remove the skewer and continue doing it with all the shaped cylinders.
6. Take a baking tray and line it with aluminium foil, place the holed cylinders on the tray and baste them with oil. Grill/Broil at low heat, 15 minutes, per side. Grill them till they are nicely done on both sides. (You can even grill them on a charcoal grill for the best smoked flavor).

Suggested Accompaniments: Enjoy the kawabs along with ‘Kaddu ka Dalcha’, or ‘Khatti Dal’ and ‘Baghara Chawal’ aka Zeera rice, or simply along with a chutney as a finger food.

Tip: Enjoy the leftover kawabs as delicious Pita pockets.

Luv,
Mona

AddThis Social Bookmark Button

Chanay ki Dal

October 1st, 2007 Mona Posted in Black Peppercorns, Chane ki Dal, Cilantro/Kothmir (fresh), Eid/Ramadhan/Iftaar, Green Chillies, Hyderabadi special, Lemon/Nimbu, Salt/Namak, Simple Kitchen Tips, Turmeric/Haldi 12 Comments »

Fall’s here! My first Fall here in Toronto insallah. I love the trees in this season, with colors of the leaves ranging from red, orange, yellow and some shades of green, nature’s beauty I must say! Earlier I only got to witness these beautiful sceneries in movies, but now I am able enjoy it all right in front of my house! I love to go out on walks, perceiving it all, and I thank my God for making Earth a beautiful place to live in, with all sorts of visual pleasures for humans to enjoy, admire and be thankful.

It has also become cold, and I look forward to the winter, again.. will be my first winter here. My hubby sometimes scares me, telling me about the temperatures going very cold, and it being shivering cold here during the peak in winter. I just am looking forward to see snow all around, hoping it wouldnt be so terrible as described inshallah.

Well, this recipe is one of the most easiest recipes, a Ramadan special served at Iftaars. Its an instant light snack and very nutritious.

Tip: While you are preparing dals, it is always necessary to pre-soak them in surplus water for 4-6 hours preferably. And then to drain and discard the water and wash the dal well in fresh water. The water in which the dal was soaked should never be used for cooking and should always be thrown away coz if you use that water, chances of intestinal gas (flatulence), bloating and abdominal cramps are higher, and you do not want to end up with that. If you do not have time to presoak the dal, you can use it as it is, but you should throw away the water in which you boil the dal.. losing some of the vital water soluble vitamins, so I always only pre-soak my dals. In the later case, you need not throw away the water used to boil it, as the water while soaking them was already thrown away.

Here goes the recipe:

Chanay ki Dal – Lemony Boiled Split Bengal Gram

Ingredients:

Split Bengal Gram/Chana Dal – 1 cup
Turmeric – 1/2 tsp
Salt – to taste
Black Pepper Powder – to taste
Finely chopped small green chillies – 1 tbsp
Cilantro – 1/2 cup, finely chopped
Mint leaves – 2 tbsp, finely chopped
Lemon Juice – to taste

Chanay ki Dal

Method:

1. Wash and soak the dal for 4-6 hours preferably. Drain the water away and wash them well.
2. Now boil them in warm water, taking care you do not add too much of water to it. When the dal has softened up, make sure it not mushy and still in its shape, (the water shouldn’t be there, it should be dry). So, while boiling water, add only a cup of water and if it dries up before the dal being softened, add little more amount of warm water to it.
3. Remove the dal and add black pepper powder, salt, cilantro, lemon juice and chopped green chillies. Serve it warm.

This delicious dal is my entry to the event ‘Delicious Dals from India’ being hosted by Suma at her blog Veggie Platter.

Luv,
Mona

AddThis Social Bookmark Button