Delish Dahi-Vade

September 16th, 2007 Mona Posted in Black Gram/Urad Dal, Blog Events/Entries/Polls, Canola Oil, Cilantro/Kothmir (fresh), Dried Red Chillies, Eid/Ramadhan/Iftaar, Green Chillies, Hyderabadi special, Mustard seeds/Rai, Salt/Namak, Simple Kitchen Tips, Sugar/Shakkar, Turmeric/Haldi, Yogurt/Dahi 26 Comments »

Dahi means Yogurt, and Vade, or Vada (vada is a single deep fried lentil ball and vade or vadas is the plural of vada) are the deep fried lentil balls shaped differently according to the recipe in which you are adding them. Different kind of vade are added in different dishes. In this particular recipe the vada are shaped like little doughnuts and added to the Yogurt relish. Dahi-Vade are one of the most favorite snacks enjoyed by Indians. And Muslims in Hyderabad usually prepare it in Ramadhan for Iftaar, when they break the fast.

My version of the Dahi-Vade is simple. I combined the recipes of my Mother and Mother In Law here. Soak the dal a day ahead, then then I go to the kitchen an hour before the Iftaar time to prepare it so that they are just ready before the Iftaar time.

Dahi-Vada – Lentil cakes in Yogurt Sauce

Ingredients:

For the Yogurt Relish-
Yogurt – 500 gms
Water – 1 1/2 cups
Salt – 1/4 tsp
Green Chilli paste – 1 tsp
Sugar – 1/2 tsp
For the Vade-
Urad Dal/Black Gram dal – 1 cup
Green chillies – 2, very finely chopped
Salt – 2 tsp
Water
For the Baghaar
Dry Red Whole Chillies – 2, broken in half, and seeds removed
Mustard seeds – 1/2 tsp
Turmeric powder/Haldi – 1/4 tsp
Canola Oil – 2 tbsp
Cilantro – 1 tbsp, finely chopped

Method:

1. Wash and soak the dal in 2 glasses water overnight.
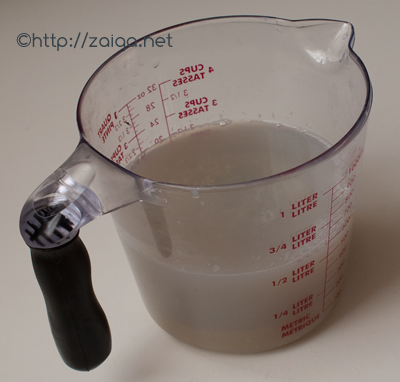
2. In a large and wide tray, pour in the yogurt, add salt, sugar, water, and green chilli paste. Whisk to mix the yogurt for 5 minutes till the mixture is well blended. Keep in the refrigerator.
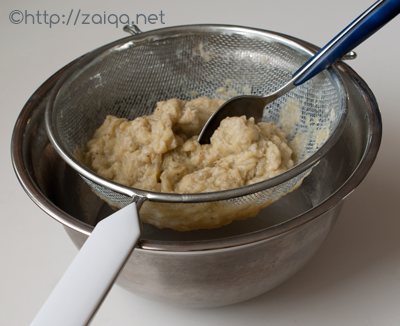
3. About 30-40 minutes before you plan to serve the Dahi-Vade, drain the water from the dal and grind them into a smooth and fairly thick batter along the salt and water. Add water drops, as little as possible at a time, just to assist in grinding the dal. The grinded mixture should be fairly thick in consistency as you will be shaping them into vada. Pour the grinded mixture into a bowl. Add the chopped green chillies and mix well.
4. Heat oil to deep fry the vadas in a pan or a kadai. (Never deep fry in a non stick pan)
5. Wet your palm with a few drops of water and spoon about a heaped tablespoon of the mixture onto your wet palm. Wet your index finger and insert it into the centre of the batter to form a hole so that they look like doughnuts. Gently and carefully slip/drop this shaped doughnut into the hot oil and deep fry the vadas in hot oil on both sides until they are nicely golden brown in colour. Remove with a slotted spoon to a plate lined with paper towel. The vadas are ready.
5. Once all the vadas have been fried, drop them in a bowl of warm water. Let them soak for 2 minutes. Gently squeeze excess water from the vadas carefully pressing them lightly between your palms. This is done to soak out the oil. Transfer the soaked and squeezed vade into the earlier prepared cooled yogurt relish. Arrange the vade in the yogurt relish so that each one is nicely dipped into it. Cover the tray and transfer it into the refrigerator. Leave it to soak for 10 minutes.
6. Just before you serve, prepare baghaar. In a small pan, pour the oil and add the ingredients under the heading ‘for baghaar’ except cilantro. Let the spices splutter. Pour this onto the Dahi-Vade all over. Also garnish with cilantro, Serve immediately.

Some Tips:

  • For this recipe the lentils are to be soaked before hand, preferably overnight, and grinded. People usually grind the lentils and store the mixture some time ahead of preparing the Dahi-Vade. Here, I suggest NEVER to do so, because I have learnt from my experience, that if you grind it beforehand and keep the mixture at room temperature or in the fridge and you fry the vada out of the mixture later on, they tend to absorb more oil, it becomes thirsty for oil. I have noticed it every time I tried to simplify my work and grind and keep the lentils, when I am free, to deep fry it later on. So I have stopped doing it since and grind it only just before I plan to fry and serve the Dahi-Vade. Or you can grind and deep fry the vadas then and there, ahead of time, and store the fried vadas in the freezer for upto 3 months in an air tight container. When you want to prepare the Dahi-Vade, you simply will have to soak the vadas in warm water for the specified time and then in the yoghurt relish.
  • If you end up with many vadas, some people put all the vadas in the yoghurt relish even if they know they will all not be eaten up by your loved ones in home, which results in soggy Dahi-Vadas the next time you feel like having the left over Dahi-Vadas. Instead.. Count the number of people at home whom you are going to prepare and serve this dish, and the number of vade prepared. Do not soak all vade in water and then put them into the yoghurt, instead, store the excess vadas in the freezer. The next time you want to have them, make the yoghurt relish again, and dip the vadas, now in warm water for the specified time, and then in the yoghurt relish. Also NEVER prepare the yoghurt relish before hand too as it turns sour. Always prepare everything fresh for best results and good taste.

Asha of Foodie’s Hope has requested me to send this recipe for RCI Karnataka Cuisine because she says this recipe is very similar to Mosaru vade, which they prepare in Karnataka, So, here’s my recipe Asha, all the way to you!

Luv,
Mona

AddThis Social Bookmark Button

Chicken with Lychees

August 16th, 2007 Mona Posted in Blog Events/Entries/Polls, Canned Tomato paste, Canola Oil, Capsicum, Ginger-Garlic paste, Gram Flour/Besan, Lychee, Poultry/Murgh, Red Chilli flakes, Red Chilli powder, Salt/Namak, Sugar/Shakkar, Yellow Onion/Pyaaz 1 Comment »

This recipe is my contribution to the event – A fruit a month’ AFAM, which the lovely Sig, of Live to Eat, has hosted for this month with Lychee as the fruit of the month. Many people do not know what Lychee are. Lychee is a fruit, mostly grown in China, and known for its sweet tart flavour. This fruit has a rose coloured skin when young, but as it matures, it develops a hard and leathery rind, which is inedible. It comes off easily leaving behind the jelly like, pearly white flesh with a single inedible seed inside. They are available fresh or canned in most asian stores. Anyways, here’s my entry for the event :

Ingredients:

Marination Ingredients-

  • Boneless Chicken Breast Pieces – 500 gms, cut into 2 cm cubes
  • Salt – 2 tsp
  • Black Pepper – 1 tsp
  • Canola Oil – 1 tsp
  • Sugar – 1/2 tsp

Gravy Ingredients-

  • Gram Flour – 5 tbsp
  • Canola Oil – 3 tbsp
  • Red Capsicum – 1/2 of a large capsicum, chopped
  • Green Capsicum – 1/2 of a large capsicum, chopped
  • Ginger Garlic paste – 2tsp
  • Yellow Onions – 1, finely chopped
  • Canned Lychee in Syrup – 1 can, 565 gms
  • Tomato paste – 3 tbsp
  • Water – 2 tbsp
  • Red Chilli flakes – 1 tsp
  • Red Chilli Powder – 2 tsp

Chicken with Lychees

Method:

  • Drain and reserve all the lychees and a cup of syrup individually in two bowls.
  • Marinate the Chicken in the marination ingredients for preferably 30 minutes.
  • Roll the chicken breast pieces in 4 tbsp gram flour and fry till golden brown. Make sure you do not fry them for too long as breast pieces toughen up too quickly.
  • In a pan on medium heat, in a tbsp of oil, stir fry the red and green capsicum for about 7 minutes. Remove and keep aside.
  • In the same pan add the remaining oil and fry the onions till light brown.
  • Add the ginger garlic paste and fry it along.
  • Add the reserved cup of lychee syrup to it and simmer covered for 5 minutes.
  • Now add the tomato paste and the stir fried capsicum to it and mix well.
  • Dilute the remaining one tbsp gram flour in a 2 tbsp water and pour this into the pan. Let it cook till the mixture begins to thicken up.
  • Add the Chicken pieces and the drained lychees, chilli flakes and red chilli powder and give a good stir.
  • Let it cook on simmer uncovered for 5 minutes.
  • Once ready, Serve it hot.

Luv,
Mona

AddThis Social Bookmark Button

Kaddu ka Meetha

August 13th, 2007 Mona Posted in Almonds/Badaam, Bottle Gourd/Kaddu, Butter/Makhan, Cardamom/Elaichi, Confectionary, Eid/Ramadhan/Iftaar, Hyderabadi special, Khoa, Milk and Milk Products, Sugar/Shakkar 4 Comments »

I am not much of a ‘Mithai’ person, I do not like sweets/mithai’s a lot. Just yesterday I had to attend a party at my aunt’s place and she gifted us some Boondi Laddu’s and the one to have them are everyone besides me in this house. I usually prefer sweets/desserts that are light, with not too much sugar, infact only a hint of sugar in it.

Kaddu/Bottle Gourd/Opo Squash

One such meetha that is light on stomach and calories, quick to get prepared, nonetheless satisfies my sweet cravings is Kaddu ka Meetha. For all those of you who haven’t tried this delicious meetha yet, I recommend you prepare it and try it atleast once.

Kaddu Ka Meetha/Halwa – Bottle Gourd Sweet
Serves: 4

Ingredients:

Bottle gourd/Opo Squash/Kaddu – 1, medium sized, around 1 kg in weight
Ghee – 1 tbsp
Milk – 1/2 cup
Green Cardamom – 3, skin discarded and black seeds finely powdered
Sugar – 1/2 cup
Chopped/Sliced Almonds or Chopped/Sliced Pistachios or Raisins or Chopped Cashewnuts – shallow fried in little oil/ghee, for garnish

Method:

1.Wash, pat dry and peel the bottle gourd. Discard the peels or use them to prepare this curry. Then slice off the central pith containing the seeds and discard it. Use only the clear white flesh devoid any seeds present between the central pith and the peel. Grate this flesh using a grater or in a food processor. Mine came to around 4-5 cups of grated bottle gourd.

Grated Bottle gourd (left); Cut and Peeled bottle gourd (right)

2. In a heavy bottom sauce pan on medium heat, add the grated bottle gourd and cook it stirring continuously, but very gently, make sure you do not mush it up while stirring; until mostly dry. At this point add ghee and let it cook for a minute while stirring it gently. Pour in milk and let it cook again until it absorbs most of the milk. Add cardamom powder, sugar and keep stirring it. You can add more or less sugar according to your taste. Let it cook again until the sugar dissolves for about 5-10 mins more. Add fried nuts or raisins and mix. Remove from heat and let cool. Once cool, refrigerate for a few hours and serve chilled.

Kaddu Ka Meetha/Halwa – Bottle Gourd Sweet

Suggested Serving: To impress your guests, serve the chilled meetha in mini pastry cases that are easily available in stores. You can name it ‘Kaddu ka Meetha Tarts’.

Luv,
Mona

AddThis Social Bookmark Button

Summer Cooler

July 25th, 2007 Mona Posted in Drinks/Sharbat, Milk and Milk Products, Sugar/Shakkar 2 Comments »

One of my addictions, this refreshing drink has and irresistible flavor, and works well as both a drink or a pudding.

Makes : 1 glass

Ingredients:

  • Cappuccino/Coffee powder, which you like – 2 tsp
  • Milk – 1/2 cup
  • Granulated sugar – 2 tsp
  • Chocolate Ice Cream – 2 scoops
  • Vanilla Ice Cream – 2 scoops
  • Broken Ice Cubes – 2 tbsp

Method:

  • Add milk, cappuccino and sugar powder to a saucepan and bring to a boil. Stir it to dissolve the sugar. Remove from heat and let it cool down. Once cool, chill in the refrigerator for an hour.
  • Pour the chilled milk coffee into a blender container, add the chocolate and vanilla ice cream and blend it until smooth and frothy.  Add broken ice-cubes and serve it chilled.

Enjoy this lovely cold refreshing drink.

Luv,
Mona

AddThis Social Bookmark Button

Banana Jelly

July 10th, 2007 Mona Posted in Banana/Mauz, Citric Acid, Jam and Jelly, Sugar/Shakkar, Vegetables/Tarkariyaan 3 Comments »

Jellies are translucent spreads made from strained fruit juice. I had learnt this process while studying Nutrition during my graduation in Hyderabad. We were taught to prepare few jams and jellies using local fruits and this jelly was one of them. Recreating it today in my kitchen brought back all those fun memories during that time of my life.

Banana Jelly

Jelly making a two-step process. First the juice is to be extracted, then strained. Then, the clear juice is cooked along with sugar and acid until the perfect jelly consistency is reached. Ripe bananas which have a naturally sweet taste are perfect for jelly preparation. Do prepare it and try at least once.

Banana Jelly

Ingredients:

Ripe Banana/Pake huwe Mauz – 6
Sugar – 2 cups
Lemon juice – 1 tbsp

Method:

1. Wash and peel the bananas. Cut them into small pieces.

2. Take a pressure cooker and add cut banana pieces into it. Add water just enough to cover the banana pieces and let it pressure cook for just a few minutes till the banana are very soft. Mash the banana mixture and sieve through a strainer so that no pulp fiber should come into the extract. Discard the residue.

3. Pour the obtained clear extract into a measuring glass, and add equal amounts of sugar to it. ( I adapted because the bananas that I used were very sweet. I added 2 cups of sugar for 2 1/2 cups of obtained clear extract)
4. Cook the extract again in a heavy bottom pan by stirring continuously till the consistency of a jelly is obtained. Make sure that you do not to over cook it, else it will crystallize and harden. Pour the jelly into sterilized glass jars and let it cool. Store in the refrigerator.

Luv,
Mona

AddThis Social Bookmark Button