Besan Ka Salan

May 23rd, 2009 Mona Posted in Canola Oil, Cilantro/Kothmir (fresh), Gram Flour/Besan, Green Chillies, Red Chilli powder, Yellow Onion/Pyaaz 13 Comments »

My father is not a very good cook, but he prepares a few dishes perfectly well, like Pyaz ka Anda, Ande ka Meetha, Khichdi, Nimrish Anda, etc. Among these dishes, Besan ka Salan is his favorite, which he very lovingly used to prepare while my Ammi fixed a few Parathas to go along with it for us all as the Sunday breakfasts during my childhood. 

Besan Ka Salan – Gram Flour Curry

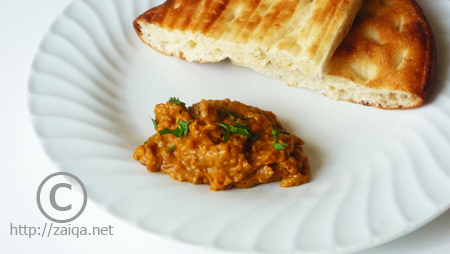
Today I present you all with one of my beloved father’s favorite curry, which I enjoyed along with store brought Afghani Roti as my weekend breakfast today. Hope you enjoy it as well. 

Besan Ka Salan – Gram Flour Curry

Ingredients:

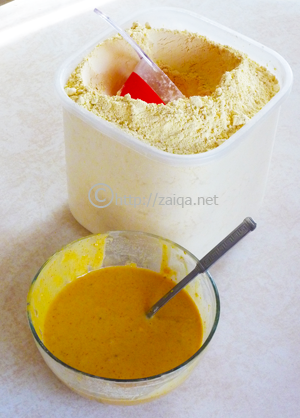
Chickpea flour/Besan – 1 cup
Canola oil – 2 tsp
Sliced Onions – 1/2 cup
Red chilli powder – 1 tsp
Salt – to taste
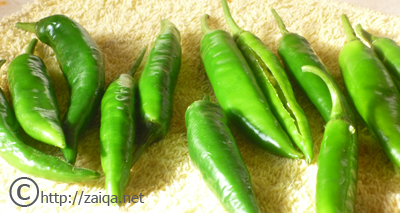
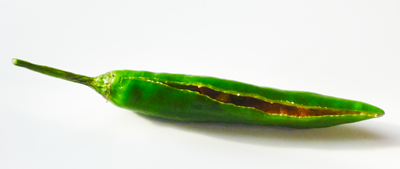
Small green chillies – 4, finely chopped
Warm Water – 2 cups
Chopped Cilantro – for garnish

Method:
-In a non-stick frying pan at medium heat, pour in canola oil and as soon as it warms up add the onions and fry them until they are golden brown in color. Add the besan and mix throughly. Roast the flour along with the onions for a minute or two, stirring it continuously until you achieve a rich orange-yellow color, similar to the color of turmeric, and a beautiful aroma. Be careful so that you do not burn it into brown and also that the flour does not form into lumps.
-Pour in warm water, add red chilli powder, salt and chopped green chillies and stir it all well and breaking any lumps of flour if present into a smooth paste with the back of a wooden spoon. Let it cook for 2-5 minutes until you achieve the desired pasty consistency. Taste for salt and chilli, add more if you wish. Garnish with chopped cilantro. Serve warm immediately.

Note:
1. Serve Besan Ka Salan immediately as soon as it is prepared, or else it will absorb the liquid and form a cake. If due to any reasons it has dried up, simply pour in a little more water so that it forms a paste and reheat it stirring it well. Serve right away.
2. Enjoy this curry along with Roti/Paratha/Phulka. Rice is a not good accompaniment to it.

Suggested Accompaniments: Serve Besan Ka Salan warm along with warm Roti or Parathas for a delicious breakfast.

Luv,
Mona

AddThis Social Bookmark Button

Mash ki Dal

April 30th, 2009 Mona Posted in Black Gram/Urad Dal, Canola Oil, Cilantro/Kothmir (fresh), Ginger-Garlic paste, Ginger/Adrak, Green Chillies, Red Chilli powder, Salt/Namak, Yellow Onion/Pyaaz 20 Comments »

Dry dal with phulka or paratha are my favorite breakfast options. This usual combination is what I have been having since my childhood for breakfasts~simple, healthy, quick to prepare and comforting.

Saadi Dhulli Mash ki dal ~ Gingery black gram dhal with caramelized onions

Split husked black gram, also called as Dhulli Mash ki dal or Mash ki Dal in Urdu, are a kind of creamy white pulses, a good source of iron, protein and fibre and low in fats.

The fried onions added to the warm dal as a garnish impart a delicious rich sweet taste to the salted soft gingery dal adding a depth of flavors. A perfect accompaniment with Roti for a light delicious meal.

Saadi Dhulli Mash ki dal ~ Gingery black gram dhal with caramelized onions

Ingredients:

Yellow Onion – 1, large, finely sliced
Canola oil – 3 tbsp
Split husked black gram/Maash ki dal/Urad dal – 250 gms
Ginger – 1/4 tsp, finely grated
Salt – to taste
Small green chillies – 3, finely sliced, for garnish
Cilantro and Mint leaves – 1 tsp each, finely chopped, for garnish

Dhuli Mash ki Dal ~ Split husked Black gram, in a tea-cup

Method:
1. Wash and soak the dal for about 20 minutes in surplus fresh cool water.
2. Drain the soaking dal and add it to a pressure cooker. Pour in about 1 1/2 cups of fresh water and add ginger and salt. Pressure cook dal until soft but not mushy, probably for around 3-5 minutes on high heat. (Make sure that the dal retains its shape and is not overdone and pastelike)
3. Meanwhile pour oil in a frying pan and as soon as it warms up, add the sliced onion and fry them stirring continously until nicely browned. Make sure you do not burn them. Remove the fried onion using a slotted spoon onto a platter, draining as much oil as possible from the fried onions. Reserve the remaining oil in the pan.
4. Once the dal is done, remove it to a serving bowl. Garnish with sliced green chillies, cilantro and mint and the fried onion. Pour about 1 tbsp of the oil in which the onions were fried onto the dal. Serve immediately with Phulka or Paratha.

Suggested Accompaniments: Enjoy this delicious dal along with Phulka or Paratha and Tala huwa Adrak Lahsun (recipe below) on the side. My late Grandfather used to enjoy the dal along with ‘Dhoop-Numbu‘.

This delicious dal is my entry to the event ‘Delicious Dals from India’ being hosted by Suma at her blog Veggie Platter.

Tala huwa Adrak Lahsun – Ginger-Garlic paste Masala

Ingredients:

Ginger paste – 2 tbsp
Garlic paste – 2 tbsp
Red chilli powder – 2 tsp
Salt – to taste
Canola oil – 1 tbsp

Tala huwa Adrak-Lahsun – Fried Ginger-Garlic paste Masala

Method:

In a small non-stick frying pan with a heavy bottom at medium heat, pour oil and as soon as it warms up add the ginger and garlic pastes. Cover the pan with a splatter screen and stir fry it, stirring continously and scraping the bottom of the pan with a wooden spoon around for 8-10 minutes. Add salt and red chilli powder and mix well. Remove from heat and enjoy it along with dal and roti as a side-dish.

Suggested Accompaniments: Tala huwa Adrak-Lahsun tastes delicious along with Saadi Mash Ki Dal or Moong Ki Dal.

An Update: I am sending my Hara Dhaniya aur Pudine Ki Chutney – Coriander and Mint Chutney over to Jhiva for Ingredients/JFI event, initiated by Indira originally. This month the theme is the most used asian herb ‘Cilantro’, known for its very aromatic and refreshing flavors, being hosted by Cilantro herself at her blog.

Luv,
Mona

AddThis Social Bookmark Button

Chatpate Kale Chane

April 15th, 2009 Mona Posted in Amchur powder, Canola Oil, Cilantro/Kothmir (fresh), Cumin seeds/Zeera, Dried Red Chillies, Green Chillies, Kala Chana, Nigella seeds/Kalonji, Red Chilli powder, Salt/Namak, Tomato/Tamatar (fresh), Yellow Onion/Pyaaz 19 Comments »

Snacks at the evening time after a small afternoon siesta were always so looked forward to by us all kids during my childhood in Hyderabad. Mirchi ke bhajiye, Palak ki pakodi, Aloo ke bhajiye, Pyaz ki pakodiBhelpuri, Aloo cutlets with chutneys, Samosa, or a variety of Fruit-chaat etc are the usual typical Indian tea time snacks.

Black Chickpeas-Kala Chana     ~     White Chickpeas-Kabuli Chana
Top-Pressure cooked Chana; Middle-Soaked Chana; Bottom-Dried Chana

There are two types of Chickpeas found in the market, black chickpeas called as Kala Chana in Urdu, and white chickpeas called as Kabuli Chana in Urdu. The black chickpeas are also sprouted and consumed in salads or lightly stir fried for a nutritious snack.

Note: Fresh chickpeas are green in color, in fuzzy pods, and are called as Hara Chana or Hari Boot. Have a look at them here. Fresh green chickpeas are sweetish in taste and taste awesome when dry roasted in pods in pans on stovetop until lightly charred, then shelled and eaten warm. When these green fresh chickpeas are dried in sun, they get dark in color with brown skin and rock like, called as the Kala Chana or Black Chickpeas. When these black chickpeas are skinned and split, we get Chana Dal or Bengal Gram. Instead when the black chickpeas are roasted and then skinned, we get Phula Chana, also referred to as Dalia or Bhuna Chana or Roasted Chana.

Spicy Black Chickpeas – Chatpate Kale Chane

During a recent visit to one of the grocery stores here, I spotted a bag of Kala chana which I quickly bought home and decided to enjoy them the way one of my aunt used to prepare during my childhood which I had always loved.

Spicy Black Chickpeas – Chatpate Kale Chane

Ingredients:

Dried Black Chickpeas/Kala Chana – 200 grams
Salt – 2 tsp
Canola oil – 1 tsp
Kalonji – 1 tsp
Dried red chilli – 1, whole
Cumin seeds/Zeera – 1 tsp
Red Ripe Tomato – 2, medium sized
Amchur powder – 1 1/2 tsp
Red chilli powder – 1 1/2 tsp
Onion – finely chopped, for garnish
Cilantro – finely chopped, for garnish
Green chillies – finely chopped, for garnish

Method:

1. Wash and soak the dried kala chana covered overnight in cool fresh water.
2. The next day, drain the water and wash the kala chana in cool water. Drain and put them in a pressure cooker. Pour 1 glass of cool water and add salt into the cooker and pressure cook the chana until tender, around 10 minutes.
3. Meanwhile, in a pan at medium heat, pour oil and add the kalonji and zeera. As they splutter, add the tomatoes, stir and cover the pan for 2-3 minutes. Add the red chilli powder and amchur powder and stir them again. Add the pressure cooked kala chana with the water and stir gently to mix well, half cover the pan and let cook until it is mostly dry. Add a few more splashes of water if needed. Once done, the chana should be fairly dry.
4. Serve them into individual plates. Garnish with chopped onion, green chilli and cilantro. Enjoy with a cup of warm evening tea as a snack.

Luv,
Mona

AddThis Social Bookmark Button

Sheekh Kawab Series~II

March 19th, 2009 Mona Posted in Almonds/Badaam, Cilantro/Kothmir (fresh), Coriander seeds, Cumin seeds/Zeera, Egg/Anda, Green Chillies, Khoa, Lamb/Beef/Mutton/Veal/Sheep, Nuts/Maghziyaat, Raw Papaya Skin paste, Red Chilli powder, Salt/Namak, Simple Kitchen Tips, Turmeric/Haldi, Yogurt/Dahi 18 Comments »

Sheekh kawabs are quite interesting and fun finger foods to prepare, and very versatile too. I love to mix and match and play with a variety of ingredients to flavor the sheekh kawabs and alter the tastes deliciously for a change. I had also posted an another version of sheekh kawabs a few months back. The main ingredients in todays version of sheekh kawabs are dhaniya/cilantro and hari mirch/green chillies, lending a faint tangy yet fresh flavor to them. These kababs are sure to whet your taste buds.

My lunch plate – Khushka with Khatti dal and Sheekh Kawab
(Plain boiled rice with sweet and sour lentil soup and Meat Kababs)

Marinate the meat in the spice mixture for atleast 6-8 hours or overnight for the best results, so that it absorbs all the flavors and the meat gets tender. One of my close friends S was telling me that she sun-dries the peels of very raw young papaya and once completely dry, powders them to store in jars in cool dark place at room temperature. It has a long shelf life. She added that she uses about a pinch or two of this powder as a tenderizer for the meat and leaves it to marinate for delicate melt in mouth kawabs. This I thought is a useful tip to share with my readers.

Sheekh Kababs – Minced meat Kebabs (II)

Makes: 15-18, enough for a large gathering

Ingredients:

Dry roasted and powdered Cumin seeds/Zeera – 1/2 tsp
Dry roasted and powdered Coriander seeds/Dhaniya – 1/2 tsp
Green chillies/Hari mirch – 8, roughly chopped
Lean Lamb meat (boneless) – 900 gms, cubed into bite size pieces (or) Minced Lamb/Veal meat – 900 gms
Thick yogurt – 2 tbsp
Chopped blanched almonds – 1 tbsp
Turmeric/Haldi – 1/4 tsp
Salt – 2 tsp
Red chilli powder – 1/2 tsp
Egg -1, large
Ginger garlic paste – 2 tbsp
Khoa – 1 tbsp
Raw papaya skin paste – 2 tbsp
Roughly chopped Cilantro/Kothmir – 1 cup, loosely packed
Lemon zest – 1/2 tsp

Kawabs ready to be grilled

Method:

1. Wash the meat and drain it well till all the water has been removed completely and the meat is dry. This is important or else the shape does not come out very well.
2. If using meat cubes, add the meat to a food processor along with all the other ingerdients and pulse just until the meat is minced. Do not make it into a paste. Transfer the minced meat into a mixing bowl and add all the other ingredients and mix/knead well using hands. If using minced meat, simply mix/knead it with all other ingredients until well combined in a mixing bowl. Cover and let it marinate in the refrigerator overnight for for minimum 2 hours.
3. The next day bring it back to room temperature. Dip your fingertips in a little canola oil and smear you palms with it. Take a large lemon size ball of the meat mixture in your hands and shape it into a sausage. Insert a metal skewer into it to make hole all the way through it. Enlarge the hole by rotating the kawab a few times around the skewer. Remove the skewer and place the kawab on a greased baking pan lined with aluminium foil. Keep repeating until the whole mixture is used up.
4. Preheat the oven to 350°F. Place the baking tray uncovered in the middle rack. Turn the kawabs once after 15 mins. Let cook for a furthur 15 mins. Serve warm.

Suggested Accompaniments: For a simple meal, serve these kawabs warm along with Khatti dal and Khushka. You could also serve it along with Dalcha, Baghara khana and a salad for a party meal, or simply along with a chutney as a snack.

Tip: Leftovers? Chop up the two Kawabs roughly and keep aside. Warm a pita bread, cut it onto halves, open it up and add some chopped fresh lettuce, cucumber, sliced avocado, tomato, and the chopped kawabs. Add a few drops of Chipotle hot sauce and some low-fat yogurt as topping. Serve these delicious pita pockets immediately.

Luv,
Mona

AddThis Social Bookmark Button

Mirch Bhajiye

January 26th, 2009 Mona Posted in Canola Oil, Carom seeds/Ajwain, Coriander seeds, Dry Desiccated Coconut, Eid/Ramadhan/Iftaar, Gram Flour/Besan, Green Chillies, Groundnut/Moomphalli, Hyderabadi special, Red Chilli powder, Salt/Namak 15 Comments »

Mirchiyon ke bhajiye, or stuffed deep fried chillies in a thick chickpea flour batter is a very common sight as a snack item loved my almost all Indians. Its one among the top rated street foods dear to every Bharatiya.

Mirch Bhajiye – Stuffed Deep fried Green Chillies

In this cold and chilly weather, I had prepared these as a snack. Actually I was missing Hyderabad so much and felt very nostalgic. It was necessary for me to have Mirch Bhajiye atleast once weekly, or even better more than that when I used to live in Hyderabad. My Ammi used to prepare them for us all, or we used to get them from the Chaat-Walas while shopping at Abids along with the delicious array of chutneys they offer.

Slit Serrano chillies

I use serrano chillies for preparing these bhajiye, you can however use any kind of long fat and straight green chillies that you like.

Mirch Bhajiye – Stuffed Deep fried Green Chillies

Ingredients:

Serrano chillies – 12, straight
Oil for deep frying

For the stuffing-

Roasted coconut paste – 1/2 tsp
Roasted groundnut paste – 1/2 tsp
Roasted Sesame seed paste – 1/2 tsp
Roasted Coriander seed powder – 1/2 tsp
Tamarind concentrate – 2 tbsp
Salt – to taste

For the batter:

Besan Batter

Chickpea flour/Besan – 300 gms
Red chilli powder – 1 tsp
Salt – to taste
Ajwain – 1/2 tsp
Water

Method:

  • Wash and pat dry the chillies. Slit them with the tip of a knife and carefully remove the seeds from inside. (Be careful with your hands while you do this. Do not rub you eyes with your hands while doing this or else they will burn. When all the chillies are done, wash your hands well in warm soapy water)
Stuffed Chilli
  • In a mortar and pestle, add all the ingredients for the stuffing and make a paste. Stuff the chillies with the prepared stuffing and keep aside.
  • In a seperate bowl, add the flour and spices and mix well with a fork. Add water, just a little at a time, to make a thick and smooth batter. (Make sure the batter is not thin)
  • Heat a Kadai or Wok at medium heat. Gently dip the stuffed chillies in the batter to cover them completely and slowly drp them into the hot oil. Deep dry until golden brown in color. Serve warm.

Suggested Accompaniments: Enjoy this snack along with any chutney of your wish.

Wishing every Indian a very Happy Republic Day. Mera Bharat Mahaan!

Luv,
Mona

AddThis Social Bookmark Button