Haleem~I

September 19th, 2007 Mona Posted in Broken Wheat/Daliya, Capsicum, Carrot/Gajar, Chane ki Dal, Eid/Ramadhan/Iftaar, Green Beans/Binees ki phalli, Green Chillies, Hyderabadi special, Lamb/Beef/Mutton/Veal/Sheep, Peas/Matar, Poultry/Murgh, Red Lentils/Masoor ki Dal, White Cauliflower/Phool Gobi, Yellow Lentil/Tuvar ki Dal/Toor dal 26 Comments »

Haleem, is a stew or a porridge made by slow cooking the lentils, meat and broken wheat together. It is a nutritous one-dish meal, perfect for a cold weather, or a starving stomach.

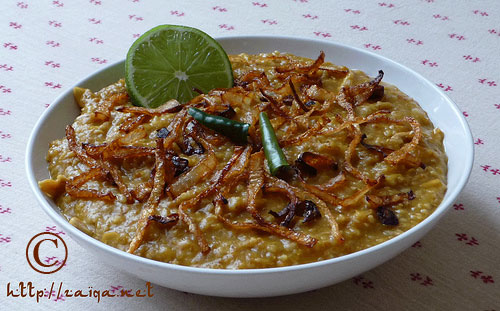
Murgh/Chicken Haleem garnished with fried onion slices, halved lime and sliced green chillies

It is mostly a middle-eastern dish in origins, heavily modified by Hyderabadis to suite their palate and is today one of the most famed dishes of Hyderabad city. It is usually prepared by muslims at Iftaar or dinner in the holy month of Ramadhan. I remember back in India, stalls and shops, especially for the month of Ramadhan would be set up and people would gather in big crowds to have it then and there, or parcel it and take home for everyone at home. The crowds and the stalls, the Pista restaurant famous for Haleem being one such, which would especially be seen in the month of Ramadhan in Hyderabad was a sight to watch, remember and recollect always.

This dish needs some pre-planning and is a little bit time consuming. But you will definitely love it once you try it. It is a balanced, delicious and famous Hyderabadi one dish meal.

I have been trying out many ways of preparing this delicious one dish meal and here is my modified simpler version of the dish. Inshallah I will post my Ammi’s version of Haleem in the future.

Haleem – Slow Cooked Lentils, Wheat and Meat/Vegetables Porridge
Serves: 4-5

Ingredients:

For Nonvegetarian Version-

Lamb/Veal Meat, boneless or with bone – 300 gms, washed and cubed (or) Chicken meat, boneless or with bone – 300 gms washed and cubed (I suggest using meat with bone) (you could also use minced chicken or lamb/veal meat)

For Vegetarian Version-

Fresh/Frozen chopped mixed Vegetables -300gms (you can use chopped vegetables like Cauliflower/PhulGobi, Peas/Matar, Carrots/Gajar, Capsicums/Shimla Mirch, Green Beans/Phalli)

Remaining Ingredients:

Broken Wheat/Bulgar Wheat/Dalia – 1 1/2 cups
Split Bengal Gram/Chana Dal/Chane ki dal – 2 tbsp
Split Yellow Lentils/Masoor dal – 2 tbsp
Split Yellow Lentils/Tuvar dal – 4 tbsp
Salt – to taste
Turmeric/Haldi – 1/2 tsp
Canola oil – 6 tbsp
Onions – 4, large, finely sliced
Ginger-Garlic paste – 4 tbsp
Red chilli powder – 1 tsp
Coriander seeds – 2 tsp, dry roasted and powdered
Cumin seeds – 2 tsp, dry roasted and powdered

Garam masala – 1 tsp

For Garnish:

Mint leaves/Pudina – chopped, for garnish
Cilantro/Kothmir – chopped, for garnish
Green chillies/Hari Mirch – 4, finely chopped or slit
Fried Onion/Pyaz – 1 cup
Juicy Lemon/Lime – 4, halved
Ghee – 2 tbsp (optional)

Method:

1. Add the broken wheat to surplus fresh cool water and drain in very fine wire mesh strainer several times to wash it, and soak the it and the lentils~chana dal, tuvar dal and masoor dal, seperately overnight or for atleast 3 hours, in generous amount of fresh cool water.
2. For a Non-vegetarian version, pressure cook the meat in surplus amount of water enough to cover it along with a pinch of salt and turmeric till tender. Chicken Meat will cook faster than Lamb meat. Once the meat is tender, drain, measure and reserve the stock in a bowl, shred the meat and keep aside in an anther bowl. Discard the bones. If using minced meat, cook it in a little oil, salt and red chilli powder until browned evenly. Keep aside.
3. Drain the soaking wheat and lentils and keep aside in a fine wire mesh strainer. In a non-stick 7 quart Dutch oven at medium heat, pour oil and as it gets warmed up throw in the sliced onion and stir fry until evenly browned and crisp (make sure you do not burn it). Remove the pan from heat and using a slotted spoon, remove about 1/2 of the fried onions from the pan onto a platter and spread the fried onions well so that they crisp up. Return the pan with leftover fried onions to heat and add ginger-garlic paste, coriander and cumin seed powder, red chilli powder, salt and turmeric. Add the drained broken wheat and lentils and mix well. Pour in the reserved meat stock. If you are preparing a vegetarian version, you can add vegetable stock or just plain water. You need to add a total of 8 cups of liquid to the saucepan. Let it boil once then simmer and let it cook covered, until the lentils are tender and the wheat mushy, about 1 1/2 hours, stirring it every once in a while taking care it doesnt stick to the bottom of the dish.
4. Stir in the garam masala and add the frozen/fresh chopped vegetables, or for a non-vegetarian version, the reserved shredded meat or minced meat, and mix well. Let it cook covered till the vegetables are tender and oil comes to surface, about 5 -8 minutes. You can keep adding a little water if needed. Remove the dutch oven from heat. Let it cool down slightly.
5. Once cool, pour the entire thing into a food processor and process for a minute. Pour back into the dutch oven, add a little water, and let simmer covered for 5 more minutes.
6. To serve pour the Haleem into individual plates with a laddle and garnish each plate with a few chopped mint leaves, chopped cilantro, chopped/slit green chillies, reserved fried onion, halved lemon for squeezing fresh lemon juice and a dollop of ghee(optional) for a deliciously nutritious meal.

Luv,
Mona

AddThis Social Bookmark Button

Delish Dahi-Vade

September 16th, 2007 Mona Posted in Black Gram/Urad Dal, Blog Events/Entries/Polls, Canola Oil, Cilantro/Kothmir (fresh), Dried Red Chillies, Eid/Ramadhan/Iftaar, Green Chillies, Hyderabadi special, Mustard seeds/Rai, Salt/Namak, Simple Kitchen Tips, Sugar/Shakkar, Turmeric/Haldi, Yogurt/Dahi 26 Comments »

Dahi means Yogurt, and Vade, or Vada (vada is a single deep fried lentil ball and vade or vadas is the plural of vada) are the deep fried lentil balls shaped differently according to the recipe in which you are adding them. Different kind of vade are added in different dishes. In this particular recipe the vada are shaped like little doughnuts and added to the Yogurt relish. Dahi-Vade are one of the most favorite snacks enjoyed by Indians. And Muslims in Hyderabad usually prepare it in Ramadhan for Iftaar, when they break the fast.

My version of the Dahi-Vade is simple. I combined the recipes of my Mother and Mother In Law here. Soak the dal a day ahead, then then I go to the kitchen an hour before the Iftaar time to prepare it so that they are just ready before the Iftaar time.

Dahi-Vada – Lentil cakes in Yogurt Sauce

Ingredients:

For the Yogurt Relish-
Yogurt – 500 gms
Water – 1 1/2 cups
Salt – 1/4 tsp
Green Chilli paste – 1 tsp
Sugar – 1/2 tsp
For the Vade-
Urad Dal/Black Gram dal – 1 cup
Green chillies – 2, very finely chopped
Salt – 2 tsp
Water
For the Baghaar
Dry Red Whole Chillies – 2, broken in half, and seeds removed
Mustard seeds – 1/2 tsp
Turmeric powder/Haldi – 1/4 tsp
Canola Oil – 2 tbsp
Cilantro – 1 tbsp, finely chopped

Method:

1. Wash and soak the dal in 2 glasses water overnight.
2. In a large and wide tray, pour in the yogurt, add salt, sugar, water, and green chilli paste. Whisk to mix the yogurt for 5 minutes till the mixture is well blended. Keep in the refrigerator.
3. About 30-40 minutes before you plan to serve the Dahi-Vade, drain the water from the dal and grind them into a smooth and fairly thick batter along the salt and water. Add water drops, as little as possible at a time, just to assist in grinding the dal. The grinded mixture should be fairly thick in consistency as you will be shaping them into vada. Pour the grinded mixture into a bowl. Add the chopped green chillies and mix well.
4. Heat oil to deep fry the vadas in a pan or a kadai. (Never deep fry in a non stick pan)
5. Wet your palm with a few drops of water and spoon about a heaped tablespoon of the mixture onto your wet palm. Wet your index finger and insert it into the centre of the batter to form a hole so that they look like doughnuts. Gently and carefully slip/drop this shaped doughnut into the hot oil and deep fry the vadas in hot oil on both sides until they are nicely golden brown in colour. Remove with a slotted spoon to a plate lined with paper towel. The vadas are ready.
5. Once all the vadas have been fried, drop them in a bowl of warm water. Let them soak for 2 minutes. Gently squeeze excess water from the vadas carefully pressing them lightly between your palms. This is done to soak out the oil. Transfer the soaked and squeezed vade into the earlier prepared cooled yogurt relish. Arrange the vade in the yogurt relish so that each one is nicely dipped into it. Cover the tray and transfer it into the refrigerator. Leave it to soak for 10 minutes.
6. Just before you serve, prepare baghaar. In a small pan, pour the oil and add the ingredients under the heading ‘for baghaar’ except cilantro. Let the spices splutter. Pour this onto the Dahi-Vade all over. Also garnish with cilantro, Serve immediately.

Some Tips:

  • For this recipe the lentils are to be soaked before hand, preferably overnight, and grinded. People usually grind the lentils and store the mixture some time ahead of preparing the Dahi-Vade. Here, I suggest NEVER to do so, because I have learnt from my experience, that if you grind it beforehand and keep the mixture at room temperature or in the fridge and you fry the vada out of the mixture later on, they tend to absorb more oil, it becomes thirsty for oil. I have noticed it every time I tried to simplify my work and grind and keep the lentils, when I am free, to deep fry it later on. So I have stopped doing it since and grind it only just before I plan to fry and serve the Dahi-Vade. Or you can grind and deep fry the vadas then and there, ahead of time, and store the fried vadas in the freezer for upto 3 months in an air tight container. When you want to prepare the Dahi-Vade, you simply will have to soak the vadas in warm water for the specified time and then in the yoghurt relish.
  • If you end up with many vadas, some people put all the vadas in the yoghurt relish even if they know they will all not be eaten up by your loved ones in home, which results in soggy Dahi-Vadas the next time you feel like having the left over Dahi-Vadas. Instead.. Count the number of people at home whom you are going to prepare and serve this dish, and the number of vade prepared. Do not soak all vade in water and then put them into the yoghurt, instead, store the excess vadas in the freezer. The next time you want to have them, make the yoghurt relish again, and dip the vadas, now in warm water for the specified time, and then in the yoghurt relish. Also NEVER prepare the yoghurt relish before hand too as it turns sour. Always prepare everything fresh for best results and good taste.

Asha of Foodie’s Hope has requested me to send this recipe for RCI Karnataka Cuisine because she says this recipe is very similar to Mosaru vade, which they prepare in Karnataka, So, here’s my recipe Asha, all the way to you!

Luv,
Mona

AddThis Social Bookmark Button

Veggies and Me!

August 29th, 2007 Mona Posted in Almonds/Badaam, Basmati Rice/Chawal, Black Peppercorns, Blog Events/Entries/Polls, Butter/Makhan, Canned Tomato paste, Canola Oil, Capsicum, Cardamom/Elaichi, Cilantro/Kothmir (fresh), Cinnamon/Dalchini, Clove/Laung, Corn (fresh/frozen), Dry Bay Leaf/Tej Patta, Eid/Ramadhan/Iftaar, Fennel seeds/Saunf, Frozen Mixed Vegetables, Garam masala powder, Ginger-Garlic paste, Green Beans/Binees ki phalli, Hyderabadi special, Lima Beans, Milk and Milk Products, Mint/Pudina (fresh), Nutmeg, Rose water/Gulab jal, Saffron/Zafraan, Salt/Namak, Turmeric/Haldi, Vegetables/Tarkariyaan, White Potato/Aloo, Yellow Onion/Pyaaz 32 Comments »

I had always disliked vegetable biryani. My Ammi had to run behind me to make me finish my plate. The other day while I was browsing through this cookbook, I came across this recipe and I am so glad I tried it. This recipe is a keeper and I will definitely be trying it again and again in my kitchen.

Vegetable Dum Biryani –  Rice Cooked With Vegetables and Spices
Source: India’s Vegetarian Cooking
Serves: 4

Ingredients:

  • Spices for the Rice water:
  1. Bay Leaves – 2
  2. Fennel Seeds/Saunf – 1 tsp
  3. Nutmeg Powder – 1 tsp
  4. Cinnamon – 1 small stick
  5. Cloves – 5
  6. Black peppercorns – 8
  7. Green cardamom – 3
  • Milk – 4 tbsp
  • Saffron strands – 1/2 tsp
  • Rose Water – 4 tbsp (optional)
  • Green cardamoms – 2
  • Butter/Canola Oil – 6 tbsp
  • Yellow Onion – 3, medium, thinly sliced
  • Ginger Garlic paste – 1 tbsp
  • Tomato paste – 2 tbsp
  • Turmeric Powder – 1/2 tsp
  • Garam Masala powder – 1/2 tsp
  • Salt – 1 1/4 tsp
  • Frozen Mixed Vegetables (Corn, Carrots, Potatoes, French Beans, Lima beans) – 270 gms
  • Red capsicum – 1, chopped
  • Basmati Rice – 300 gms
  • Mint leaves – 1 tbsp
  • Cilantro – 1 tbsp
  • Slivered Almonds – 3 tbsp

Vegetable Dum Biryani / Tarkari Ka Chawal

Method:

  • Preheat Oven to 425 °F /220 °C/Gas Mark 6
  • Put the spices meant for the rice water in 600 ml of water. Bring to a boil and turn off heat. Cover the pan and allow the flavours to infuse. This will be our liq. 1.
  • Meanwhile crush the two green cardamoms with milk and saffron and rose water and keep aside in a small bowl. This will be our liq. 2.
  • In a pan on medium heat, pour 3 tbsp of butter/oil and stir fry the chopped red capsicum. Remove with a slotted spoon and reserve.
  • In the same pan and butter/oil fry the onions until brown. Remove half of them and reserve for garnish. Add Ginger garlic paste to the pan and stir fry it along with the remaining onions. Remove from heat and let it cool. Grind the fried Ginger-Garlic and Onion.
  • Heat 1 1/2 tbsp butter/oil in a pan and pour the above grinded mixture along with turmeric powder, Garam masala and tomato puree. Season with salt and let it cook for 5-10 minutes.
  • Add the frozen mixed vegetables to the tomato and onion mixture in the pan. Also add the stir fried red capsicum. Mix Well and simmer. Let it cook for 10 more minutes. Remove from heat and reserve.
  • Strain the liq. 1 and keep aside. Throw away the spices.
  • In a pan add 1 1/2 tbsp of butter/oil and fry the rice over high heat. (Note: Do not wash the rice before hand. Rinsing will wash away the significant amount of surface starch that contributes to the dish.)
  • When the rice has become shiny, add half of the liq. 1 and bring to a boil. Reduce the heat and cover for about 6-8 minutes or until the water has evaporated.
  • Take an oven proof dish and start the layering process of the Biryani. The top and bottom layers are always the rice in a Biryani. Start by a layer of rice in the bottom of the dish, then add a layer of Vegetable mixture, then a layer of rice, and layer of vegetable mixture, and then the final rice layer. Pour evently the remaining liq.1 and the liq. 2 and the reserved fried onions on the rice layer. Also sprinkle the chopped coriander and mint leaves, and the slivered almonds on it. Seal the dish with tinfoil.
  • Cook the biryani for 40 minutes in the oven reducing the heat to 375 °F/190 °C/Gas Mark 5 after 20 minutes. Open the dish/Remove the tinfoil from the dish, just before serving.

Suggested Accompaniments: Tamatar ki Chutney

This goes as my contribution to Sharmi for the event she is holding Jihva for Ingredients JFI and its Rice this month at her place.

Luv,
Mona

AddThis Social Bookmark Button

Garma-Garam Qimah Samosa

August 25th, 2007 Mona Posted in Blog Events/Entries/Polls, Butter/Makhan, Canola Oil, Coriander seeds, Cumin seeds/Zeera, Eid/Ramadhan/Iftaar, Garam masala powder, Ginger-Garlic paste, Green Chillies, Lamb/Beef/Mutton/Veal/Sheep, Lemon/Nimbu, Mint/Pudina (fresh), Nutmeg, Red Chilli powder, Salt/Namak, Turmeric/Haldi, Whole Wheat Flour/Durum Atta, Yellow Onion/Pyaaz 24 Comments »

Samosas are triangle shaped Indian pastries that are filled with meat or vegetables, or both. The filled pastries are generally deep-fat fried but can also be baked. These pastries are eaten as snacks or appetizers. I’m a BIG fan of Samosas. I and my hubby usually go and get potato stuffed samosas for us all from the Samosa King Embassy Restaurant here, but today I thought of preparing them at home, Hyderabadi style.

This non-veg version of Samosas are my favorite,, which I prepare occasionally at home. I will also post the recipe of Aloo/Potato Samosas very soon in the coming days. I remember the wonderful aromas of all kinds of snacks and appetizers and the fast foods… tempting us to stop by from the road side stalls on the way home from College back in India. My Mom also used to make these samosas in large quantities in the month of Ramadhan, when we all Muslims fast, and at occasions or celebrations. This is my Mom’s recipe, and here it goes:

Qimah Samosa – Spicy Ground Meat Samosas

Ingredients:

For the Dough
Wheat Flour (Durum Atta) – 1 cup + Extra flour while rolling the dough
Salt – 1/2 tsp
Canola oil – 2 1/2 tbsp (optional)
Warm Water – 1 cup
For the Filling
Canola Oil – 2tbsp
Yellow Onion – 1, chopped
Ginger-Garlic Paste – 1 1/2 tsp
Coriander seed/Dhaniya powder – 1 tsp
Cumin seed/Zeera Powder – 1 tsp
Tumeric/Haldi powder – 1/2 tsp
Red Chilli powder – 1/8 tsp
Garam Masala powder – 1/2 tsp
Minced Lean Lamb meat – 200 gms
Salt – 1 tsp
Lemon juice – 1 tbsp
Mint leaves – 1 tbsp, finely chopped
Green chilli – 2, small, finely chopped
Canola Oil for deep frying the Samosas.

Method:
For the Dough
1. Sift the flour and salt together in a bowl. Rub in oil and gradually add water.
2. Knead and mix the dough, preferebly 10 minutes, until it is soft and leaves the side of the bowl.
3. Cover the bowl with a plastic wrap and keep aside at room temperature for 30 minutes.
For the Filling
4. Pour oil in a heavy bottom pan over medium heat and fry the onion till it changes color. Add the ginger garlic paste and stir fry. Lower the heat and add the cumin, coriander, turmeric powder, red chilli powder, salt and garam masala powder and mix well. Add the minced meat and stir it well, mashing it against the walls of the pan, with the spoon to prevent it from forming lumps. Add lemon juice, chopped mint leaves, green chilli and stir well. Cover and cook it until the mixture is dry. Remove from heat and let it cool.
5. Now, Lightly knead the rested dough. Divide into 8 balls and press each ball and cover with a plastic wrap.

The Dough Balls

6. Now roll out each ball, one by one, on a lightly floured work surface woth a rolling pin into approx 12 cm circles.
7. Cut each circle into semi circles and brush the edges with water.

Preparing Samosas

8. Put a generous teaspoon of the filling on one half of the semi circle and fold the free half over the filling to form a triangle.
9. Press the edges firmly to seal.
10. Fold until all the samosas are ready.

Prepared Samosas ready for frying

11. Heat oil in a wok or kadai or a deep, heavy bottomed sauce pan until it begins to sizzle.
12. Fry the Samosas, a few at a time, on medium heat, gently, until they are golden brown in colour.

Frying Samosas

13. Remove with a slotted spoon and drain on absorbent paper. The Samosas are ready to be served.

To Bake the Samosa:
After step 10, place the samosas in a greased or non-stick baking tray. Bake in a pre-heated 220° C oven for 20 minutes or until light brown in color. Serve immediately

This recipe goes as a contribution to Hima for the event ‘Whats Your Favourite..’ she is holding. For this time, the theme is ‘Whats your favourite Snack’. I’m sure her inbox will soon be overflowing with lots of snacks. So, it will a snack party at Hima’s place in the month of September. Be sure to drop by at here place! Eagerly and impatiently waiting for the round up Hima.

These Samosas make great Snacks, or you also serve them as Appetizers. Enjoy.

Luv,
Mona

AddThis Social Bookmark Button

Aloo Paratha

August 23rd, 2007 Mona Posted in Canola Oil, Cilantro/Kothmir (fresh), Cumin seeds/Zeera, Eid/Ramadhan/Iftaar, Green Chillies, Hyderabadi special, Red Chilli powder, Salt/Namak, Turmeric/Haldi, Vegetables/Tarkariyaan, White Potato/Aloo, Whole Wheat Flour/Durum Atta 5 Comments »

These yummy stuffed griddle breads with spicy potato filling are a favorite breakfast choice in my house. I enjoy them along with a little tomato chutney on the side. A cup of chai to end the meal and I am satisfied. Bliss!

Aloo Paratha – Flat Bread stuffed with spicy Potato mixture

Ingredients:

For the Stuffing mixture:
Potatoes – 5, medium, washed, peeled and cubed
Canola Oil – 2 tbsp
Cumin seeds/Zeera – 1/4 tsp
Mustard seeds – 1 tsp
Green chillies – 2, very finely chopped
Turmeric/Haldi Powder – 1/2 tsp
Salt – to taste
Red Chilli powder – 1 tsp
Cilantro – 2 tbsp, very finely chopped
For the Bread:
Wheat flour (Durum Flour) – 450 gms
Canola Oil/Ghee – 2 tbsp
Salt – to taste
Water – as needed

Note: You will need additional oil for cooking the Parathas/Bread.

Aloo Paratha – Potato Stuffed Indian Bread served along with Tomato Chutney

Method:

1. Boil or pressure cook the potatoes until they are soft. Drain, peel and mash them and keep them aside in a bowl. Heat a pan on medium high heat and pour oil into it. Add cumin seeds and mustard seeds. When they splutter, add the chillies and fry them for a minute and add the turmeric powder. Add this to the the mashed potatoes. Also add salt, red chilii powder, and cilantro. Mix well and keep aside.
2. Now for the parathas, combine the flour, salt, oil and water (reserving some of the flour for rolling). Add only a little water at a time and knead hard for 10 minutes until the dough is smooth, firm and pliable. Divide the dough into 16 equal sized balls. Roll each ball into a circle with a rolling pin of 8 cm approx diameter on a lightly floured board. Divide the potato mixture and roll them into 8 balls between your plams, 4 cm approx diameter and keep aside. Put each potato filling in the middle of each of the 8 rolled out discs and flatten it a bit. Cover the remaining 8 rolled discs onto each of them like a sandwich, and press the edges of the discs to make a potato parcel and enclose the potato mixture inside. Cover them all with a kitchen towel.

3. On a lightly floured working surface, take the sandwiched bread+potato and roll out very lightly and carefully, each one by one, to a circle, the size of a breakfast plate. Do not press too hard on the rolling pin or the filling will break through the dough, and also, do not roll it too thin or the Paratha will tear. Keep the working surface generously floured to aid in the process. Roll gently.
4. When all the parathas are filled and ready to cook, heat a heavy flat bottomed frying pan/girdle/tawa until very hot. Keep oil/ghee ready in a small bowl. Put a teaspoon of oil/butter on the girdle, spread it and put a paratha on it carefully and let the paratha sizzle on the girdle for a minute. Spread another small teaspoon of oil/butter on top of the paratha. Turn the paratha over and cook another side until nicely golden on both sides. Remove into a platter lined with kitchen towel. Cover with another kitchen towel to keep warm. Repeat until all the parathas are ready and serve warm.

Suggested Accompaniments: Serve at once with Tomato chutney or have it with any curry you like. You can also enjoy them as it is.

Tip: If there is a leftover potato mixture (filling):
1. You can make Potato cutlets with it and store in the refrigerator. Shallow fry them later when you want and a snack is ready.
2. You can also use the potato mixture as the filling into mirchi and make mirch bhajiya with besan. A yummy snack is ready.

Luv,
Mona

AddThis Social Bookmark Button