Qimah ki Tahari

August 3rd, 2007 Mona Posted in Basmati Rice/Chawal, Canola Oil, Caraway seeds/Shahzeera, Cardamom/Elaichi, Cilantro/Kothmir (fresh), Cinnamon/Dalchini, Eid/Ramadhan/Iftaar, Garam masala powder, Green Chillies, Hyderabadi special, Lamb/Beef/Mutton/Veal/Sheep, Red Chilli powder, Salt/Namak, Yellow Onion/Pyaaz, Yogurt/Dahi 9 Comments »

Tahari is a kind of one dish meal made with mutton pieces+rice, or minced meat+rice and masalas for flavor. In this technique, the meat is cooked in seasonings and masalas and later water is poured in to the gravy in which rice is added and it is all cooked together until the rice is done. For this, one has to learn the perfect ratio of water and rice so that the rice does not end up like an over cooked mushy mess.

Qimah ki Tahari is different than Biryani. In Mutton or Chicken biryani, Mutton or Chicken is layered along with half cooked rice and finished in the oven until the rice completely done; whereas in Tahari, rice is cooked on dum in the gravy containing Minced meat or Mutton pieces.

Qimah ki Tahari, served along with tomato chutney

I like Qimah ki Tahari along with ‘Tomato Chutney’. On our Saturday’s trip to the Niagara Falls, we had Qimah ki Tahari and Tomato chutney for lunch. After a very long drive when we reached there, my hubby was so hungry, we quickly had Tahari and set out to enjoy the beautiful landscapic view of the Falls.

Qimah ki Tahari – Minced Meat with Rice Casserole
Serves: 6-7

Ingredients:

Ground Lamb lean meat – 500 gms
Yellow Onion – 1, large, sliced
Canola Oil – 5 tbsp
Green Chillies – 4, slit in middle
Ginger garlic paste – 1 1/2 tbsp
Tomatoes – 3, finely chopped
Red chilli powder – 1 tbsp
Salt – 2 1/2 tbsp
Garam Masala powder – 1 tsp
Yogurt – 1/2 cup
Green Cardamoms -4
Cinnamon sticks – 2
Caraway seeds/Shah Zeera – 1 tsp
Water – 5 cups
Rice – 3 cups
Cilantro – 3 tbsp, finely chopped

Method:

1. Wash and soak the rice in fresh cool water sufficient enough to remain 5 cms above the level of rice.
2. Wash ground meat along with sliced onions well and drain the water completely in a very fine mesh strainer.
3. In a large saucepan at medium heat, add three tablespoons oil and green chillies, cinnamon stick, cardamom, caraway seeds and ginger garlic paste. Let it splutter and fry. In a minute. Add the drained onions+ground meat and also add red chilli powder, 2 1/2 tsp salt, garam masala powder, tomatoes and stir well and let it cook for 10-15 minutes until you see oil floating on top. Add the yogurt and mix well. Let cook for 2-3 minutes. Add cilantro and mix well.
4. Add the water and let the mixture come to a boil. As soon as it begins to boil well, add rice and mix well. Let it come to a boil. Once boiling, reduce heat to simmer and cover with a lid. Let it cook till very little water remains. Keep checking it every now and then, and give a gently stir everytime. Add a few splashes of water if you feel you need more water for the rice to cook. Once the water is mostly dried up, close the heat, but leave the saucepan on the hot stove so that a nice steam forms. Let the dish rest for 15-30 minutes. Serve warm.

Suggested Accompaniments: Enjoy this ambrosial one-dish meal along with Dahi ki Chutney or Baghare Baingan or Mirchi Ka Salan or Tomato Chutney.

Luv,
Mona

AddThis Social Bookmark Button

Tamatar Ki Chutney

July 25th, 2007 Mona Posted in Canola Oil, Chutneys and Pickles, Cumin seeds/Zeera, Curry leaves (fresh), Eid/Ramadhan/Iftaar, Garlic/Lahsun, Green Chillies, Hyderabadi special, Mustard seeds/Rai, Red Chilli powder, Salt/Namak, Simple Kitchen Tips, Tomato/Tamatar (fresh), Turmeric/Haldi 10 Comments »

Tomato Chutney is the Indian condiment that you can prepare and store in air-tight food storage containers in the refrigerator for days together. It has a very long life if used with care and can be enjoyed as a dip or spread along with many snacks or even with meals.

Tomato chutney is spicy, tangy, and this is the reason it is complimentary to almost all other dishes as a side-dish. My Mom is an expert and she always made the perfect Tomato chutney. I have never tasted a Tomato chutney as tasty as hers. My cousin sister who used to come to live with us during holidays when I was a kid, used to lick her fingers endlessly after having that chutney and would appreciate my Mom for the culinary treasures she possessed. I’m proud I got to learn from her the procedures of some of her known dishes.

Fresh Ripe Tomatoes and Tamatar Ki Chutney – Tomato Chutney

Its spicy, its tangy, its tasty, a perfect Indian Chutney. You can have this as a side dish or with any of your favourite Manchuria’s or snacks you love. Go ahead and try it out.

Tamatar Ki Chutney – Tomato Chutney
Serves: 6

Ingredients:

Tomatoes (fresh) – 4, large, red and ripe, washed and quartered
Green chillies – 2-4, washed and slit (optional)
Red chilli powder – 2 tsp
Salt – 1 1/2 tsp
Canola Oil – 2 tbsp
Cumin seeds/Zeera – 1 tsp
Black Mustard seeds/Rai – 1 tsp
Ginger Garlic paste – 1 tsp
Turmeric powder – 1/4 tsp
Curry leaves (fresh) – 6 leaves
Garam masala powder – 1/4 tsp
Dry roasted Cumin seed powder – 1/2 tsp

Method:

  • In a saucepan, add the quartered tomatoes and the red chilli powder, turmeric powder, green chillies, salt and and give it a nice stir. Cover and let it cook on medium low heat for about 5-10 minutes, stirring it occasionally, until the tomatoes are all mushy.
  • Meanwhile, prepare baghaar~pour oil in a pan at medium heat and as soon as its warm, throw in the cumin seeds and mustard seeds. Cover with a splatter screen and as the seeds begin to pop, add the curry leaves and the ginger garlic paste as well and stir for about 15-30 more seconds until the galic pods are slightly reddish in colour. This is the baghaar, or the tempering. Remove from heat and keep aside.
  • When the tomatoes are all cooked and most of the moisture has been evaporated and the consistency has reduced to a thick pulp as shown in the picture, add the garam masala powder, cumin seed powder and mix well. Add baghaar and mix well. Cook for 3-5 more minutes. Let cool, and serve.

Tip: You can store Tomato Chutney in an air tight glass jar in the refrigerator for almost a week, or freeze it in (microwavable) food storage containers for months together. When you want to have it, just microwave it for a few seconds or if you do not have a microwave, leave it outside at room temperature for a few hours, or in the refrigerator overnight and its ready to serve.

Suggested Accompaniments: ChickenDum Biryani, Gosht Ki Biryani, Tarkaari Ki Biryani, Qubuli or Tahari(Minced Meat Rice)

Luv,
Mona

AddThis Social Bookmark Button

Hyderabadi Maheqalya

July 19th, 2007 Mona Posted in Canola Oil, Cilantro/Kothmir (fresh), Coriander seeds, Cumin seeds/Zeera, Dried Red Chillies, Dry Desiccated Coconut, Eid/Ramadhan/Iftaar, Fenugreek/Methi seeds, Ginger-Garlic paste, Green Chillies, Groundnut/Moomphalli, Hyderabadi special, Lamb/Beef/Mutton/Veal/Sheep, Mint/Pudina (fresh), Onion/Pyaaz, Red Chilli powder, Salt/Namak, Sesame seeds/Til, Sunflower oil, Tamarind/Imli, Tomato/Tamatar (fresh), Turmeric/Haldi, Vegetable Oil, Yellow Onion/Pyaaz 7 Comments »

Maheqalya, is an classic Hyderabadi meat curry with onions, tomatoes, and tamarind and a range of aromatic spices.

Hyderabadi Maheqalya – Tangy Meat Curry

Ingredients:

Lamb Meat – 500 gms, cubed-1.5 cm or sliced, boneless or with bone
Yellow Onions – 3, large, sliced thick
Tomatoes – 2, roughly chopped
Dry Desiccated Coconut – 1/2 cup
Dry roasted Coriander seed powder – 1 tsp
Dry roasted Groundnut powder – 3 tbsp
Dry roasted Sesame seeds – 3 tbsp
Canola Oil – 1/2 cup
Cumin seeds – 2 tsp
Curry leaves (fresh) – 1 sprig
Dried red clillies/Baghaar ki mirch – 3-4
Methi/Fenugreek seeds – 1/2 tsp
Ginger-Garlic paste – 1 tbsp
Red chilli powder – 2 tsp
Salt – to taste
Turmeric powder – 1/4 tsp
Tamarind juice – 1 cup
Slit green chillies – 4
Cilantro/Kothmir – 1 tbsp, chopped finely
Mint leaves/Pudina – 1 tbsp, chopped finely

Hyderabadi Maheqalya – Tangy Meat Curry

Method:

  • Prepare browned onion+tomato paste: Take a large thick bottomed & non-stick frying pan/skillet on medium heat, preferably a cast iron pan, and as soon as it gets warm, add the sliced onions. Keep stirring the onions and cook them without oil until the onions are all browned soft and get cooked in their own moisture evenly. Remove the pan from heat, and let them cool down. Add the chopped tomatoes and the cooled browned onions into a blender container or food processor and blend till pureed smooth adding just a few drops of water if necessary to aid in the process. Keep aside.
  • Prepare masala powders: Put a small non-stick frying pan on medium heat and dry-roast the groundnuts, sesame seeds, coriander seeds, shredded coconut each individually without oil till they are golden brown in colour. Do not burn them. Remove them into a platter. Once cool, grind them all together very finely. (You can dry roast a handful of almonds/cashewnuts/chironji nuts and grind them together along if you want it more rich). Make sure the obtained spice powder is very fine.
  • Take a pressure cooker and add oil and keep it on medium high heat. Once the oil is hot, add cumin seeds, dried red chillies, and fenugreek seeds to the oil and let them splutter. Now add the browned onion and tomato paste to it and cover the lid immediately, shake the cooker to mix, remove from heat and keep aside for 3-5 minutes, so that the aroma of the tempered oil with spices gets absorbed by the onion mixture. Remove the lid, put the cooker back on stove, lower the heat to medium low and add the ginger-garlic paste, the masala powders, red chilli powder, salt and turmeric powder and stir it well. Cook stirring continuously until oil leaves. This masala tends to stick to the bottom, so keep a close eye. Add the washed cubed meat pieces, slit green chillies and mix well. Cover with a splatter screen and let it cook while stirring it for 3- 5 minutes. Pour in half a cup of water, stir to mix, and close the lid. Pressure cook it on medium heat for 10-15 minutes until the meat is tender. Then open the lid and cook it till the oil has seperated out from the mixture and starts appearing on the surface. Add the tamarind paste and give it a stir. Add about 2-3 cups water till you get the consistency you desire. Simmer and let it cook on medium high for about 3-5 more minutes. Garnish with chopped cilantro and mint leaves. Serve warm.

Suggested Accompaniments: Basmati Chawal or Parathas.

Luv,
Mona

AddThis Social Bookmark Button

Hyderabadi Dum Pukth (Pakki) Murgh Biryani

July 17th, 2007 Mona Posted in Almonds/Badaam, Basmati Rice/Chawal, Butter/Makhan, Canola Oil, Caraway seeds/Shahzeera, Cardamom/Elaichi, Cashewnuts/Kaaju, Cilantro/Kothmir (fresh), Clove/Laung, Cumin seeds/Zeera, Dry Bay Leaf/Tej Patta, Eid/Ramadhan/Iftaar, Garam masala powder, Ginger-Garlic paste, Green Chillies, Hyderabadi special, Lemon/Nimbu, Milk and Milk Products, Mint/Pudina (fresh), Poultry/Murgh, Red Chilli powder, Saffron/Zafraan, Salt/Namak, Tomato/Tamatar (fresh), Turmeric/Haldi, Yellow Onion/Pyaaz, Yogurt/Dahi 22 Comments »

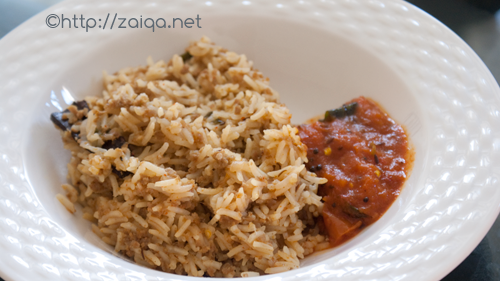
Mazadaar!! (meaning ‘yummy’ in English) is what everyone in my house say when they have just had thier first niwaala/morsel of my Dum Pukth Murgh Biryani.

Chicken Biryani is an exotic one-dish meal, served usually at large get-togethers, occasions and parties like weddings, ceremonies and festivals in the city of Hyderabad, India. The method of cooking involves a layering process of half cooked rice with the cooked till done spiced chicken mixture. Hyderabadi people have a great fondness for Biryanis and it is seen at almost every restaurant in the menu cards as the speciality item.
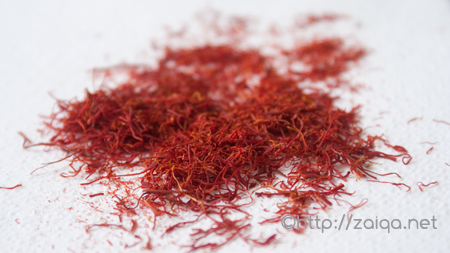
Saffron strands

Basically, there are two kinds of Biryani: Pakki Biryani, and Kachchi Biryani.

Pakki Biryani: where are half Basmati cooked rice is layered along with completely cooked chicken or lamb meat and then cooked till done on slow heat on dum.
1. Pakki Gosht ki Biryani
2. Pakki Murgh Biryani

Kachchi Biryaniwhich is the true Hyderabadi Biryani – where are half cooked Basmati rice is layered along with raw marinated meat and then finished on slow heat till done on dum.
1. Kachchey Gosht ki Biryani
2. Kachche Aqni ki Dum Murgh Biryani

The following is the procedure how I prepare Pakki Murgh biryani in my house on a regular basis. In this recipe you can use a whole chicken with bones, cut into pieces; but I usually prefer to use boneless Chicken, as my family prefers boneless breast pieces of Chicken, which has minimal fat in it, hence a healthier option. Check out my Instant Light Chicken Biryani, which is light on stomach, and gets prepared in less than 30 minutes.

The caraway seeds, garam masala powder, saffron strands, and all other spices used in this recipe can be easily found in most Indian grocery stores which sell spices. My family prefers to have Biryani a bit hot and lemony with a little bit of an acetous flavor, so I’ve added red and green chilli and lemon juice according to our tastes. You can alter those according to your tastes.

Do not worry if you have never prepared Biryani till now by yourselves. I have tried here to explain each step in as simpler method as possible. Do write to me if you have any doubts regarding the procedure. Go ahead and prepare this for your family, Enjoy.

Hyderabadi Dum (Pakki) Murgh Biryani – Fragrant Rice-Chicken Casserole with Spices
Serves: 8

Ingredients:

Ginger-Garlic Paste – 2 tbsp
Garam Masala – 1 1/2 tsp
Yogurt -1 1/2 cup
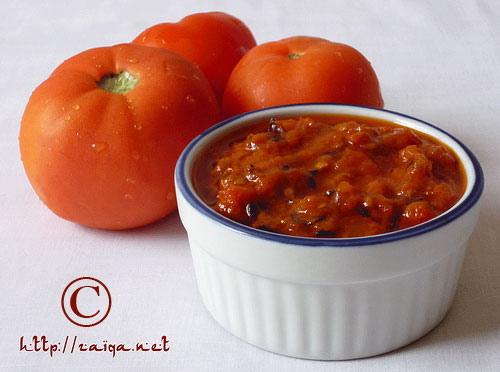
Tomatoes – 2, large and ripe, pureed into a smooth paste (or) Canned tomato paste – 5 tbsp (optional)
Turmeric – 1/4 tsp
Red chilli powder – 2 tsp
Lemon juice – 6 tbsp
Salt – to taste
Almonds – 1/2 cup, slivered
Cashew nuts – 1/2 cup
Yellow Onions – 5, large, sliced
Chicken – 900 gms, Boneless, skinless breast pieces, cut into 2 cms cubes
Basmati, Long Grained Rice – 5 cups
Water – 8 cups
Canola Oil -9 tbsp
Caraway seeds/ShahZeera – 1 tbsp
Warm Milk – 1/2 cup
Saffron strands – one big pinch
Bay leaves – 1
Green cardamom – 3
Green Chillies – 5, small sized, slit lengthwise
Home-made Ghee – 3 tbsp
Fresh Mint leaves/Pudina – 2 tbsp, wahsed, chopped finely
Fresh Cilantro/Kothmir – 2 tbsp, washed, chopped finely

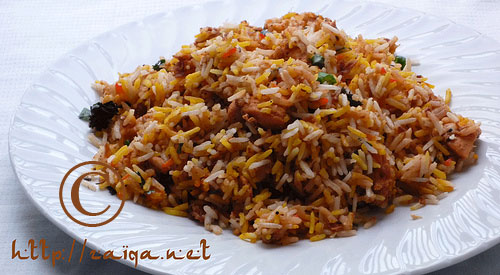
Hyderabadi Dum Pukth Murgh Biryani

Method:

1. Marinate the chicken with the first 8 ingredient for about 6-8 hours maximum or one hour minimum covered in the refrigerator.
2. Start by pouring 1 tbsp oil into a large heavy bottomed non-stick frying pan and fry the almonds and cashewnuts till they are golden brown and remove them into a bowl.
3. In the same pan add 8 tbsp oil and add the sliced onions. Fry them till the onions are brown and crisp. Make sure not to burn them. Remove from heat. Remove about a cup of the fried onions with a slotted spoon onto a paper towel in a platter.
4. Take out the chicken from the refrigerator, bring it to room temperature. In the pan with oil and fried onions, dump the whole bowl consisting of the marinating chicken and all its juices into it and put the pan on medium high heat. Let it cook uncovered until the gravy is dry and dense and the chicken is done. Keep stirring it occasionally. This might take about 20-30 minutes. Remove from heat and keep aside.
5. Meanwhile take half a cup of warm milk, and add a few strands of saffron. Let them soak  for an hour.
6. Wash and soak the rice in water for preferably half an hour. Later, drain the rice and keep it in the sieve. Boil 8 cups of water and add cinnamon sticks and caraway seeds/shah zeera, bay leaves, green cardamom and salt (I use the proportion:1 tsp salt for 1 cup rice). Once the water is boiling add the strained rice, give it a stir and let the rice soften up a bit. Once the rice is half done, strain the rice and throw away the water. Discard the bay leaves and the cinnamon stick.
7. Arrange half the amount of rice as the bottom layer layer in a large dish. Next, add the chicken mixture prepared earlier in a layer. Now add the remaining rice above the chicken layer, covering it completely.
8. Garnish with mint, cilantro, fried onions, slit green chillies, and fried nuts from step 2. Now pour evenly the milk with saffron strands and two tablespoons of ghee over the layered and garnished rice. Cover the dish with a lid or aluminium foil.
9. Preheat the oven to 350°F and put the dish in the oven for 10-12 minutes, till a nice steam has formed inside the dish, and the rice has been done. Serve hot for a delicious meal.

Tip: Adding salt to the water in which you cook rice is essential, or else the whole taste of Biryani turns upside down. One tip if you have forgotten to add salt to the water while boiling rice is – stir the required amount of salt in a little quantity of hot water, about half cup or a few tablespoons, and pour this on the biryani evenly. Warm the biryani in microwave and serve immediately.

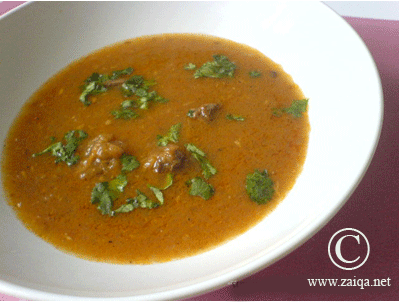
Suggested Accompaniments: Biryani goes very well along with Mirchi Ka Salan or Baghare Baingan, or Tamatar Ki Chutney and Dahi Ki Chutney.

Luv,
Mona

AddThis Social Bookmark Button

Colourful Pasta

July 14th, 2007 Mona Posted in Black Beans, Canned Tomato paste, Canola Oil, Capsicum, Carrot/Gajar, Dals (Pulses & Legumes), Green Beans/Binees ki phalli, Lamb/Beef/Mutton/Veal/Sheep, Milk and Milk Products, Olive/Zetoon, Pasta & Noodles, Red Chilli powder, Salt/Namak, Tomato/Tamatar (fresh), Turmeric/Haldi, Yellow Onion/Pyaaz 4 Comments »

There’s one thing about pasta that I like a lot. It can be made in a thousand different ways changing the flavours with every ingredient you wish to add to it. While preparing pasta you can experiment a lot, with whatever you like, and it gets ready instantly for a delicious heartful meal.

This recipe which I make is loved by everyone in my home. You can substitute meat in this recipe with the same amount of chicken breast pieces, or omit both and make it a vegetarian pasta dish.

Serves : 4

Colourful Pasta

Ingredients:

Lamb/Veal meat – 110 gms, cubed into bite size pieces
Fusilli Pasta – 400 gms
Ripe Tomatoes – 2, large, chopped finely
Canned Tomato paste – 1 cup
Carrots – 2, washed peeled and sliced
Red capsicum – 1, large
Green beans/Binees – 1 cup, washed and chopped
Canned Black beans – 1 cup, drained and gently washed
Salt – to taste
Red chilli powder – 1 tsp
Turmeric – 1/4 tsp
Garam masala – 2 tsp
Yellow Onion – 1, small, sliced
Canola Oil – 4 1/2 tbsp
Parmesan Cheese – 1 cup, Grated (optional)
Black Olives – 1 cup, sliced and deseeded (optional)

Method:

  • Put a pressure cooker on heat and add half a tablespoon of oil to it. Add the washed and cubed lean meat pieces and stir until no longer red. Pour a little water and pressure cook till it becomes soft. You can even use some left over meat. Just shred it into bite size pieces. Remove the meat with all its juices to a bowl once done.
  • Take a pan and add two teaspoon oil to it. Fry the cut carrots, capsicum, french beans individually for 3-4 minutes each and remove in an another bowl.
  • In a sauce pan, add the remaining oil and put it on heat. Add the sliced onions to it and let them turn translucent. Add the finely chopped tomatoes and cover the lid for a few minutes till the tomatoes have become soft. Add the tomato paste and stir to mix. Add salt, chilli powder, garam masala and turmeric and stir again. Now add the meat pieces with all its juices to the tomato mixture and let it cook for 2-3 minutes.
  • Meanwhile cook Fusilli according to instructions and reserve half cup of the water in which the Fusilli was cooked. Drain and keep aside.
  • Add the drained pasta with its reserved water, the drained black bean and the sautéed vegetables to the tomato mixture. Reduce the heat to medium low and let it cook uncovered for 5 more minutes.
  • Serve immediately into individual plates sprinkled with grated parmesan cheese and sliced olives on top.

Luv,
Mona

AddThis Social Bookmark Button