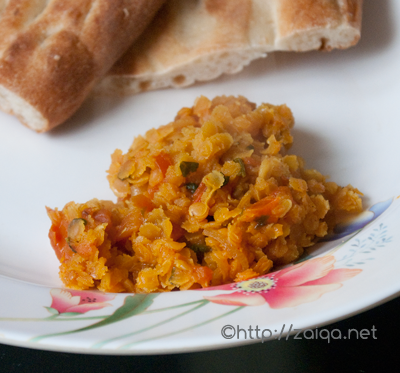
Khadi Masoor Ki Dal

March 26th, 2008 Mona Posted in Canola Oil, Dals (Pulses & Legumes), Dill/Suvabhaji (fresh), Eid/Ramadhan/Iftaar, Fats and Oils/Tel, Ginger-Garlic paste, Hyderabadi special, Onion/Pyaaz, Quick fix meals, Red Chilli powder, Red Lentils/Masoor ki Dal, Salt/Namak, Spices & Seasonings/Masaale, Sunflower oil, Turmeric/Haldi, Vegetables/Tarkariyaan, Yellow Onion/Pyaaz 18 Comments »

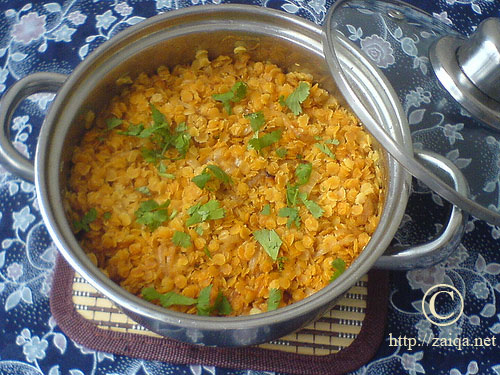
Khadi Masoor Ki Dal reminds me of those beautiful sunny and summery Indian breakfasts, that consisted of warm Parathas and Khadi Masoor ki Dal. My Aunt-Mami used to prepare the best Khadi Dal. I always used to request some of it whenever I would go to visit her.

Khadi Masoor Ki Dal, served along with Afghani Roti

Khadi Dal is one very easy side dish that goes well along with Mirchi Ka Salan or Mahekhalya or Andey Ka Khatta Salan, Baghare Baingan and Basmati Chawal for a meal, or just with Parathas for a breakfast or brunch. This recipe is so quick to prepare that it is one of the very first dishes one learns when he/she starts to experiment in kitchen discovering their culinary skills.

You can garnish it with finely chopped cilantro/dhaniya and mint/pudina, or with finely chopped fresh dill/Suvabhaji. It tastes best along with chopped dill, but if unavailable you can also go by the cilantro and mint.

Khadi Masoor Ki Dal – Red Lentils curry
Serves – 4-6

Ingredients:

Split Red Lentils/Masoor Dal – 1 cup
Canola Oil/Sunflower Oil – 2 tbsp
Yellow Onion – 1, small sized, finely sliced
Ginger Garlic paste – 1 tsp
Tomatoes – 1, large, finely chopped
Red Chilli Powder – 2 tsp
Turmeric – 1/4 tsp
Salt – 1 tsp or to taste
Warm Water – 1 cup, to cook
Warm Water – 2 cups, to soak

for garnish:
Finely chopped Cilantro and Mint – 1 tbsp (or) Finely chopped Dill/Suvabhaji – 1 tbsp

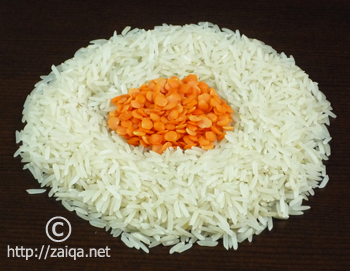
Khadi Masoor Ki Dal – Dry Red Lentils

Method:

  • Wash the lentils well in a strainer till water runs clean and soak them in a bowl of warm water-to soak for about 30 minutes.
  • Meanwhile in a pan on medium high heat, pour in oil and as soon it warms up add the sliced onions and stir fry them till they are golden brown in color.
  • During this time, drain the soaking dal and throw away the water.
  • Lower the heat and add ginger garlic paste, fry for a minute. Add the chopped tomatoes, red chilli powder, turmeric and salt. Mix well. Add the drained dal and mix it well with a spoon. Pour in the warm water to cook and give it a stir. Cover the lid of the pan and let it cook on medium heat till a nice steam has formed inside. Keep an eye on it as soon as the dal is done remove it from heat (You can add a few drops of water and stir to mix gently if needed if the dal is still undone)
  • Garnish it with fresh finely chopped dill(Suvabhaji) or fresh finely chopped cilantro and mint. Serve immediately.

Suggested Accompaniments: Mahekhalya or Andey Ka Khatta Salan or Baghare Baingan or Mirchi Ka Salan and Basmati Chawal, or Parathas..

This delicious dal is my entry to the event ‘Delicious Dals from India’ being hosted by Suma at her blog Veggie Platter.

Luv,
Mona

AddThis Social Bookmark Button

Adraki Murgh

March 20th, 2008 Mona Posted in Canola Oil, Clove/Laung, Curry leaves (fresh), Eid/Ramadhan/Iftaar, Fats and Oils/Tel, Garam masala powder, Ginger/Adrak, Green Onion/Hari Pyaz, Hyderabadi special, Milk and Milk Products, Non-Vegetarian/Gosht, Onion/Pyaaz, Poultry/Murgh, Red Chilli powder, Salt/Namak, Spices & Seasonings/Masaale, Sunflower oil, Turmeric/Haldi, Vegetables/Tarkariyaan, Yellow Onion/Pyaaz, Yogurt/Dahi 12 Comments »

Today is the first official day of Spring here and the forecast nowhere shows such signs. It will be remaining cloudy with a few showers of snow and the temperatures remaining in ‘minus’ for some more time. There are a few signs of sun only the next week, which again are not very consistent. I hope Spring arrives very soon. Winter has been too beautiful, loved it so much, but i admit it gave many problems to my dear hubby.. the shoveling, the problem with car and snow troubled him a lot. I am waiting for spring, then summer, mainly because i can take my grill out, and also plant a little vegetable garden inshallah. So looking forward to it..

Speaking about planting your backyard with plants and herbs, ginger is the simplest. Whenever i see some rhizomes with buds, i just plant them in a pot, keep it well watered, and in some time i see the pot full of ginger rhizome. It comes very useful to me, and it keeps fresh in the soil.

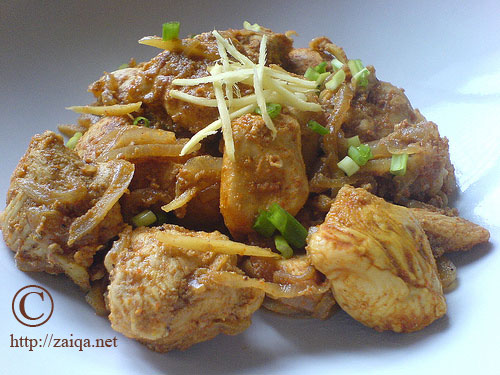
Adraki Murgh – Ginger Chicken

I prepared this dish with these fresh ginger rhizomes. And it is also one of the quick non-vegetarian dishes that i prepare quite often in my house. Today i share with you the procedure of how i prepare Ginger Chicken. I believe the flavor of chicken goes very well along with ginger. They are made for one another. The sharp pungent taste of ginger, the sweet flavor of onion, and chicken is this dish is perfectly delectable. Irf loves this dish.

Adraki Murgh – Ginger Chicken

Serves:6-8

Ingredients:

To Marinate-

  • Chicken Boneless Breast Meat/Murgh – 800 gms, washed, pat dried and cubed into bite size pieces
  • Ginger juliennes – 3 tbsp
  • Garam Masala – 2 tsp
  • Yogurt/Dahi – 3 tbsp
  • Red Chilli Powder/Lal Mirch Powder – 2 tsp
  • Salt/Namak – 2 tsp
  • Turmeric/Haldi – 1/3 tsp

Other Components-

  • Cloves/Laung – 3
  • Canola/Sunflower Oil – 3 tbsp
  • Curry leaves (fresh) – 6-8
  • Yellow Onion – 1, large, thinly sliced
  • Scallions/Hari Pyaz – chopped, for garnishing
  • Ginger juliennes – 1 tbsp

Method:

  • In a bowl or a resealable plastic bag, marinate the chicken with the ingredients under the heading ‘To Marinate’. Let the chicken marinate for about 2-4 hours in the refrigerator. Remove the chicken from the refrigerator and bring it to room temperature atleast an hour befor you plan to cook it. (Remember this always)
  • Later, heat oil in a non-stick heavy bottomed pan at medium high heat and throw in the cloves and thinly sliced onions. Stir fry it till the onion is lightly browned. Add the curry leaves and saute it for just a minute more.
  • Add the marinated chicken and mix it well with the sauteed onion mixture. Close the lid for about 15 minutes. Later, open the lid and stir it gently, being careful not to break the tender chicken pieces.
  • Let it cook uncovered for a little more time, till it is quite dry. Garnish with the ginger juliennes and spring onions.

Suggested Accompaniments: Parathas or Naan or Pulao..

Luv,
Mona

AddThis Social Bookmark Button

Kalonji Wali Bhindi-Tamatar Subzi

March 17th, 2008 Mona Posted in Canola Oil, Eid/Ramadhan/Iftaar, Fats and Oils/Tel, Hyderabadi special, Nigella seeds/Kalonji, Okra/Bhindi, Onion/Pyaaz, Quick fix meals, Red Chilli powder, Salt/Namak, Tomato/Tamatar (fresh), Vegetables/Tarkariyaan, Yellow Onion/Pyaaz 15 Comments »

Bhindi or Okra is one of my most favorite vegetables. I love it a lot, and i am glad my loved ones love it equally.

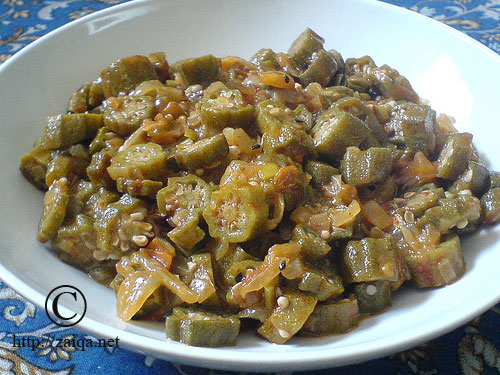
I usually keep prepararing three kinds of preparations with Bhindi/Okra whenever they are available fresh which are so adored by my family. I either fry them or make a Curry/Patla Salan or sometimes make a sautéed dish with tomato and onion which is what I’m writing about today. We have it along with Parathas for Brunch on the weekends or at Breakfasts.

Kalonji Wali Bhindi-Tamatar Subzi – Sautéed Okra with Tomatoes and Nigella seeds

Adding Nigella seeds/Kalonji to the dish here gives it its own unique peppery taste. The seeds are also known for their medicinal value. These little things are considered as a herbal medicine for many ailments and is beneficial for good health. Lots about this spice is also written in the Quran, The Prophet Mohammad (صَلَّى اللَّهُ عَلَيْهِ وَسَلَّمَ) has said “Hold on to the use of Black Seed for it has a remedy for every illness except death”. Evidence of the therapeutic use of Nigella seed has been found in all over the world. So I tend to add it to almost all the dishes I can in small amounts.

Kalonji Wali Bhindi-Tamatar Subzi – Sauteed Okra with Tomatoes and Nigella seeds

Ingredients:

  • Canola/Sunflower Oil – 3 tbsp
  • Okra Pods/Bhindi – 550 gms, washed, dried with paper towels, chopped into 1/2 inch pieces
  • Tomato (fresh)/Tamatar – 1, ripe red, large, finely chopped
  • Yellow Onion/Pyaz – 1, large, finely sliced
  • Nigella Seeds/Kalonji – 1 tbsp
  • Red Chilli Powder/Lal mirch powder – 1 1/3 tsp
  • Salt/Namak – 1 1/3 tsp

Method:

  • In a sauce pan at medium high heat, pour in the oil, and as soon as it warms up, add the kalonji, and the sliced onions. Let them cook till they are all nicely lightly browned.
  • Add the chopped tomatoes and let it cook till they are sofy and mushy. Also throw in the red chilli powder and salt and mix well.
  • Lower the heat and add the chopped Bhindi and fry it for 3 minutes. Pour in a cup of water and close the lid. Let it cook till the Bhindi is soft and done. Keep opening the lid, and checking it, if it’s getting stuck to the bottom. Also, you can add a little more water if needed. Serve hot.

Serve it hot along with warm Parathas for a Brunch or Breakfast. You will also enjoy this as a dry side-dish along with Basmati Chawal/Rice.

Luv,
Mona

AddThis Social Bookmark Button

Pakki Gosht Ki Biryani, and Dahi Ki Chutney

March 4th, 2008 Mona Posted in Almonds/Badaam, Basmati Rice/Chawal, Blog Events/Entries/Polls, Butter/Makhan, Canola Oil, Caraway seeds/Shahzeera, Cereal Grains, Chutneys and Pickles, Cilantro/Kothmir (fresh), Eid/Ramadhan/Iftaar, Fats and Oils/Tel, Fruits/Phal (fresh), Ghee, Ginger-Garlic paste, Green Chillies, Hyderabadi special, Lamb/Beef/Mutton/Veal/Sheep, Lemon/Nimbu, Milk and Milk Products, Mint/Pudina (fresh), Non-Vegetarian/Gosht, Onion/Pyaaz, Raisins/Kishmish, Red Chilli powder, Red Chilli/Lal mirch, Saffron/Zafraan, Salt/Namak, Spices & Seasonings/Masaale, Sunflower oil, Tomato/Tamatar (fresh), Vegetable Oil, Vegetables/Tarkariyaan, Yellow Onion/Pyaaz, Yogurt/Dahi 25 Comments »

Dear readers, today I present you with renowned Hyderabadi Lamb Biryani. Biryani is one of the most famous Hyderabadi one-dish meals craved and devoured by people from all over the world. The basic process of preparing Biryani involves the layering of raw marinated or cooked meat along with half cooked long grained aromatic Basmati rice, and a range of fresh spices and herbs for exceptional flavor and aroma.

Basically, there are two kinds of Biryani: Pakki Biryani, and Kachchi Biryani.

Pakki Biryani: where are half Basmati cooked rice is layered along with completely cooked chicken or lamb meat and then cooked till done on slow heat on dum.
1. Pakki Gosht ki Biryani
2. Pakki Murgh Biryani

Kachchi Biryaniwhich is the true Hyderabadi Biryani – where are half cooked Basmati rice is layered along with raw marinated meat and then finished on slow heat till done on dum.
1. Kachchey Gosht ki Biryani
2. Kachche Aqni ki Dum Murgh Biryani

Biryani always reminds me of my wedding, when I wore a very beautiful Khada Dupatta. It was on that day that I had best Biryani ever! This dish is so important in the Hyderabadi Muslim community that it is served along with Mirchi Ka Salan and Baghare Baingan and Dahi Ki Chutney, as the main dish at almost all gatherings, occasions, parties, all kinds of merry making get togethers. Essentially all weddings in Hyderabad are suposed to have Lamb Biryani and Mirchi Ka Salan in the menu.

My lovely sister had prepared this dish on the weekend. We were all in a mood to treat our family and ourselves with something special, and we immediately thought of this dish. What could be a more better meal to delight ourselves than this flavorsome fare.
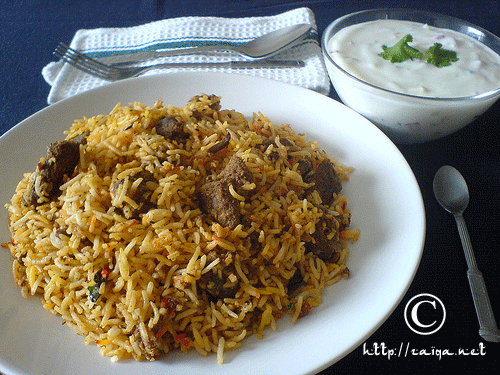
Gosht Ki Biryani, Dahi Ki Chutney

***

Dahi Ki Chutney – Yogurt Chutney
Makes:One small bowl

Ingredients:

Plain Yogurt (low-fat or full-fat)- 375 ml
Salt – 2/3 tsp or according to taste
Thai Red Chillies – 2, chopped (optional)
Green Chillies – 2, chopped
Yellow Onion – 1, medium, finely chopped
Mint leaves – 1/2 cup, finely chopped
Coriander leaves – 1/2 cup, finely chopped
Firm Red Tomato (fresh) – 1, small, deseeded and chopped finely (optional)

Method:

1. To the yogurt in a bowl, add salt and half a cup of water and whip it till smooth, and creamy for approx 2-3 minutes.
2. Add the remaining ingredients and fold them into the yogurt gently. Adjust salt according to your taste and cover the bowl with a plastic wrap.
3. Put it in the refrigerator to serve it later along with Biryani.

You can store Dahi Ki Chutney in the refrigerator in an air tight food storage box for only one more day in a refrigarator, it doesnt last long. It is always better if you have an idea how much your family memebers will have it and you prepare it in only the required amount.

***

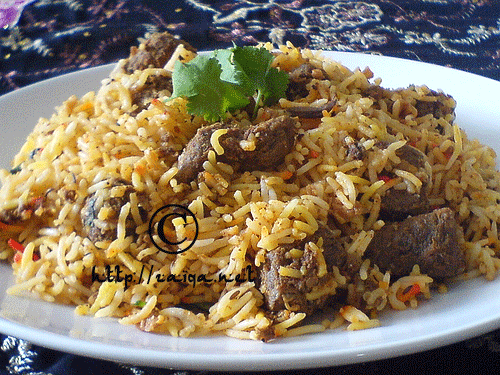
Hyderabadi Dum Pukth Pakki Gosht Ki Biryani – Fragrant Flavored Meat and Rice Casserole
Serves:5-8

Ingredients:

For the Marinade
Canola/Vegetable/Sunflower Oil (or) Butter/Makhan (or) Clarified Butter/Ghee – 90 ml/6 tbsp
Yellow Onion/Pyaz – 2, large, thinly sliced
Lean Lamb leg meat – 1 kg, washed and cubed into 3 cm pieces approx (with bones preferably if available, I have used only boneless here)
Plain Yogurt/Dahi – 500 ml, lightly whipped
Red Chilli Powder/Lal mirch powder – 1 1/2 tsp
Salt/Namak – 1 1/2 tsp
Lemon Juice/Nimbu Ras – 4 tbsp
Garam Masala – 1 tbsp
Turmeric/Haldi – 1/2 tsp
Ginger Garlic paste – 2 tbsp
Water/Meat Stock – 1/2 cup
For the Garnish
Green Chillies/Hari Mirch – 2, each slit into two
Thai Red chillies/Choti Lal Mirch – 2, each slit into two (optional)
Fried Onion reserved for garnish earlier
Mint Leaves/Pudina – 1/2 cup
Cilantro/Kothmir – 1/2 cup
Toasted sliced Almonds/Bareek Kata Badaam – 2 tbsp
Fried Red Raisins and Cashwnuts/Tala-huwa Kishmish – 3 tbsp
Pinch of Saffron threads/Zaafraan soaked in 1/2 cup warm Milk
A dollop of Butter/Makhan or Clarified Butter/Ghee (optional)
For the Rice
Long Grained Basmati Rice/Chawal (preferably ‘Lal Qilla’ Brand) – 4 cups
Salt/Namak – 4 tsp
Black Cumin seeds/Shah Zeera – 1 tsp
Method:

1. Wash and soak the rice in a big bowl for about 30 minutes.
2. In a pressure cooker at medium high heat, fry the onions in oil/butter until they are golden brown in colour. Remove with a slotted spoon on a kitchen towel and reserve half for garnish. Blend the other half in 2 tbsp water inoi a paste.
3. In the same pressure cooker, with oil/butter in it, add the washed cubed meat pieces, Stir fry till the meat has browned on all sides. Add the fried onions paste and the ginger garlic paste and turmeric. Saute them for 2 minutes. Throw in the red chilli powder, salt, garam masala, half cup water, and yogurt. Mix well and pressure cook for about 15-20 minutes until the meat is tender.
4. Meanwhile drain the soaking rice and keep aside. Bring 9 cups of water in a to boil in a large saucepan with Black cumin seeds and salt (do not forget to add salt to the rice!!) in it. As soon as its boiling, add the drained rice and let it cook till the rice grains are just done. Drain and keep aside.
5. Now, open the lid of the cooker and cook the meat mixture well without covering the lid on medium high heat until the meat mixture is done and most of the liquid has dried up. It should be a little bit dry mixture.
Add lemon juice to the meat and mix. Remove from heat.
6. Preheat the oven to 350°F.
7. In a large oven proof baking dish, add half of the rice in a layer at the bottom of the dish. Now add the whole meat mixture in one layer. Then cover it with the remaining rice completely and work gently, try not to break the rice kernels.
8. Garnish the layered rice with the reserved fried onions, mint and coriander leaves, slit red and green chillies, toasted and fried nuts, and sprinkle the milk with saffron threads in it. You can also add a dollop of butter if you wish.
9. Cover the dish with a tight lid or aluminium foil and keep it in the preheated oven for about 10-15 minutes, till a nice steam has formed inside.
10. Before serving, dig the spoon into the dish till the base and take the rice and meat in a bowl. mix it and serve it hot.

Tip: Adding salt to the water in which you cook rice is essential, or else the whole taste of Biryani turns upside down. One tip if you have forgotten to add salt to the water while boiling rice is – stir the required amount of salt in a little quantity of hot water, about half cup or a few tablespoons, and pour this on the biryani evenly. Warm the biryani in microwave and serve immediately.

Suggested Accompaniments: Mirchi Ka Salan or Baghare Baingan or Dahi Ki Chutney or Tomato Chutney.

This is my entry for Meeta’s Monthly Mingle-One Dish Dinners

Luv,
Mona
AddThis Social Bookmark Button

Khichdi aur Till ka Khatta

February 28th, 2008 Mona Posted in Basmati Rice/Chawal, Canola Oil, Cereal Grains, Dals (Pulses & Legumes), Eid/Ramadhan/Iftaar, Fats and Oils/Tel, Ginger-Garlic paste, Hyderabadi special, Onion/Pyaaz, Red Lentils/Masoor ki Dal, Roasted Sesame seed paste, Salt/Namak, Spices & Seasonings/Masaale, Turmeric/Haldi, Vegetables/Tarkariyaan, Yellow Onion/Pyaaz 12 Comments »

Khichdi always reminds me of my childhood when on every friday afternoon, by the time my father would come home for lunch from the masjid after the Jummah Salah, my beloved Ammi would prepare and serve Khichdi piping hot along with its accompaniments. The beautiful aroma of Khichdi used to fill the house provoking our taste buds. This dish is uniquely tasteful and very comforting, and we all used to enjoy the meal to the last morsel.. Sweet old memories!

Split Red Lentils-Masoor dal and Basmati Rice

This dish is also sometimes prepared at breakfasts in Hyderabad, especially when someone is invited for a brunch or a breakfast. Khichdi is most usually enjoyed with accompaniments such as Khatta (see below for its recipe), Qimah, Mango Pickle/Keyri Ka Achar, Papad, Qageena and Cilantro and Mint Chutney/Hara Dhaniya aur Pudine ki Chutney or the Till ki Chutney. Everyone is allowed to help themselves with whatever he/she likes as an accompaniment with Khichdi. My grandmother/dadi used to loved it along with the chutney the most. It is also very delicious when had as it is with no accompaniments. The ginger garlic paste and onion are the main flavor ingredients and give the dish a sweet-pungent flavor.

Khichdi is best for upset stomachs and diarrhoeas. Add a little water to the prepared Khichdi and pressure cook it a little more so that the rice is very soft. Mash it lightly with the back of a wooden spoon. Have it along with yogurt. You will definitely feel good as it is easy to digest and very nutritous.

Khichdi – Red Lentil Rice

I like my Khichdi piping hot. As soon as it gets prepared I serve it along with its accompaniments. So I prepare the accompaniments well before the khichdi is to be prepared, so that everything can be served all at once. Warm Khichdi is so very comforting in these wintery days. It gives immense gratification to the soul.

Khichdi – Red Lentil Rice

Ingredients:

Basmati Rice – 2 cups
Masoor Dal/Red Split Lentils – 1/2 cup
Canola Oil/Ghee – 4 tbsp
Cinnamon stick – 1 inch stick
Cardamom – 2, whole
Green chillies – 3, each slit into two
Yellow Onions – 2, medium size, finely sliced
Ginger-Garlic Paste – 1 heaped tbsp
Salt – 2 tsp
Turmeric – 1/4 tsp
Water – 4 cups

Method:

1. In a big bowl, wash together the split red lentils and rice very well. Soak them in surplus fresh cool water for about 30 minutes.
2. In a heavy bottomed deep non stick saucepan at medium high heat, pour oil and let it warm up.
3. As soon as it gets warm, throw in the sliced onion and stir fry them till they are all light brown in colour.
4. Meanwhile drain the soaking dal+rice in a strainer and keep aside.
5. Now add cinnamon stick, cardamom, ginger-garlic paste, turmeric, green chillies, salt to the frying onions and reduce the heat to medium. Fry the spices along with the onions for a minute or two. Add the water retaining 2/3 cup water to add later. Increase the heat to high and let it come to a boil. Once boiling add the drained dal+rice to it and gently mix it all well and let it come to a boil once.  Once boiling, lower the heat to medium and cover with a lid, and let cook until the rice has absorbed all water, 2-4 minutes. Add the remaining water and mix gently. Cover with a lid and lower the heat to minimum and let cook until the water has almost all been absorbed and the rice is almost soft. Close the heat and leave to rest for about 10 minutes. During this time nice steam will be built up and the rice will all be cooked further to perfection. Serve hot along with above suggested accompaniments. Enjoy.

Suggested Accompaniments: It is had along with Khatta (see below for its recipe), Qimah, Mango Pickle/Keyri Ka Achar, Papad (I love Lijjat Papad), Qageena and Till ki Chutney or Hara Dhaniya aur Pudine ki Chutney

I am sending this as an entry to ‘Think Spice, Think Turmeric‘ event being hosted by Sudeshna.

Updated-Nov 07, 2008:

On the request of a few readers of my blog, I am updating this post with the recipe for ‘ ‘Till ka Khatta’. Roasted sesame seed paste is added to the thin tamarind water and then tempered along with aromatic spices. This thin soup is then used to wet the khichdi. Here’s the recipe:

Til ka Khatta – Sesame seed flavored Tamarind Water

Ingredients:

For the Tamarind water:

Tamarind paste – 4 tbsp
Water – 2 cups
Salt – to taste
Cilantro/Dhaniya – 1 tbsp, finely chopped
Mint leaves/Pudina – 1 tbsp, finely chopped
Yellow Onion – 1 tbsp, finely chopped
Ginger-Garlic paste – 1/3 tsp
Dry roasted Sesame seed paste (or blanched Almond paste) – 1 tsp

For Baghaar:

Canola oil – 2 tsp
Fresh Curry leaves – 4-6
Cumin seeds – 1 tsp
Small green chilli – 1, fresh, slit into two

Method:

1. In a bowl mix all the ingredients under the heading – ‘For Tamarind water’.
2. Heat the oil in a small saucepan, and add curry leaves, cumin seeds and chopped green chillies. Fry for a minute. Immediately add the above prepared tamarind water and let it come to a boil. Cover with a lid and remove from heat. Serve along with Khichdi.

And it is not the end, I have another pleasing information to share with you all, Priya of 365 Days of Pure Vegetarian and Lubna of A Hyderabadi Foodie’s Cookbook, have again presented me with the Nice Matters Award, Thanks Dear. I’m honored!

Luv,
Mona

AddThis Social Bookmark Button