Pasta is loved by everyone, and i believe it is one of those simplest one dish meals one can think of which is also everyone’s favorite for times when you have to serve the meal in less than 35 minutes. This is one such dish that i prepare using the usual ingredients and turns out to be a great hit with my loved ones.
This is my lovely Sisters recipe. She taught me this recipe and i prepare this along with any noodles that I have in my house. I also serve it along with Chicken Tikka, Salmon Tikka or Lamb Tikka. Children will especially devour upon it, and the elders too.
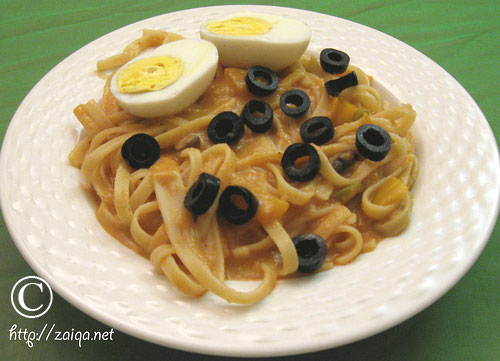
Fettucine in Creamy Coconut Milk
Coconut Milk here makes a creamy sauce giving it a rich golden colour. Its healthy and nutritious.
Fettucine in Creamy Coconut Milk
Ingredients:
To Prepare Sauce
- Canola Oil – 4 tbsp
- Yellow Onions – 2, thinly sliced
- Tomatoes – 1, large, finely diced
- Red Chilli Powder – 2 tbsp
- Salt – 2 tbsp
- Garam Masala – 1 tbsp
- Cornmeal – 2 tbsp
- Coconut Milk – 3 tbsp
- Light Cream – 1 tbsp
- Water – 2 cups approx
- Green Capsicum – 1, chopped
- Red Capsicum – 1, chopped
- Cremini Mushrooms – 100 gms, sliced
To Prepare Pasta
- Fettuccine Noodles – 500 gms
- Water – 5.5 litres
- Salt – 1 tbsp
Method:
- In a heavy non-stick saucepan at medium high heat, pour in oil and as soon as it warms up, add the sliced onions and sauté them till they are light brown in colour. Add the chopped tomatoes, red chilli powder, salt and garam masala. Mix and let it cook on medium heat till the tomatoes are mushy.
- Transfer the mixture to a blender container and add cornmeal to it. Blend till pasty.
- Pour this paste back in the same pan and let it cook till oil seperates.
- Add Coconut milk, cream and water to it. Let it cook for 3 minutes.Throw in the chopped red and green capsicums and mushrooms. Bring to a boil at medium high heat.
- Meanwhile in a large saucepan , pour water and add the remaining salt to it. Bring it to a boil and add the pasta and stir until water again returns to a boil. Cook uncovered for 9 minutes stirring occassionally or until al dente. Drain.
- Mix the drained pasta with the prepared Coconut milk sauce in the saupan and cook on low heat for 3 minutes.
Suggested Accompaniments: Serve it hot along with Boiled halved Eggs, and sliced Black Olives, Chicken Tikka or Lamb Tikka or Salmon Tikka, Chicken Croquettes, Pan Grilled Chicken Mustard, Grilled Sweet Chilli Chicken.
Luv,
Mona