I miss my uncle a lot whenever I prepare this curry at my house. He loves this curry to no extent and would always pour some tablespoons of the silky bright sunny colored yogurt gravy into his plate after he finished his meal to savour upon it in the end. I always enjoyed seeing him doing so. It feels so nice to see someone enjoy food to the last morsel.

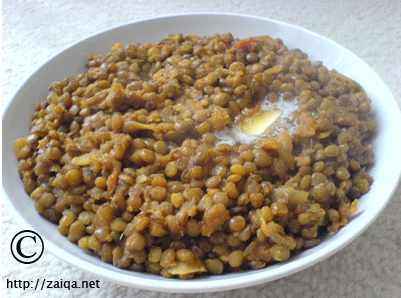
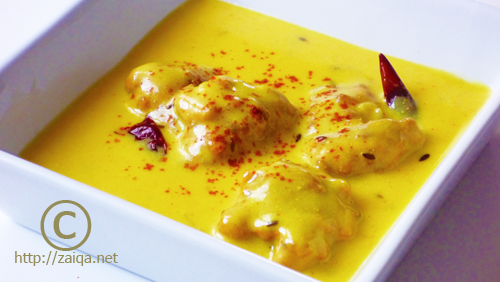
Dahi Ki Kadi – Gram Flour Dumplings in a silky yogurt gravy
Dahi ki Kadi is an another dish prepared in most Hyderabadi houses very commonly. It is a simple curry with a thick yogurt gravy with a bright gold tint due the added spice especially for the color, turmeric. Gram flour is also added to give it a little volume. Be careful while you add turmeric to it, as too much turmeric will give a bitter taste to the curry. So be very careful while using this spice for color in this dish.
The dumplings are made of gram flour, chopped onions, spices and herbs. This is the customary method of preparing the bhajiyas for the dahi ki kadi. I sometimes substitute onion with cauliflower florets, and add the cauliflower fritters to the kadi for a new and different taste. You can try it, with different vegetables too.
This curry is usually is not reheated later. The left over is generally had cold from the refrigerator, with plain boiled rice or Khushka. I prepare this curry along with an another dry curry as a side dish.
Serves : 6-8
Dahi Ki Kadi – Gram Flour Dumplings in a silky yogurt gravy
Ingredients:
For the Kadi (Kadi is the thick yellow coloured yoghurt gravy in which the Bhajiya are added later)
Yogurt – 750 ml
Turmeric – 1/2 tsp
Water – 3 cups
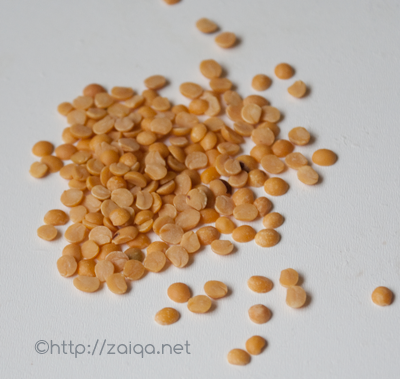
Besan/Gram Flour – 1/4 cup
Red chilli powder – 1 tsp
Salt – 1 tsp
Onion – 1, small, finely chopped
For the Baghaar (Baghaar is the Tempering. It is the flavored oil added to curries in the end for garnishing and flavoring the dish)
Canola Oil – 4 tbsp
Cumin seeds/Zeera – 1 tsp
Dried Red Chillies – 2, each cut into half, seeds shaken away
Garlic – 1
Curry leaves – 6
Canola/Sunflower Oil – 3 tbsp
For the Bhajiya (Bhajiyas here are the fritters/dumplings added to the yogurt gravy)
Gram Flour – 1/2 cup
Water – to make paste
Red chilli flakes or Finely chopped small green chillies – 3/4 tsp
Salt – 1 tsp
Cilantro and Mint leaves – 1/2 cup, finely chopped
Ginger-Garlic paste – 1 tsp
Canola/Sunflower Oil – for deep frying
Dahi Ki Kadi – Gram Flour Dumplings in silky yogurt gravy
Method:
1. In a bowl, whisk the yogurt till smooth and creamy and keep aside. Mix in the gram flour,water, turmeric powder, salt and red chilli powder, and pass the mixture throw a strainer into a deep and heavy bottomed non stick saucepan. Mix well using a spoon and let cook at medium low heat and keep stirring constantly and gently until it comes to a boil once. Once it is boiling, let it simmer uncovered for about 30-45 minutes or until the raw smell of the gram flour goes away. Keep stirring it occasionally to avoid it getting burnt at the bottom.
2. In the meantime, put a kadai or wok on medium high heat with oil enough to prepare the gram flour bhajiyas/fritters. Now, in a small bowl, mix together the gram flour, the ginger garlic paste, red chilli flakes/green chillies, cilantro, salt and water just enough to make a thick paste. Drop teaspoons of this paste at a time into the hot oil,leaving space between them, and deep fry the bhajiyas/frittes till they swell up and are golden in colour. Remove with a slotted spoon and keep aside on a paper towel.
3. Now in a small non stick pan, pour oil and throw in the cumin seeds, crushed garlic pod, curry leaves once the oil is hot. Stir fry the seeds till they splutter and change colour for abour a minute. Add the dried red chillies, and remove from heat. This is the Baghaar.
4. Finally, check the deep pan in which the kadi has been cooking. If it has attained a consistency of a loose gravy, it is done (make sure it not very thin, and also not too thick in consistency or else later on when it gets cooled, it will become like a cake. If it has become thick, add a little water, and if it is thin, cook it for a little more time). Now add the chopped onion and the fried bhajiyas to the kadi and give a stir to dip them in the curry. Pour the prepared baghaar over the curry and serve it warm.
Note: While preparing Kadi, one has to take a few precautions in order to avoid getting the yogurt curdled:
1. Once you mix the yogurt with all the ingredients and strain it, make sure that the yogurt is well blended.
2. When you begin cooking the kadi, make sure you cook it at a medium low heat and keep it stirring it until it comes to a boil.
Suggested Accompaniments: Talahuwa Gosht and Chawal
I am sending this as an entry to ‘Think Spice, Think Turmeric‘ event being hosted by Sudeshna.
Luv,
Mona