Tuna Avocado Salad

August 9th, 2010 Mona Posted in Avocado, Black pepper powder, Cilantro/Kothmir (fresh), Dill/Suvabhaji (fresh), Green Chillies, Lemon/Nimbu, Salt/Namak, Tuna 6 Comments »

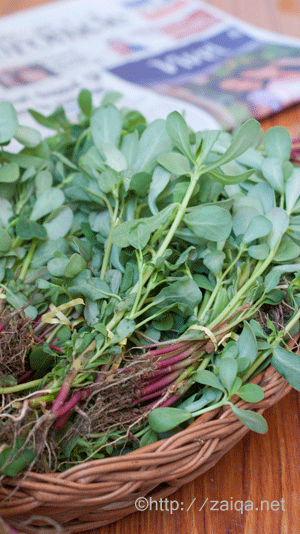
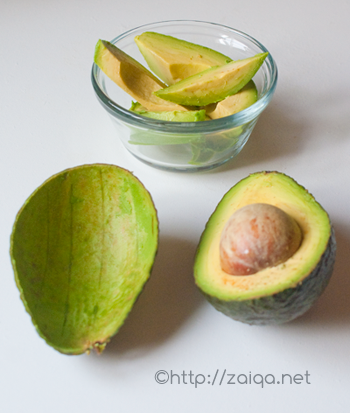
Avocado, with more than 500 varieties and chock full of healthy nutrients, is one of my favorite power fruits. The first time I had tasted it in Toronto, I was a little apprehensive if I would fancy its taste or not. But as it is so good for health, I kept getting one every time I visited the market and began having chunks of this fruit every once in a while at breakfast instead of mayo in my sandwich. And oh boy, I eventually fell in love with it.

If unripe when bought, keep them wrapped in a newspaper at room temperature for a few days until they are ripe and yield slightly to pressure. Once ripe, cut around the pit using a sharp knife, twist the halves to open the fruit. Carefully whack a knife on the pit, twist to remove and discard the pit. Cup the avocado halve, score and scoop out flesh. Cut avocado reacts with air and browns just like an apple, so it is better to use it immediately.

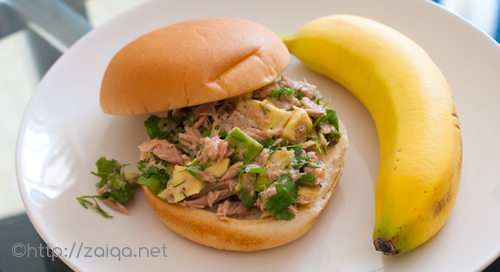
I was eyeing this recipe from one of my most favorite and inspiring chefs from Food network~Micheal Smith, since long. I tried it and whipped up this yummy quick salad/sandwich filling for a yummy evening snack along with chai and a banana on the side.

Tuna Avocado Salad
(Inspired from Chef Micheal Smith’s recipe)

Ingredients:

Canned tuna, packed in water – 1 can
Avocado – 1, pitted and peeled, chopped
Lemon juice – 2 tbsp
Dill leaves – 1/4 cup, finely chopped
Cilantro – 1/4 cup finely chopped
Green chillies – 2, finely chopped
Salt and Black pepper powder – to taste

Method:

Combine all in a mixing bowl, toss together to mix. Serve as a sandwich or in a wrap.

Luv,
Mona

AddThis Social Bookmark Button

Sun-Dried Food Products Series ~ III: Dal ki Badiyan

July 30th, 2010 Mona Posted in Ginger-Garlic paste, Green Gram/Moong ki Dal, Green Onion/Hari Pyaz, Hyderabadi special, Red Chilli powder, Salt/Namak, Turmeric/Haldi 12 Comments »

Among all those amazing dried products that one can make during hot Indian summer days making use of the strong sunshine, dal ki badiyan are the ones I really love.

Badiyan are tiny sun dried lentil nuggets, which are nutritious and an excellent substitute for meat in curries. Many varieties of badiyan are available ready made in stores. But nothing compares to these homemade variation that I am addicted to since childhood.

Dal ki Badiyan ~ Sun Dried Lentil Nuggets

Split and skinned green gram/Moong ki Dal – 500 gms
Hari Pyaz/Spring greens, finely chopped – 3 cups (only the greens, not the white)
Ginger-garlic paste – 1 tbsp
Turmeric powder – 1/4 tsp
Salt and Red chilli powder – to taste

Method:

1. Soak the dal for 2 hours in fresh cool water. Later, drain and wash the dal in several changes of water. Once washed and drained, puree the dal in blender adding just enough water to aid in the process. (Note: Do not add too much water, or else the badiyan will not form properly)
2. In a mixing bowl, add the pureed dal, chopped spring greens, ginger garlic paste, turmeric powder, red chilli powder and salt. Mix thoroughly.
3. Drop blobs of the prepared mixture on a clean and dry tray or a rimmed baking sheet using your hands or a spoon. Leave the tray in the sun during daytime and bring the tray indoors when dark. On the first night, gently scrape the partially dried badiyan and invert them so that the next day the bottoms also get nicely dried up in the sun. It usually takes 3-5 days under hot sun for the badiyan to completely get dried.
4. When completely dried, transfer the badiyan to an air tight container and store at room temperature or in the refrigerator. Be careful and keep away from moisture.
5. Always shallow fry a few needed badiyan in some oil until the color changes to golden brown just before consumption. Do not burn them or else their taste will worsen. Consume the crunchy shallow fried badiyan on the side to your meals, or add the shallow fried badiyan to any of your favorite curries or soups and cook for just a few minutes.

Dal Ki Badiyan Pictorial

Blobs of the mixture on tray, ready to be sun dried

Badiyan – Sun drying

Shallow fried Badiyan, ready for consumption

Preparing Dal ki Badiyan in Oven:

If you live in areas where sunlight is scarce and plays hide and seek with you, you can even prepare badiyan in the oven. Just lightly spray or brush the tray with a little bit of cooking oil, then drop the batter on the tray as shown above and place the tray in the oven pre-heated at the lowest setting. Let it bake for around 2-3 hours. Shake the tray after every hour. Keep a close eye and as you observe they are completely dried up, remove and let them cool on a rack. Once completely cool, transfer to air tight containers and store until needed. Shallow fry a few needed the badiyan in a little oil and enjoy when fancied.

Other Amazing sun dried Indian food products from this series are:
1. Sukhi Dahi Mirch – Sun dried Yogurt Chillies
2. Dhoop Nimbu ~ Sun Preserved Lemons

AddThis Social Bookmark Button

Kulfa ki Katli

May 20th, 2010 Mona Posted in Bok Choy, Canola Oil, Cumin seeds/Zeera, Curry leaves (fresh), Dried Red Chillies, Garlic/Lahsun, Hyderabadi special, Purslane leaves/Kulfa ki bhaji, Red Chilli powder, Salt/Namak, Tamarind/Imli, Tomato/Tamatar (fresh), Turmeric/Haldi, Yellow Lentil/Tuvar ki Dal/Toor dal 42 Comments »

Its a wonderful day today in Hyderabad. The weather is the coolest it has ever been since I landed here, and my jet lag seems to be fading away gradually. So, I thought this morning as the perfect opportunity to visit the wholesale market in Hyderabad at Gudimalkapur, and indeed the visit was totally worth it. The market was a frenzy, but a treat my sore eyes. There were huge piles of fresh greens, seafood, vegetables and fruits, flowers and I bought all that I could at very reasonable prices.

Kulfa ki bhaji ~Purslane

To start with I chose Kulfa ki bhaji (in Urdu language), (Purslane in English) that I bought to cook and satisfy my long patience. It had been more than 3 long years since I had tasted Kulfa ki bhaji and many other such basic fresh vegetables and fruits available here in Hyderabad. Purslane is a succulent with thick leaves and reddish stems and a crisp citrusy taste.

Today my Ammi prepared Kulfa ki Katli, a dal preparation cooked along with Kulfa ki bhaji, tomatoes, tamarind and other aromatic spices. Aloo Methi and Khushka were accompaniments to this humble dal concoction and I thoroughly enjoyed my meal.

Kulfa ki Katli – Purslane simmered in Aromatic and Tangy Dhal

Ingredients:

Thick Tamarind concentrate – 1/4 cup
Kulfa ki bhaji/Purslane – washed and drained, tender leaves and stems chopped fine, roots discarded ~ around 3 cups, loosely packed
Tuvar ki dal – 1 cup, washed in several changes of water and drained
Red chilli powder – 1 1/2 tsp
Salt – to taste
Turmeric powder – 1/4 tsp
Curry leaves – 1 sprig
Tomato – 1, medium sized, roughly chopped
For Baghaar:
Canola oil – 4 tbsp
Cumin seeds – 2 tsp
Dried red chillies – 2, each split into two
Garlic pods – 2, finely chopped
Curry leaves – 2 sprigs

Method:

In a pressure cooker, add the washed dal, red chilli powder, turmeric powder, tomatoes, salt and curry leaves. Add about 4 cups water and pressure cook until the dal is mushy. Once done, mash the dal with a dal ghotni, or blend it until smooth. Add the chopped purslane and gently mash just a little bit. Add tamarind and pour in more water to adjust the consistency. Let it cook on medium high flame. Meanwhile prepare baghaar, add oil to a small frying pan at medium high heat. As soon as it is hot, add the baghaar ingredients and let them splutter for just a few seconds. Immediately pour this baghaar hissing into the cooking dal. Let the dal cook for a further 5-10 minutes. Serve warm along with rice and a curry of your choice.

I have never been able to find this green leafy vegetable/herb in Toronto. If anyone of you living in Toronto has been able to spot Purslane at grocery stores, please let me know. Also, if anyone is willing to trade seeds with me, I am more than happy. Please contact me if interested.

Note: If Purslane is unavailable you can try this recipe with any of your favorite greens. I have tried this dal using baby bok choy and spinach.

Luv,
Mona

AddThis Social Bookmark Button

Palak Gosht

May 3rd, 2010 Mona Posted in Canola Oil, Coriander seeds, Dill/Suvabhaji (fresh), Ginger-Garlic paste, Green Chillies, Hyderabadi special, Lamb/Beef/Mutton/Veal/Sheep, Red Chilli powder, Salt/Namak, Spinach/Palak ki bhaji, Tomato/Tamatar (fresh), Turmeric/Haldi, Yellow Onion/Pyaaz 24 Comments »

One of the most usual accompaniments to khatti dal and rice, or parathas at meals, palak gosht is a simple spinach+meat medley that both nourishes as well as satisfies. It is comfort food for me. Give me this combination and I will happily gobble it all up anytime.

Fresh Spinach leaves – Palak

You can even use frozen spinach as it will save both time and effort. However, fresh is best and always recommended. Make sure you wash the fresh spinach leaves well before use.

Palak Gosht – Spinach Meat curry

Ingredients:

Lamb Meat with bone – 500 gms
Canola oil – 2 tbsp
Onion – 1, medium, finely sliced
Red chilli powder – 3 tsp
Green chillies – 6, chopped
Salt – 2 ½ tsp
Turmeric powder – 1/4 tsp
Ginger-garlic paste – 1 tbsp
Tomato – 1, chopped
Fresh Spinach/Palak – 300 gms (or) Frozen Spinach – 300 gms
Dill leaves/Suva bhaji – 1/2 cup, finely chopped (optional)

Palak Gosht – Spinach Meat curry

Method:

1. If using fresh spinach: Wash the spinach carefully. Cut and discard the thick stems. Hold the leaves together in a bunch and cut into thin strips. Again cut these strips thinly in opposite direction.
2. In a pressure cooker at medium high heat, add oil and as soon as it warms up, add the sliced onion. Stir fry until golden brown. Add ginger garlic paste, chopped green chillies, red chilli powder, salt and turmeric powder. In a minute add the meat with bones and mix well. Cook until the meat is no longer pink. Now add the chopped tomatoes. Mix well. Pour in about 1 ½ cup fresh cool water and pressure cook until the meat is tender. Once done, open the lid and cook at medium hight heat while stirring frequently until the mixture dries up and starts leaving oil. Add the chopped spinach and chopped dill leaves and pressure cook for 3 more minutes. Open the lid and cook for 10 minutes at medium high heat. You can cook until the curry is dry, or leave a little gravy if you like. Serve warm.

Luv,
Mona

AddThis Social Bookmark Button

Tamatar ka Achaar

April 29th, 2010 Mona Posted in Canola Oil, Cumin seeds/Zeera, Curry leaves (fresh), Fenugreek/Methi seeds, Ginger-Garlic paste, Mustard seeds/Rai, Red Chilli powder, Salt/Namak, Tamarind/Imli, Tomato/Tamatar (fresh), Turmeric/Haldi 30 Comments »

Every Andhra kitchen in India is well stocked with a range of spicy pickles. Even I love to prepare and store a few pickles to compliment and add a zing to my meals. Right now, I have jars of tomato pickle, lemon pickle and mutton pickle sitting in the refrigerator.

Tomato Pickle – Tamatar ka Achaar

Tangy, sour, salty and bold on taste buds ~ Tomato pickle is one such specialty from the state of Andhra Pradesh. This pickle is not labor intensive, but it does require a little attention and time. I prepare only small batches that last for a month or so, and again keep preparing this pickle whenever I see good quality tomatoes on sale.

Tomato Pickle – Tamatar ka Achaar

Ingredients:

Tomatoes – 800 gms, red & ripe, firm, juicy and blemish free
Thick tamarind pulp – 3 ½ tbsp
Red chilli powder – 1 tbsp
Salt – 1 tbsp
Haldi – ½ tsp
Cumin seeds/Zeera – 1 ½ tbsp
Fenugreek seeds/Methi dana – 1 tsp
For Tempering/Baghaar:
Canola oil – 6 tbsp
Mustard seeds/Rai – ½ tbsp
Cumin seeds/Zeera – ½ tbsp
Ginger-garlic paste – 3 tbsp
Curry leaves – 2 sprigs

Method:

1. Wash the tomatoes, pat dry thoroughly, and cut them into quarters.
2. In a spice grinder, add the cumin seeds and fenugreek seeds and grind them individually into a fine powder.
3. In a blender container, add the quartered tomatoes, cumin seed powder and fenugreek seed powder, tamarind pulp, red chilli powder, salt and turmeric powder. Blend until smooth. Pour into a saucepan at medium hight heat and bring it to a boil. Keep stirring it frequently.
4. Meanwhile, prepare baghaar: In a small frying pan at medium high heat, pour oil and as soon as it warms up, add the mustard seeds and cumin seeds. As they start spluttering, add the ginger-garlic paste and stir fry for a minute. Add curry leaves and mix well. Immediately pour this baghaar hot and hissing into the cooking tomato mixture and mix well.
5. Once the tomato mixture is boiling reduce heat to medium and keep cooking uncovered while stirring frequently until most of the moisture has been evaporated and the tomato mixture has been reduced to a thick paste and the oil starts leaving, this might take around 1 ½ hour time of slow simmering. Remove from heat and let cool. Once completely cool, spoon the pickle into sterilized glass jars with tight lids. Store in the refrigerator and enjoy the pickle along with your meals. Stays well for around a month or two.

Luv,
Mona

AddThis Social Bookmark Button