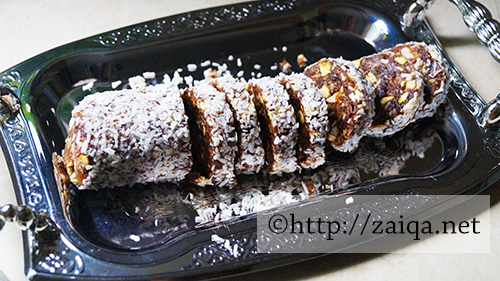
Rasgulla – Rasmalai

Posted on January 9th, 2014 by Mona ©copyrighted in Cardamom/Elaichi, Eid/Ramadhan/Iftaar, Lemon/Nimbu, Milk and Milk Products, Saffron/Zafraan, Sugar/Shakkar | 4 Comments »

One of my favorite desserts since my childhood is this Bengali delicacy Rasgulla. The white spongy balls in the sugar syrup please me to no extent. Its cousin is Rasmalai. The first time I tasted Rasmalai I remember very nicely was in one Ramadan during my childhood when we were staying at my Mama’s house for holidays. It was love at first bite.

In order to prepare Rasmalai you have to have Rasgullas. When you have guests and you need a quick dessert to make, you can use tinned store-brought rasgullas to make rasmalai, or making them from scratch is also as easy, but it needs a little time.

Rasgulla and Rasmalai 

For Rasgulla – Cheese Balls in Fragrant Sugar Syrup:
Milk – 4 cups
Lemon juice – juice of half a lemon
Water – 2 1/2 cups
Sugar – 1 cup
1 green cardamom powdered
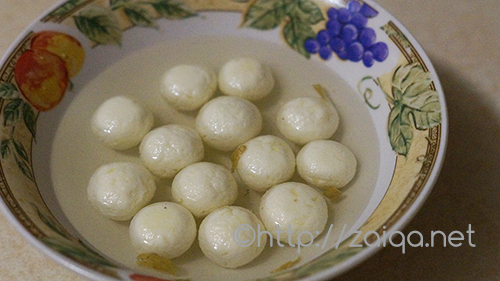
In a heavy bottomed saucepan at medium high heat, pour in milk and let it come to a boil. Once boiling, remove from heat and let cool for 10 minutes. Add the lemon juice, stir and keep aside for 20 minutes. The milk will curdle. Line a sieve with a muslin cloth and drain the curdled milk. Bring the ends of the cloth together into a bundle and squeeze it to drain water. Hang for a further 30 minutes until all the water is properly drained out. Transfer the milk solids to a bowl and knead into a soft ball. Make smooth equal sized 10-12 balls. In a pressure cooker, boil sugar in water and add green cardamom powder and the prepared balls. Pressure cook until you get a whistle. The balls will now swell up in size. Let cool, chill and serve. Or use them to make Rasmalai, recipe below.

For RasMalai – Cheese Cakes in Fragrant Thickened Milk Sauce:
10-12 Rasgullas
Milk – 3 cups
Rasgulla Sugar syrup – 3/4 cup
Saffron – a pinch

Grease the bottom of a heavy bottomed saucepan with few drops of ghee, this will prevent burning of milk at the bottom. Pour in milk and bring to a boil. Once boiling, reduce heat and let simmer for a hour. Meanwhile, take the rasgullas and gently squeeze them between your fingers to flatten them, but not break them, so that most of the sugar syrup is removed. Keep them aside in a bowl. Do not discard the sugar syrup. By now the milk will be reduced to about half its quantity. Drop the squeezed flattened rasgullas in the milk. Add the sugar syrup, saffron, dried nuts and let simmer for 15- 30 minutes. In a couple of minutes, they will soak up the milk and puff up. Remove from heat, let cool to room temperature. Serve chilled.

Note:
You can store the sugar syrup and use it to flavor tea, coffee etc. It will last a few weeks in the refrigerator.

Luv,
Mona

AddThis Social Bookmark Button

Puran ki Roti – Parathas stuffed with Lentil Halwa

Posted on December 19th, 2013 by Mona ©copyrighted in Canola Oil, Cardamom/Elaichi, Chane ki Dal, Ghee, Hyderabadi special, Salt/Namak, Sugar/Shakkar, Whole Wheat Flour/Durum Atta | 7 Comments »

It isn’t until you lose something that you realize how important something was. A few days back I was on the verge of losing my blog. My blog of years, which is very dear to me. I was asking for help around, but no one could, and those who could, were way out of my budget. But I did not give up, how could I? I prayed and alhamdulillah, out of nowhere a very hunble gentleman came to my rescue like an angel. This brother was so willing to help me out for nothing in return. I will never forget your selfless help and you will always be in my prayers.

And I realized how much I missed blogging about my family recipes, and documenting the stories that live in my heart and memories. With a little boutique business and along with a toddler, I was unable to give the attention to my blog that I used to before. But inshallah, I am back. You will all see me blog regularly and I will never take my blog for granted ever again.

Today I bring you a recipe that is very close to my heart, that screams my childhood, those beautiful afternoons, when after a small siesta, my mother would make a few of these absolutely wonderful rotis for us all to fill our stomachs with. We all enjoyed the rotis with so much joy and always looked forward to the the next time when mother would make them again.

Puran ki Roti – Parathas stuffed with Lentil Halwa
Makes – around 10 Rotis

Durum Flour – 1 1/2 cup
Ghee – 1 tbsp
pinch of salt
enough water to make dough
For Puran:
Chana Dal – 1 cup
Sugar – 1 1/4 cup
Green cardamom powder – 1/3 tsp
Oil – as required for toasting

Method:

1. Wash and soak chana dal in surplus water overnight.
2. The next day, drain the water and transfer to a pressure cooker. Add water to cover the dal and pressure cook until the dal is soft. Using a whisk or an immersion blender, blend until the dal is smooth. You can also grind it if you want. Transfer to a pan at medium high heat and add sugar and cardamom powder. Mix well and cook while stirring frequently until the dal resembles a thick paste and begins to sererate from the pan. Keep a close eye. Remove from heat and let it cool to room temperature. You can also make this ahead of time and store in refrigerator for upto a week.
3. To make dough, add flour, ghee and salt in a mixing bowl. Mix well then add water little by little. Form a soft pliable dough just like chapathi dough. Cover the dough and allow it to rest for an hour.
4. Make 10 lemon sized balls of both the dough as well as the prepared lentil mixture. Roll the dough flat just slightly using your hands, then place the lentil mixture ball in the center and wrap the dough around it completely to cover it well, just like you make stuffed parathas. Then flatten it slightly. Now using your rolling pin, roll it to a thick or thin poli. Dust flour if needed. Heat tawa pan and carefully place the rolled out roti on the tawa, drizzle oil and cook the roti on both sides until brown spots appear. Continue until all are done. Serve hot.

Luv,
Mona

AddThis Social Bookmark Button

Halal Tandoori Turkey – Roasted Turkey Desi Style with Pasta

Posted on October 6th, 2013 by Mona ©copyrighted in Black pepper powder, Bok Choy, Broccoli, Carrot/Gajar, Cilantro/Kothmir (fresh), Coriander seeds, Cumin seeds/Zeera, Garam masala powder, Lemon/Nimbu, Mint/Pudina (fresh), Olive Oil, Radish, Red Chilli powder, Red Potatoes, Salt/Namak, Turkey, Turmeric/Haldi, Yogurt/Dahi | 15 Comments »

Every Eid I try to cook something special and make the day memorable by preparing a delicious meal. I had never tried turkey before. So I was ecstatic to learn that Mina Halal is now offering zabihah by hand, Grade A, whole halal turkey through large grocery retailers throughout Ontario.

Mina Halal Turkey

Turkey is a magnificent bird. It has ultra lean, high in flavor meat and is it large enough to easily feed a gathering of 8-12. Turkey is high in protein, low in calories and one of the leanest meats around. It’s also an excellent source of B12. Dark meat from the drumstick is also an excellent source of zinc and selenium. This Eid why dont you all try my recipe in your home and impress your loved ones. They will be happy to eat something new and feel special inshallah. And when there are leftovers, you can use the meat in a multitude of ways, from soup and sandwiches, to pizza and pasta, to burgers and beyond.

I wanted to make an desi version of roasted turkey. And what better roasting technique than making a tandoori roasted bird. I served the tandoori turkey along with pasta and vegetables which I made using the broth after roasting the bird. The result was a spicy lip-smacking turkey that we all thoroughly enjoyed.

Halal Tandoori Turkey – Roasted Turkey Desi Style with Pasta

Ingredients:

Halal Turkey – fresh or frozen (if frozen thaw according to instructions)
Vegetables:
Baby Bokchoy
Carrots – chopped horizpntally into 1/2 inch pieces
Broccoli florets
Baby radish
Baby potatoes with skin (red and white)
To Marinate:
Olive oil – 3 tbsp
Hung Yogurt – 1 cup
Red chilli powder – 4 tsp
Salt – 4 tsp
Juice of one large lemon
Turmeric powder – 1/2 tsp
Roasted Cumin Seed powder – 1 tsp
Roasted Coriander seed powder – 1 1/4 tsp
Garam masala powder – 1 tsp
Black pepper powder – 1/2 tsp
Cilantro and Mint leaves – finely chopped, 1/2 cup, tightly packed

Method:

1. In a bowl, add all the ingredients for the marinade and mix well to form a paste.
2. Preheat oven to 440° F. Rinse inside and outside of turkey; pat dry with paper towels. Rub the marinate mixture all over the turkey, inside and out. Transfer to a large mixing bowl, cover with cling wrap and let marinate in the refrigerator overnight.

marinated Turkey on a bed of fresh vegetables

3. The next day, atleast 5-6 hours before serving, begin the preparation of roasted turkey. Take the turkey out of the refrigerator. In a large roasting pan, place aluminium foil to cover it. Place the vegetables in the roasting pan so that they cover the entire base of the pan. Season them with salt and pepper. Tuck wings under turkey, tie the legs together with kitchen twine, and place it in the roasting pan over the vegetables.

roasted turkey

4. Roast turkey, uncovered for 15-20 minutes until you get a nice browned color on the turkey. Then lower the heat to 325° F, and cover the turkey with aluminium foil. Roast for a furthur 3 1/2 to 4 hours, until thermometer inserted into the thickest part of the thigh registers 165 degrees. The turkey will be cooked to perfection and so soft that the meat will literally fall off the bone.

vegetables nicely done in the delicious broth

5. Transfer the turkey to a platter. Let cool for 30 minutes until you make the pasta.
6. Place a strainer over a bowl. Transfer the vegetables along with the pan juices into the strainer.

turkey meat

the base for the pasta made with broth and pasta sauce

vegetables in the strainer over a bowl

pasta served along with vegetables and roasted turkey meat

For Pasta: (Serves: 4)
7. Add 350 ml pasta sauce (I choose Garden Select) and the collected pan juices to a saucepan and let it come to a boil. Taste and add salt pepper to suit your taste. Mix and add 500 gms fusilli pasta to the saucepan and enough warm water to cover the pasta. Cover the pan and cook on medium heat. Keep stirring every few minutes. After about 10-15 minutes, lower the heat to simmer and cook covered while stirring occasionally until the pasta is done. Add more water if needed to cook the pasta. While you are cooking the pasta, debone the turkey and transfer the meat into a serving platter. Once the pasta is done, add the vegetables from the strainer to the pasta and gently mix. Serve the pasta along with turkey meat. Enjoy!

I still have a ton of leftover turkey meat mashallah. I will be posting something delicious with the leftover turkey meat in a few days inshallah.

Tip: you can store cooked leftover turkey meat once it has cooled down to room temperature in freezer bags in the freezer indefinitely. To use thaw in the refrigerator.

Luv,
Mona

AddThis Social Bookmark Button

Easy Homemade Mango Ice-Cream without a Machine

Posted on August 12th, 2013 by Mona ©copyrighted in Condensed Milk, Mango/Aam | 7 Comments »

I cant believe summer is almost gone. The chill in the air is slowly and steadily returning. So before I bid farewell to summer, I was in the mood of ice-creams. I enjoy store bought ice-creams, and love to try out different flavours and brands. But homemade is far superior to the store-bought kind – without added preservatives or stabilizers, or air whipped in to add volume.

I do not have an ice-cream maker, I would love to, but I am not really sure which one is the best in the market, any suggestions from you readers?

But what if I do not have an ice-cream machine at home, I can still make yummy ice-cream using this very simple and easy method. One of my most favorite flavors for ice-cream is Mango! then comes nutella, chai, pictachio, strawberry, vanilla and the list goes on. This simple technique will give you a delicious homemade ice-cream, which everyone in your house will enjoy. Condensed milk is a magic ingredient when making no-churn ice cream – the end result will be creamy, smooth and not at all icy.

Easy Homemade Mango Ice-Cream without a Machine

Ingredients:

Mango Pulp – fresh/canned – 2 cup, smoothly pureed
Condensed Milk/Evaporated Milk – 1 cup (with or without fat – your choice), chilled overnight in refrigerator

Method:
Pour the condensed milk or evaporated and pureed mango pulp into a large bowl. Beat with an electric whisk until thick and quite stiff for 8-10 minutes. Pour into a freezer container or a large loaf tin, cover with cling film and freeze until solid, about 6 hours or overnight. Enjoy!

Luv,
Mona

AddThis Social Bookmark Button

Celebrating Eid and Blog Anniversary with Khajoor Rolls (Sugar Free)

Posted on August 6th, 2013 by Mona ©copyrighted in Almonds/Badaam, Cashewnuts/Kaaju, Dates/Khajoor, Dry Desiccated Coconut, Fig/Anjeer (dried), Pistachios/Pista, Raisins/Kishmish | 8 Comments »

Wishing an advance EID MUBARAK to all my muslim readers and friends!

This week insha’Allah muslims all over the world will be celebrating Eid-ul-Fitr. Can you believe Ramadan is coming to an end, how quickly does Ramadan pass by every year. May Allah accept our siyam, qiyam and all other ‘ibadah that we do for His sake, ameen! Taqabbalallâhu minnâ wa minkumMay Allah accept from you and us, our fasts and deeds. Ameen ♥

There is also an another reason to celebrate. My blog turned 6 this last month Alhamdulillah. I can’t believe its been 6 years since I started this little blog of mine. Masha’Allah!! Thank you everyone for being a part of my journey. With the arrival of my baby in my life Alhamdulillah, I haven’t been able to blog as regularly as I used to. But Insha’Allah I will continue to blog and share my recipe with you all for a long time. Your support and encouragement means lot to me ♥

With two special reasons to celebrate, today I am sharing with you all a very simple, sugar free and oh so yummy sweet that you can make for your loved ones on festivals and special occasions. They are healthy, tasty and look gorgeous. Also, this is a delicious way to use up leftover dates from Ramadan.

These date rolls are dense little discs that give you a bit of energy and also cure a sweet tooth. Nice, soft, dense and chewy. These date rolls would make a delicious Eid gift that’s also loaded with nutrients. A gift that’s playful enough for a child and sophisticated enough for an adult.

Khajoor Rolls – Date Rolls (Sugar Free)

Ingredients:

Pitted Dates – 1 1/2 cup, tightly packed
Dried Figs – 3/4 cup
Raisins – 1/8 cup
Cashew nuts – 1/8 cup
Pistachios – 1/4 cup
Almonds – 1/4 cup
Dessicated Coconut – 2-3 tbsp

Method:

1. In a food processor, add the pitted dates and dried figs. Process until it is a sticky pasty ball. Transfer it to a mixing bowl.
2. Add the dry fruits and nuts to a chopping board and chop them all up roughly. Add these chopped dry fruits and nuts to the dates and fig mixture and mix well.
3. On a chopping board, shape the mixture into a log about 3 inch in diameter. Sprinkle dessicated coconut and roll the log in it to cover the entire thing with coconut.
4. Refrigerate the prepared log for 1-2 hours. Then just before serving, slice them into discs using a sharp knife. Serve. These can also be stored in the refrigerator for a long time in an air tight container with lid.

Note:
1. Instead of using dessicated coconut, you can use icing sugar or warq.
2. You can add a variety of other dry fruits and nuts that you love instead of using them ones I have listed above.
3. You can also use dark chocolate chips, oats, ground flax, chia seeds, a little bit of orange juice or lemon juice, vanilla powder or cinnamon powder etc whatever you fancy to mix with the dates.
4. Instead of shaping them into logs and then cutting into slices, you can roll them into small balls and serve in gorgeous cupcake liners as date truffles to impress the guests. Or you can even shape in the form of Barfi.

Luv,
Mona

AddThis Social Bookmark Button