Sojni ki Phalli Ka Dalcha

August 27th, 2008 Mona Posted in Canola Oil, Chane ki Dal, Cumin seeds/Zeera, Curry leaves (fresh), Dried Red Chillies, Drumsticks/Sojni ki phalli, Eid/Ramadhan/Iftaar, Garlic/Lahsun, Hyderabadi special, Red Chilli powder, Red Lentils/Masoor ki Dal, Salt/Namak, Tamarind/Imli, Tomato/Tamatar (fresh), Turmeric/Haldi, Yellow Lentil/Tuvar ki Dal/Toor dal 14 Comments »

‘Phalli’, in Urdu Lanaguage means beans or pods. 
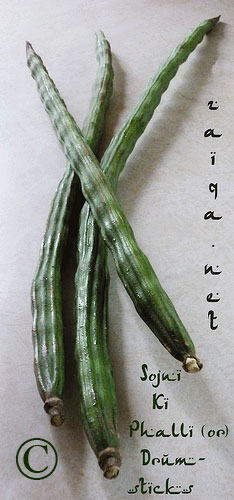
Sojni Ki Phalli in Urdu language, are also called as ‘Drumsticks’ in English language. They are long, green, slender and triangular pendulous pods which grow on the Drumstick tree or Moringa oleifera, its scientific name. The trees are drooping and are native to the Indian subcontinent mainly. The tree is very useful as it does not require any special conditions to grow well and the leaves and pods are high in nutrition. The tree is drought resistant and almost each and every part of the tree is useful to mankind. I have however never consumed the leaves of the plant, but I simply love the drumsticks.

The pods which are rich in vitamin C, iron, folic acid and calcium have an outer hard skin, winged and waxy seeds in the centre and a delicate delicious pith in between. They are very long in length, around 30 cm or more. Once cooked, the only parts of the pod consumed are the sweetish and delicate jelly like pith and the winged seeds. Be sure to look for younger looking ones which are bright green in color while you shop.Seeds show as knobbles in mature seeds, avoid these. They are available fresh at various Indian stores selling groceries, and are also sold canned. However canned or frozen drumsticks can only give you a faint impression of the real thing.

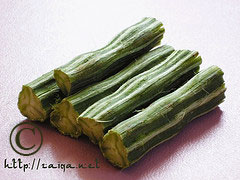
To prepare the pods, they are first washed and pat dried, top and bottom trimmed, and the outer skin is scraped slightly with knife, cut into 5-6 cm long tubes and then simmered in water and spices for 10 minutes to be added to any curry or dals and consumed. There is a particular method by which the pods are consumed. The pods are easily broken into three strips once cooked and each strip is scraped by a spoon or by running your teeth down the lenth of the strip. Some even chew the outer tough skin to extract the juices and the sweet pith and later the skin is discarded it at the side of the plate.

Among the various dishes in which these pods are added, the most favorite one enjoyed by me is Sojni ki Phalli Ka Dalcha. I remember I was a little kid when I tasted these for the first time, and I still love them immensely.

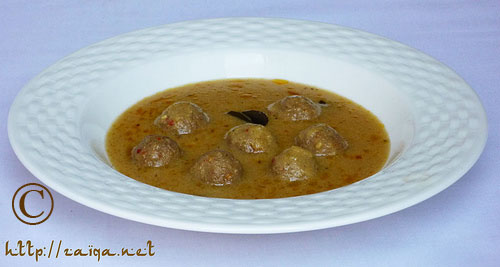
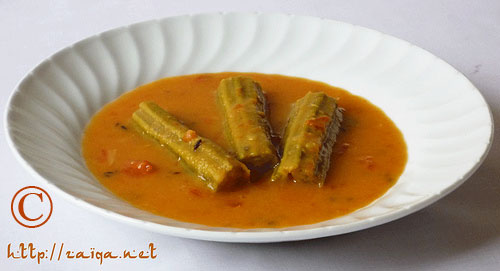
Sojni ki Phalli ka Dalcha- Drumsticks in a Tangy thin Lentil Soup

Ingredients:

Sojni ki Phalli/Drumsticks – 4, cut into small tubes-approx 5-6 cm in length (as shown in the picture above)
Tuvar ki dal/Yellow lentils (or) Masoor ki dal/Red lentils (or) Chane ki dal/Bengal gram – 1 cup
Red Chilli powder – 2 tsp
Salt – 2 tsp
Turmeric – 1/4 tsp
Tamarind concentrate – 3 tbsp
Canola Oil – 2 tsp
Curry leaves, fresh – 5-8
Dried Red chillies – 3
Garlic Cloves – 2, large, smashed
Tomato – 2, finely chopped

Method:

1. Soak the dal for about 2 hrs in surplus cool water. Later drain and boil the dal in a saucepan with 4 cups of fresh water along with a pinch of salt and turmeric until the dal is mushy. Add tamarind concentrate to the dal. With an immersion blender, puree the dal or whisk it alternatively until smooth.
2. Meanwhile, in a pressure cooker, pour oil, add the curry leaves and the dried red chillies, cumin seeds, garlic cloves and as soon as they start to splutter, add red chilli powder, turmeric, salt and the chopped tomatoes. Mix well. Add the drumsticks and pour in 2 cups water. Close the lid and pressure cook for 5 minutes or until the pods are done. To test doneness, try breaking a pod using a spoon, if it easily breaks, then it is done. Pour the pureed dal into the saucepan with the drunsticks and pour water to achieve the consistency you want. Add tamarind concentrate, and let it cook on medium for 5 more minutes. The dal is neither too thick or too thin in consistency. Serve warm.

Suggested Accompaniments: Basmati Chawal, and a Vegetarian or Non-vegeratian side dish.

This delicious dal is my entry to the event ‘Delicious Dals from India’ being hosted by Suma at her blog Veggie Platter.

Luv,
Mona

AddThis Social Bookmark Button

Kachchi Aqni ki Dum Murgh Biryani

August 23rd, 2008 Mona Posted in Almonds/Badaam, Basmati Rice/Chawal, Blog Events/Entries/Polls, Canola Oil, Caraway seeds/Shahzeera, Cardamom/Elaichi, Cashewnuts/Kaaju, Cilantro/Kothmir (fresh), Cinnamon/Dalchini, Clove/Laung, Coriander seeds, Cumin seeds/Zeera, Dry Bay Leaf/Tej Patta, Egg/Anda, Eid/Ramadhan/Iftaar, Garam masala powder, Ghee, Green Chillies, Hyderabadi special, Lemon/Nimbu, Milk and Milk Products, Mint/Pudina (fresh), Poultry/Murgh, RCI:Authentic Hyderabadi Cuisine, Red Chilli powder, Rose water/Gulab jal, Saffron/Zafraan, Salt/Namak, Tomato/Tamatar (fresh), Turmeric/Haldi, White Potato/Aloo, Yellow Onion/Pyaaz, Yogurt/Dahi 69 Comments »

Note – Read the whole post very carefully (also watch the video link I have posted at the end of the post) before you try preparing the Biryani, Please do not be overwhelmed by the length of the post. I have tried to explain each and every step briefly and as efficient as possible. Do write to me, if you have any queries. I will be glad to help you out.

Biryani is one of the most famous Hyderabadi one-dish meals craved and devoured by people from all over the world. The basic process of preparing Biryani involves the layering of raw marinated or cooked meat along with half cooked long grained aromatic Basmati rice, and a range of fresh spices and herbs for exceptional flavor and aroma.

Basically, there are two kinds of Biryani: Pakki Biryani, and Kachchi Biryani.

Pakki Biryani: where are half Basmati cooked rice is layered along with completely cooked chicken or lamb meat and then cooked till done on slow heat on dum.
1. Pakki Gosht ki Biryani
2. Pakki Murgh Biryani

Kachchi Biryaniwhich is the true Hyderabadi Biryani – where are half cooked Basmati rice is layered along with raw marinated meat and then finished on slow heat till done on dum.
1. Kachchey Gosht ki Biryani
2. Kachche Aqni ki Dum Murgh Biryani (which I am writing about today)

The preparation process of Kachchi Biryani is rather simple compared to the Pakki Biryani. In Kachchi biryani all you have to do is to marinate the chicken for overnight preferably and the next day layer it along with half cooked Basmati rice and leave it cook on slow heat/dum until completely done; whereas in Pakki Biryani you have to stand in front of your stove attending the chicken as it cooks completely, and then layer it with half cooked Basmati rice and finish it until done on slow heat/dum.

As you use the raw marinated chicken in this method, while you slow cook the Biryani on dum, the flavor of the chicken intensifies and infuses with the rice and other aromatic fresh herbs and spices giving you a heavenly aroma in the end which will fills your kitchen and your entire house.

*****

Here is the outline of the steps involved in the preparation, so that it is simpler for you all to understand the detailed method, follow these steps while you prepare the Biryani:

Outline of the steps:

Day 1:
Marinate Chicken.
Day 2:
1. Add Fried onions to the Marinated Chicken.
2. Give a smoked flavor to the Marinating Chicken with Fried Onions (
optional, but gives a very good flavor to the Biryani).
3. Prepare Basmati Rice, also called as Adhaan.
4. Arrange layers and garnish.

*****

The Detailed method:

Kachchi Aqni ki Dum Murgh Biryani
Serves – 8-10Day 1Marinate Chicken:

Chicken marinating in a bowl

Ingredients:

Chicken – 1.4 kg, with bone, cut into medium size pieces
Red chilli powder – 1/2 tsp
Green chilli paste – 1 1/2 tsp
Salt – 2 tsp
Turmeric/Haldi – 1/2 tsp
Tomato – 2, medium sized, pureed (optional)
Ginger-Garlic/Adrak-Lahsun paste – 2 tbsp
Yogurt – 2/3 cup, lightly whipped
Freshly squeezed Lemon Juice – 1/2 cup
Garam masala – 2 tbsp
Green Cardamom powder – 1 tsp
Dry roasted Cumin seed powder – 1 tsp
Dry roasted Coriander seed powder – 1 tsp
Fresh Cilantro and Mint – 2 tbsp, roughly chopped

Method:

In a large bowl marinate the chicken with all the ingredients. Make sure all the pieces of chicken are coated in the marinade. Cover and leave in the fridge overnight.

Day 2.

1) Adding Fried onions to the marinated chicken:

Ingredients:

Canola Oil – 3/4 cup
Finely sliced Yellow Onions – 800 gms
Salt – 1 tsp

Method:

1. Remove the marinating chicken from the fridge and let it come to room temperature.
2. Meanwhile, pour oil into a large non-stick frying pan at medium high heat. As soon as it gets warm, throw in the sliced onions and add salt. Stir fry until they are evenly golden brown in color. Make sure they do not burn them. Using a slotted spoon, remove the onions from the oil into a platter. Divide the fried onions into two equal parts and add one half of the fried onions to the marinating chicken and mix well. Spread the other half on a tissue lined platter to be used later for garnish, until cool. Once they are cool, they crisp up. Also divide the oil in which the onions were fried into two equal parts. Add one part of the oil into the marinating chicken and mix well. Reserve the other half to be added to the rice as the top layer along with garnish later on.

2) Give a smoked Flavor to the Marinating Chicken (optional step, but gives a really good flavor to the Biryani. I recommend you try this atleast once. Skip to the step 3 if you want to avoid)

Ingredients:

3 or 4 Burning Charcoal briquettes
Canola oil/Ghee – 1 tsp
Disposable aluminium foil tray/loaf pan

Method:

1. Make a well in the center of the marinating chicken in the bowl so that the mini aluminium loaf pans fits into it perfectly. My Ammi uses an onion skin for this purpose. With the help of tongs, carefully put the burning charcoal briquettes into the aluminium loaf pan.
2. Pour about a teaspoon of oil/ghee onto the charcoal. You will see that dense fumes start forming.
3. Immediately cover the bowl with a lid, so that the fumes do not escape. Keep it aside until you prepare the rice.

3) Preparing Basmati Rice/Adhaan:

Ingredients:

Long grained Basmati Rice (preferably ‘Lal Qilla’ Brand) – 4 cups, presoaked in water for 30 minutes
Salt – 3 tsp
Bay leaf/Tej Patta – 1
Cloves – 3
Green cardamom – 4
Cinnamon stick – 3/4 inch
Caraway seeds/Shah Zeera – 1 1/2 tsp
Water – 9 cups

Method:

1. Wash the rice and soak it in surplus water for about 30 minutes.
2. In a large cooking pot pour in water along with cloves, bay leaf, cardamom, cinnamon, caraway seeds and salt. Give it a stir, cover and let it come to a boil. (While the rice is boiling, follow the steps below under ‘Arranging layers and Garnish’ until step 4 and be ready)
3. Once boiling add the rice and mix gently, let the rice cook until it is half done, 2-3 minutes. Drain the rice and keep aside.

4) Arranging layers and Garnish: (Work fast while the rice is still hot! and try not to let the rice cool down)

Ingredients:

Marinating Chicken
Boiled, Quartered and shallow fried Potatoes – 2 cups (optional)
Mint leaves/Pudina – 1/2 cup, loosely packed, roughly chopped
Half cooked rice prepared earlier
Cilantro/Kothmir – 1 cup, loosely packed, roughly chopped
Ghee – 2 tsp (optional)
Reserved Fried Onions for garnish
1/4 Saffron strands, crushed and steeped in 1/4 cup warm milk
Rose water/Gulab Jal – 1 tsp (optional)
Green Cardamom seed powder – 1/2 tsp (optional)
Toasted Almonds and Cashewnuts – 1/2 cup total (optional)
Shelled Hard Boiled Eggs – 6-8 (optional)
Dough to seal the edges of the Casserole dish (optional)

(I use the ingredients stated as ‘optional’ only during parties when guests are invited)

Method:

1. Preheat the oven to 550°F (only if using an oven to prepare it on Dum, read below)
2. Carefully lift the loaf pan containing the charcoal briquettes from the marinating chicken, and discard it.
3. In a heavy bottomed casserole dish (which can be used in Oven-if using the Oven method (or) which can be used on stove-top-if using the Stovetop method – read below), arrange the marinating chicken along with all its juices in a single layer. Do not crowd it. (Use two casserole dishes if needed)
4. Spread the chopped mint leaves and the shallow fried potatoes (if using) over it.
5. Now add the drained warm half cooked rice prepared earlier and spread it nicely to cover the chicken all over. Reserve about 1 1/2 cups cooked rice for the top most layer.
6. Next, spread the chopped cilantro, toasted almonds and cashewnuts, hard boiled eggs (if using), reserved fried onions, cardamom seed powder and pour ghee (if using) and the saffron soaked in milk and rose water all over the rice. Add the 1 1/2 cup reserved rice and spread as the top most layer to cover evenly. Now pour the reserved oil in which the onions were fried evenly all over the rice.( I do not add fried onions over the top layer of rice to avoid getting the onions and herbs blackened or burned by steam).
7. Cover the dish with an aluminium foil or a tight lid (or) seal the edges with a dough and cover with the lid tightly, you can use some weight over the lid, so that no steam escapes.

Lid sealed with dough and being cooked on stovetop

If using an oven to cook:
Put the sealed casserole in the preheated oven at 550°F for 20 minutes. Later, lower the heat to 300°F and leave the casserole dish in the oven for about 30 minutes. Remove from dish from oven once done.

If you are cooking on stove top:
1. Take a flat Dosa Tawa or a griddle pan and put it on the stove at high heat. As it gets warm, put the casserole dish on the tawa and let it cook for about 5 minutes on high heat.
2. Later, lower the heat to medium and let it cook for about another 15 minutes.
3. Now, reduce heat to very low and let cook for another 15-20 minutes and your Biryani will be done by now.

Once done, let the dish rest for 30 minutes. Later, open the lid and a heavenly aroma fills your house inviting all your house members. Carefully dig your spoon deep into the casserole dish until it touches the bottom, and gently mix the rice with the chicken until it is all completely mixed. Serve immediately.

Tip: Adding salt to the water in which you cook rice is essential, or else the whole taste of Biryani turns upside down. One tip if you have forgotten to add salt to the water while boiling rice is – stir the required amount of salt in a little quantity of hot water, about half cup or a few tablespoons, and pour this on the biryani evenly. Warm the biryani in microwave and serve immediately.

Suggested accompaniments: I enjoy my Biryani with Mirchi Ka Salan or Baghare baingan and Dahi ki Chutney as a side dish, and glass of chilled coke alongside. Yumm-O!

Note: You can also go through this video of ‘Khan Biryani’ showcased by VahChef, one of my favorite chefs, to get an idea on how to prepare Kachchi Murgh Biryani. His method for Khan Biryani is a bit different but quite interesting though.

I shared this recipe as part of the RCI:Authentic Cuisine of Hyderabad Event that I am hosting this month on my blog.

Be sure to read all the rules for the event and drop me your entries. The last date to send me your entries is September 15th’ 07.

Luv,
Mona

AddThis Social Bookmark Button

Amchur-Harimirch wale Kacche Gosht ke Kofte

August 15th, 2008 Mona Posted in Amchur powder, Beef Stock, Blog Events/Entries/Polls, Canola Oil, Cardamom/Elaichi, Carom seeds/Ajwain, Cinnamon/Dalchini, Clove/Laung, Cumin seeds/Zeera, Curry leaves (fresh), Dried Red Chillies, Garam masala powder, Ginger-Garlic paste, Green Chillies, Hyderabadi special, Lamb/Beef/Mutton/Veal/Sheep, Red Chilli flakes, Red Chilli powder, Salt/Namak, Sesame seeds/Til, Turmeric/Haldi, Yellow Onion/Pyaaz, Yogurt/Dahi 26 Comments »

Happy Indepedence Day all my dear Indians!

Kofta (in Urdu language, Singular-Kofta; Plural-Kofte) means meatballs. Among all the meatball curries that I prepare, two of them, the Methi-Gosht ke Kofte and this one that I am writing about today are the most favorite in my house and we devour them along with warm Naan, or Afghani Roti which I get from the market usually.

It is called as ‘Kacche Gosht ke Kofte’ as the meatballs/Kofte in this method are added raw into the hot gravy and are allowed to cook in it. The meatballs cook perfectly in the hot bubbling gravy within a few minutes. I love this technique because, as the raw meatballs cook in the hot gravy, they impert their juices and flavor and give a deep taste.

Amchur-Harimirch wale Kacche Gosht ke Kofte – Meatballs in a hot and sour gravy

The two main ingredients here are Amchur in the Kofta and Green chilli paste in the gravy. You can feel the light tartness in the meatballs when you have them and the slight hotness due to the green chilli paste in the gravy make you leave wanting for more. It is a very simple recipe.

As Ramadhan is fast appraching, you can prepare this curry in large amounts, portion it and store it in freezable plastic food storage boxes that are microwave safe. When you sit to have your meal after iftaar, just microwave the box for a few minutes, and you are done. It will save you a lot of time.

You can use ground meat to prepare this curry, or if ground meat is not available, then you can even use meat chunks to prepare it. Wash and cut the meat chunks into bite size pieces, and put the chunks along with the spices for meaballs in a food processor, and pulse till the meat is well ground and mixed with the spices. Food processor is one of the most important kitchen gadgets in my kitchen. It makes my work very easier.

Amchur-Harimirch wale Kacche Gosht ke Kofte – Meatballs in a hot and sour gravy

For the Meatballs/Kofte

Ingredients:

Ground Veal/Lamb/Goat meat (or) Veal/Lamb/Goat meat chunks cut into bite size pieces or mince – 300 grams (read the notes above)
Dry Raw Mango/Amchur – 2 tsp
Red chilli flakes – 2 tsp
Garam Masala – 1 tsp
Salt/Namak – 1 tsp
Turmeric/Haldi – 1/2 tsp
Ginger-Garlic/Adrak-Lahsun paste – 2 tsp

Kacche Gosht ke Kofte – Raw meatballs

Method:

1. In a food processor or a blender, add all the ingredients and pulse till the mixture is all well mixed. Remove it into a bowl. Take a small amount into your hand and shape into little balls (approx 1 inch in diameter) rubbing the mixture between your palms. Continue making balls untill all the mixture is completed. Keep aside.
2. Wash your hands well with soap.

TIP: To freeze meatballs ahead of time: You can prepare the meatballs and freeze them for future use.
Form meatballs, and place them on a parchment paper lined baking sheet in the freezer. Once the meatballs are hard and well frozen, transfer them to a resealable plastic bag and store in the freezer for up to 3 months. To serve, thaw and cook them in the curry.

For the Curry/Gravy:

Ingredients:

Canola oil – 4 tbsp
Yellow onion – 3 , large, thinly sliced
Salt – 1 tsp
Seseme seeds/Til – 1 tsp
Cumin seeds/Zeera – 1 tsp
Carom seeds/Ajwain – 1 tsp
Clove/Laung – 2
Green cardamom/Elaichi – 4
Cinnamon sticks/Dalchini – 1 inch stick
Ginger-Garlic paste – 2 tsp
Green chilli – finely chopped, 2 tsp
Red chilli powder – 1/2 tsp
Yogurt – 2 cup, lightly whipped
Beef Stock – 1 litre
Curry leaves – 6
Dried red chilli – 4, broken into two, seeds shaken out

Method:

1. Pour 3 tbsp oil into a large non-stick frying pan at medium heat and as soon as it warms up, add the onion and salt. Saute it for 3 minutes, then cover the lid. After 3 minutes, stir the onions, add a tablespoon of water and cover the lid again. Continue doing this until the onions are well browned and soft.
2. Add seseme seeds, cumin seeds, carom seeds, clove, green cardamom, cinnamon, and ginger-garlic paste and green chillies. Saute them for 2-3 minutes. Sprinkle red chilli powder.
3. Add the yogurt and keep strirring it continously for 1-2 minutes. Turn the heat off. Once cool, pour this gravy into a blender container and blend till finely pureed.
4. In the same pan pour 1 tbsp of oil and as soon as it warms up add the dried red chilli powder and curry leaves. As they begin to crackle in a minute or two, pour the pureed sauce back into the pan. Add the meat stock and increase the heat to medium high. Let it come to a boil.
5. Lower the heat to medium low, and gently add the meatballs one by one to the gravy in a single layer, and close the lid. Let it cook for 10-15 minutes. Keep gently giving it a stir every 3 minutes or so taking care not to break the meatballs. Serve warm.

Suggested Accompaniments: This curry goes very well along with Naan or Afghani Roti, or even along with steamed Basmati.

This curry goes all the way to Srivalli of ‘Cooking 4 All Seasons’ who is hosting the event- Curry Mela.

Also, congratulations to Jyothi of Shadruchulu for winning the title of ‘The Best Hyderabadi Blog 2008′.

Have a pleasant weekend eveyone!

Luv,
Mona

AddThis Social Bookmark Button

Turai Gosht

August 7th, 2008 Mona Posted in Canned Tomato paste, Canola Oil, Gourds, Hyderabadi special, Lamb/Beef/Mutton/Veal/Sheep, Red Chilli powder, Ridged Gourd/Turai, Salt/Namak, Tomato/Tamatar (fresh), Turmeric/Haldi, Yellow Onion/Pyaaz 11 Comments »

Turai (in Urdu) also called as Ridged Gourd (in English); other names: Ridged Loofah, Silk Gourd, Chinese Okra; is my family’s all time favorite vegetable. We all love this humble vegetable a lot. It is mostly an Asian vegetable, easily found in most of the Chinese and Indian grocery stores in the North America. This curry/Salan, about which I am going to write today, is a classic Turai preperation in my house which we usually love to have along with some warm rotis for lunch or dinner. For a vegetarian version, you can simply omit the meat and cook the Turai for a comforting vegetarian meal.

Turai are similar to cucumbers and squash, dark green or green in colour with hard and sharp ridges running from its head to its bottom, and a dull rough skin. They are available in various sizes. I describe the taste of Turai slightly sweetish and a little bland, hence it easily absorbs the flavors of the other ingredients it is cooked along. When you buy them, look for younger ridged gourds without and dark spots, as if you end up buying the mature ones, they are usually fibrous, bitter and not edible. Inside its flesh is full of water, so you need not add more water while you cook Turai.

Turai or Ridge Gourd                     Peeled and Chopped Turai

To prepare it, you need to peel the gourd with a vegetable peeler, wash and pat dry it with paper towels, slice them lengthways into two, and chop them up into semi-circular discs. The gourd being quite bland in taste, absorb the sweetish flavor of the onions, and the tangy taste of tomatoes. You will love this simple and tasty dish.

Turai Gosht – Ridged Gourd in Lamb meat and Tomato Sauce

Ingredients:

Ridged Gourd/Turai – 4 or 5, young and fresh, peeled, rinced and chopped
Canola Oil – 2 tsp
Yellow Onion – 2, large, finely sliced
Lamb meat – 300 gms, cut into bite size pieces
Turmeric – 1/4 tsp
Fresh Ripe Red Tomato – 2, large, chopped finely
Red Chilli powder –  2 tsp
Salt – to taste

Turai Gosht – Ridged Gourd in Lamb meat and Tomato Sauce

Method:

1. In a pressure cooker at medium heat, pour oil and as soon as it gets warm, add the onion, meat, turmeric and salt. Pour in 1 cup water and pressure cook it till the meat is tender.
2. Later, open the lid of the cooker and add the chopped ridged gourd/turai, chopped tomatoes and red chilli powder. Pressure cook again about 5-8 minutes.
3. Open the lid of the pressure cooker and check to see if the Turai is tender. Add a few splashes of water if needed. Serve warm.

Suggested Accomapniments: Serve along with some warm Rotis, or along with Basmati Chawal/Khushka or Plain Rice and Khatti Dal for a simple and delicious meal.

Luv,
Mona

AddThis Social Bookmark Button

Announcing RCI:Authentic Hyderabadi Cuisine

August 1st, 2008 Mona Posted in Hyderabadi special, RCI:Authentic Hyderabadi Cuisine 33 Comments »

RCI or Regional Indian Cuisine is an event started by Lakshmi of Veggie Cuisine. This month its my turn to host the RCI event for Authentic Hyderabadi Cuisine.

I am proud to be a Hyderabadi, to have spent a significant part of my life in ‘Hyderabad‘, to come to know and learn about its exquisite cuisine by my elders. Hyderabad, a princely state, the capital of Andhra Pradesh, once ruled by the descendents of Mughal generals called Nawabs, who were awfully wealthy and lived a life in utmost leisure. Hyderabadi cuisine has the influnce of the Mughalai hauté cuisine. The once Muslim ruler of Hyderabad, the last Nizam, was a direct descendant of a Moghul governer, and was known for the sumptous feasts and his love for fine dining. Hyderabadi Cuisine is an amalgamation of the Moghul Muslim cooking methods, India’s predominant Hindu culture and the Persian Cuisine as well.

Charminar (Image Source:Wikipedia)

Hyderabadi cuisine is age-old, known for its rich and aromatic flavors, with a liberal use of exotic herbs and spices, yoghurt and ghee in their food preperations. If you are ever invited by a Hyderabadi, you will definitely witness an inexhaustible and staunch sense of courtesy, ‘adab’ and graciousness which flows in every Hyderabadi’s blood and is taught to every child born in their house to treat their visitors with. Many people think Hyderabadi cuisine consists of only Non-Vegetarian food, but in fact it also consists of a range of vegetarian dishes, containing a range of spiced vegetables, lentils, peas and beans.

Hussain Sagar (Image Source:Wikipedia)

The glory of Hyderabad, known for its minarets, pearl bazaars, the cuisine, its culture and their ‘ehtemam‘, has always been admired and respected by everyone. The ‘mehmaaan nawaazi‘ of Hyderabadis will definitely make you feel like a noble aristocrat. Food is had on a ‘Dastarkhaan’ which is the dining place where all family memebers sit together and have their food. Normally, on everday basis, a Hyderabadi has a Roti or Khushka and curry, which can be lentils or vegetarian or non vegetarian side-dishes, but on a particular occasion, when there are guests, the ‘mehmaan’ are treated royaly with supreme gentility providing with the best of the food they can provide them with with. Nihari, a slow simmered, thick soup like dish with Lamb shanks in a spicy gravy which is had with a tandoor baked bread called Kulcha or Naan is a famous Hyderabadi breakfast. The other most traditional Hyderabadi breakfast is Khichdi with Qaeema or Qageena and Khatta and a pickle, usually the Mango pickle, or the Kothmir-Pudina wali Chutney to tease the tongue and not to forget the Papads. The special lunches for occasions usually consist of Qorma and Kheema with Tandoori Roti. The ‘fruit biscuits’,etc from the famous Karachi bakery; ‘Osmania biscuits’, ‘Fruit biscuits’, ‘Chand biscuits’, ‘Flower biscuits’, ‘Tie biscuits’, ‘Rote’,etc from Rose bakery are other food items from Hyderabad that I miss a lot. Both Karachi Bakery and Rose Bakery are one the oldest established businesses with food as delicious as ever.

Food being cooked in huge ‘deg’/aluminium pots
at a Hyderabadi wedding

Some of the famous Hyderabadi dishes that I can remember now which I love and miss and crave for always are, Pathar Ka Gosht, Kacchi imli ka Dalcha, Till Ki Chutney, Qubuli, Kacchi Biryani, Double Ka meetha, Baghare baingan, Nihari, Pakki Biryani-Gosht kiMurgh ki, Mirchi Ka Salan, Khichdi, Qageena, Kulfe ki katli, Ambaday aur chanay ki Dal, Til wali Gavar ki phalli, Maat ki bhaji, Chukke ki bhaji, Muqtalif Kofte, Chugar Gosht, Shikampur, Shaami, Do Pyaza, Luqmi, Shirmal, Kheer, Gaajar ka Halwa, Pasinde ka Salan, Bhendi Ka Khatta, Karele ka khatta, Arvi-Gosht ka Khatta, Aloo-Gosht ka Khatta, Boti ka Salan, Marag, Aloo-Methi Gosht, Besan Ka Salan, Sojini ki Phalli wali Dal, Dil Khush, Kulcha, Khatti Dal, Qubani Ka Meetha, Rowghani Roti, Mithi Dal, Mash Ki dal, Sheer Qurma, Tamate Ka Kut, Haleem, Qimah ... the list is long.

Hyderabad is known for ‘Biryani’. I have had the best tasting Biryanis when I was in Hyderabad. I do not usually get to have those kinds in restaurants here oe anywhere else in the world I where I have tried an tasted. I miss my place, where I spent my childhood, and had some of the most excellent food in my life. I enjoy other cuisines as well, but Hyderabadi Cuisine is what I will always love and crave for.

I announce RCI:Authentic Hyderabadi Cuisine for the month of August ’08. Through this event I intend to provide a collection of various Authentic Hyderabadi recipes which one can refer to whenever they want. I have seen that there are very few cookbooks and resources which write about Hyderabadi cuisine and showcase the recipes. The rare and outstanding Hyderabadi cuisine seems to be fading away. I invite all Hyderabadis and my readers and friends to come with their versions of Authentic Hyderabadi Cuisine, that they have learnt and are familiar of.

The logo that I have created for the event is, feel free to use it:

(Image Source:Wikipedia)

The rules of the event are:

A. Prepare and write about an Authentic Hyderabadi dish that you are familiar of starting today till September 15th ’08. Make sure to click a picture of it. It can be Vegetarian, Non-Vegetarian, One-Dish meal or a side dish, a Curry, Sweets and Desserts or Meetha.. whatever you wish, but Hyderabadi in origin.
B. Those of you, who are bloggers, shall use the logo, link back to this post (and then update later with a link to the round-up), and send me the entry in the following format:
1) Your name
2) Your blog title
3) Name of the dish
4) Url of the entry
5) Picture of the dish
C. Even those of you who are not bloggers, can send me their entries in the following format:
1) Your name
2) Name of the dish
3) Picture of the dish
D. Send your entries to me with the picture of the recipe. All entries should have a picture of the prepared dish along. If you can, do write a little explaning about the dish.
E. The size of the picture should strictly be 300 pixels wide jpg and jpeg filetypes, height does not matter. Bloggers please upload to your own server/image repository.
F. The last date to submit the recipe is September 15th 2008.

I will post a round-up of all dishes within a few days after the deadline.

So, lets celebrate Hyderarabad this month! Takecare everyone and have an enjoyable long weekend.

Update: September 25th ’08-Here’s a link to the round-up of RCI:Authentic Hyderabadi Cuisine event.

Luv,
Mona

AddThis Social Bookmark Button